Creating Automated Tasks
Automated Tasks in User Management & License Optimizer let you schedule recurring user management operations. Define a saved filter in the User Browser, configure one or more bulk actions, and set a schedule. The task runs automatically and logs every execution for auditing.
How Automated Tasks Work
Create a Saved Filter in the User Browser that defines your target users.
Open Automated Tasks and click Add New Task.
Select the saved filter, configure one or more actions (e.g., add to group, suspend user), and define the schedule.
Save the task. It runs at the scheduled time and processes whichever users currently match the filter.
Review execution results and adjust the filter or schedule as needed.
Test your filter first
Before creating an automated task, open the User Browser and verify that your saved filter returns the expected users. Filters are re-evaluated on every run, so a broad filter can affect users you did not intend to include.
Organization Admin protection
Organization Admins are automatically excluded from all automated task actions. This protection cannot be overridden and prevents accidental administrative lockouts.
Accessing Automated Tasks
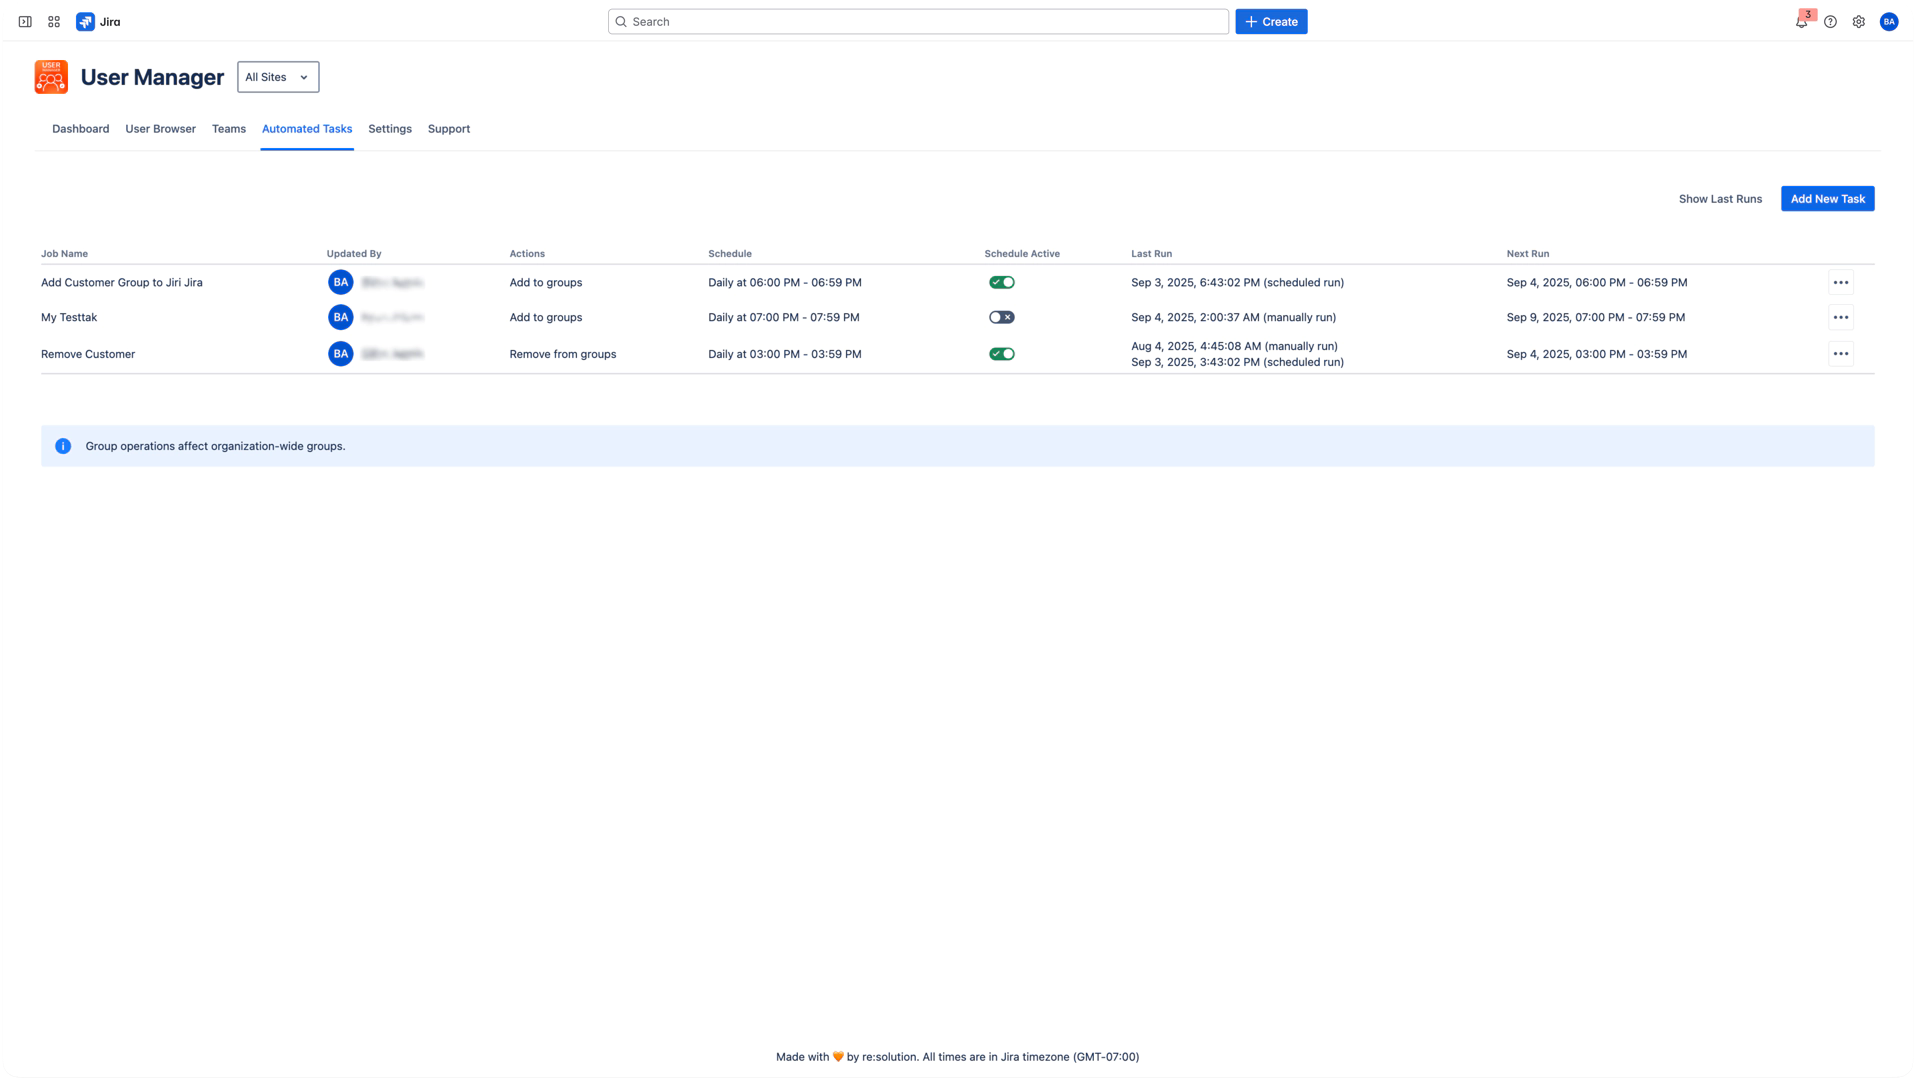
Click Automated Tasks in the main navigation menu. The page displays all existing tasks in a table with the following columns:
Job Name - The descriptive name assigned to the task
Updated By - Admin who last modified the task
Actions - The operations the task performs
Schedule - When and how often the task runs
Schedule Active - Toggle to enable or disable the task
Last Run - Timestamp of the most recent execution
Next Run - When the task will execute next
Creating a New Automated Task
Add New Task
Go to Automated Tasks from the main navigation and click Add New Task to open the task configuration dialog.
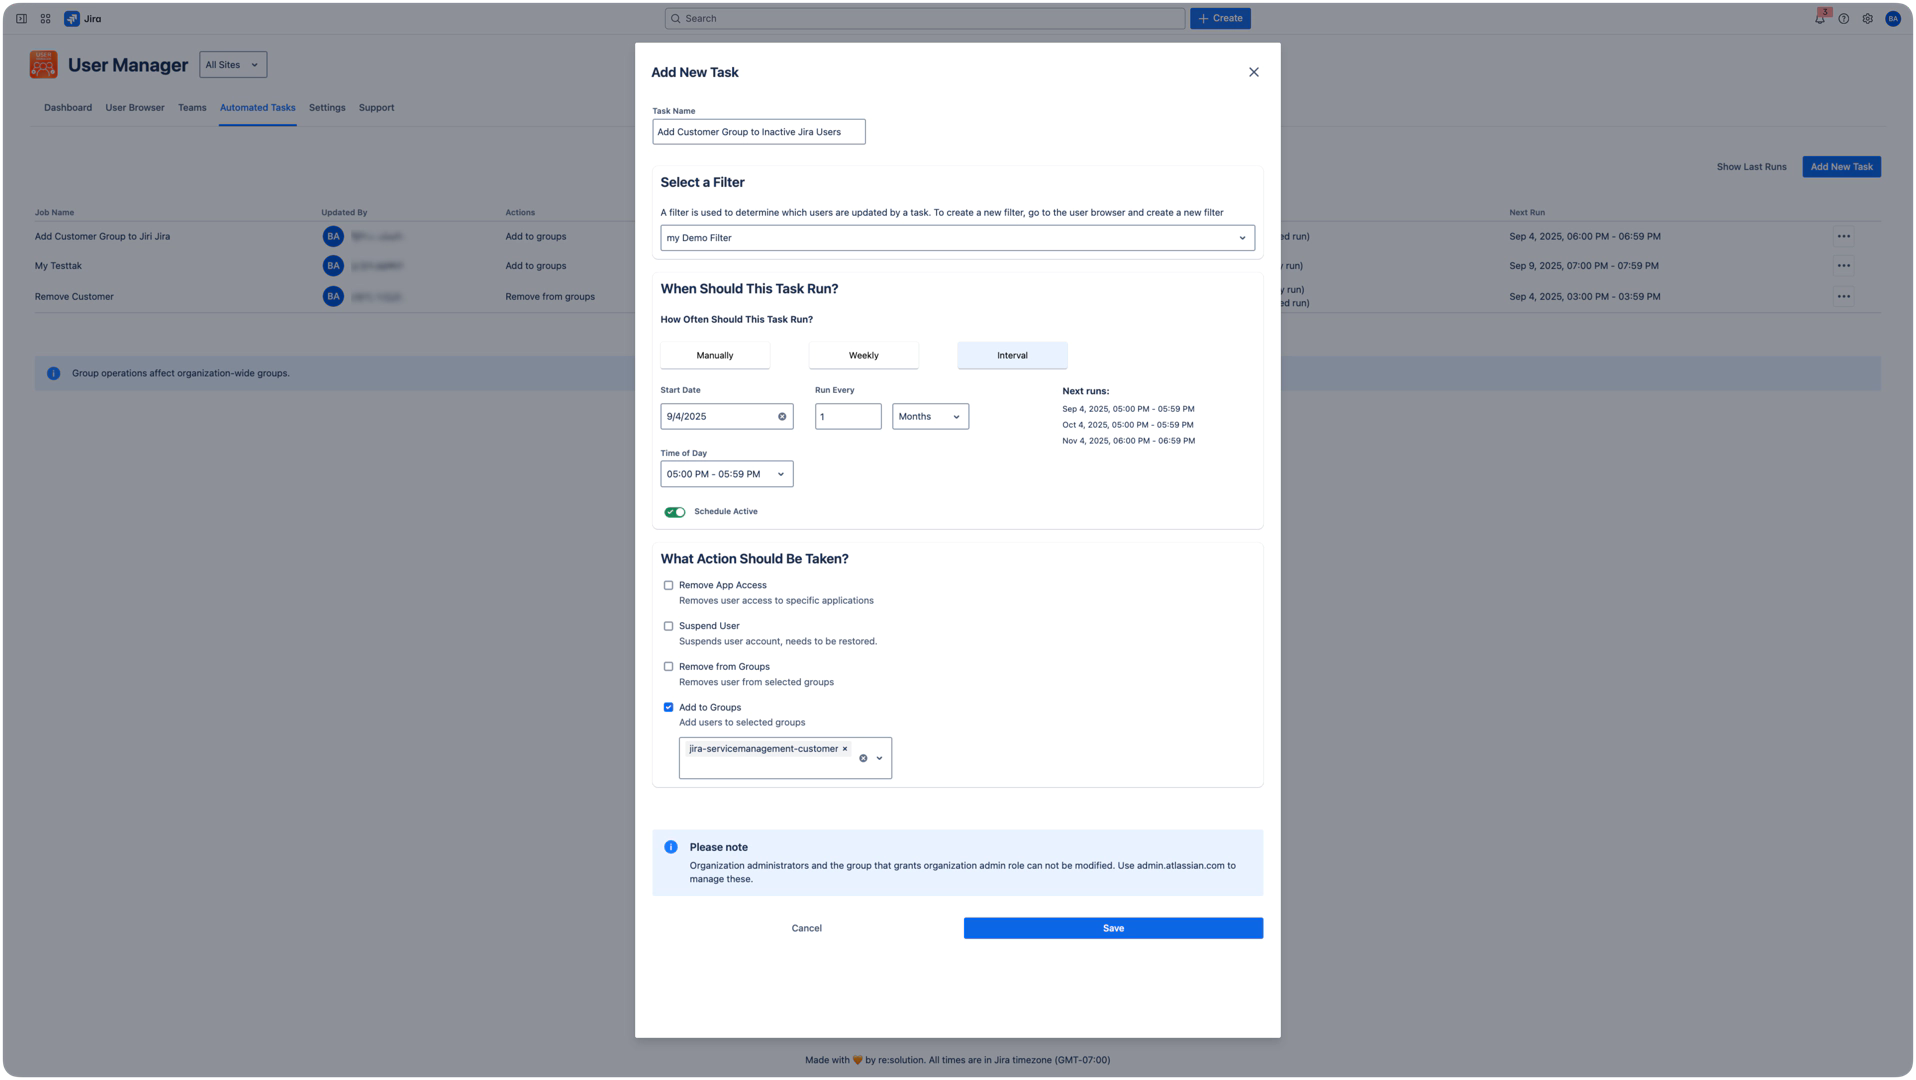
Configure Basic Settings
Enter a Task name that explains the purpose. Examples:
Add Customer Group to Inactive Jira UsersRemove Stale Confluence AccessMonthly License Cleanup
Select a Saved filter from the dropdown. The filter defines which users the task processes. It is re-evaluated on every run, so matching users may change over time.
Define the Schedule
Choose one of three scheduling modes:
Manual - The task is saved but does not run automatically. Trigger it from the actions menu when needed.
Weekly - Select one or more weekdays and an execution time (hourly slots).
Interval - Run every X days, weeks, or months starting from a specific date.
The schedule toggle must be active for recurring tasks to execute. Use off-peak hours for tasks that affect many users.
Select Actions
Pick one or more operations to run on the filtered users:
Add to Groups - Search and select target groups
Remove from Groups - Remove users from selected groups
Remove App Access - Remove access to selected Atlassian products
Suspend User - Block access without deleting the account or data
Actions execute in the order they are selected. Example sequence: remove from admin group, then add to restricted group, then remove app access.
Review and Save
Verify the task name, filter, actions, and schedule before saving. Click Save to create the task or Update Task to modify an existing one.
 Automated Tasks Create - Creating a New Automated Task.
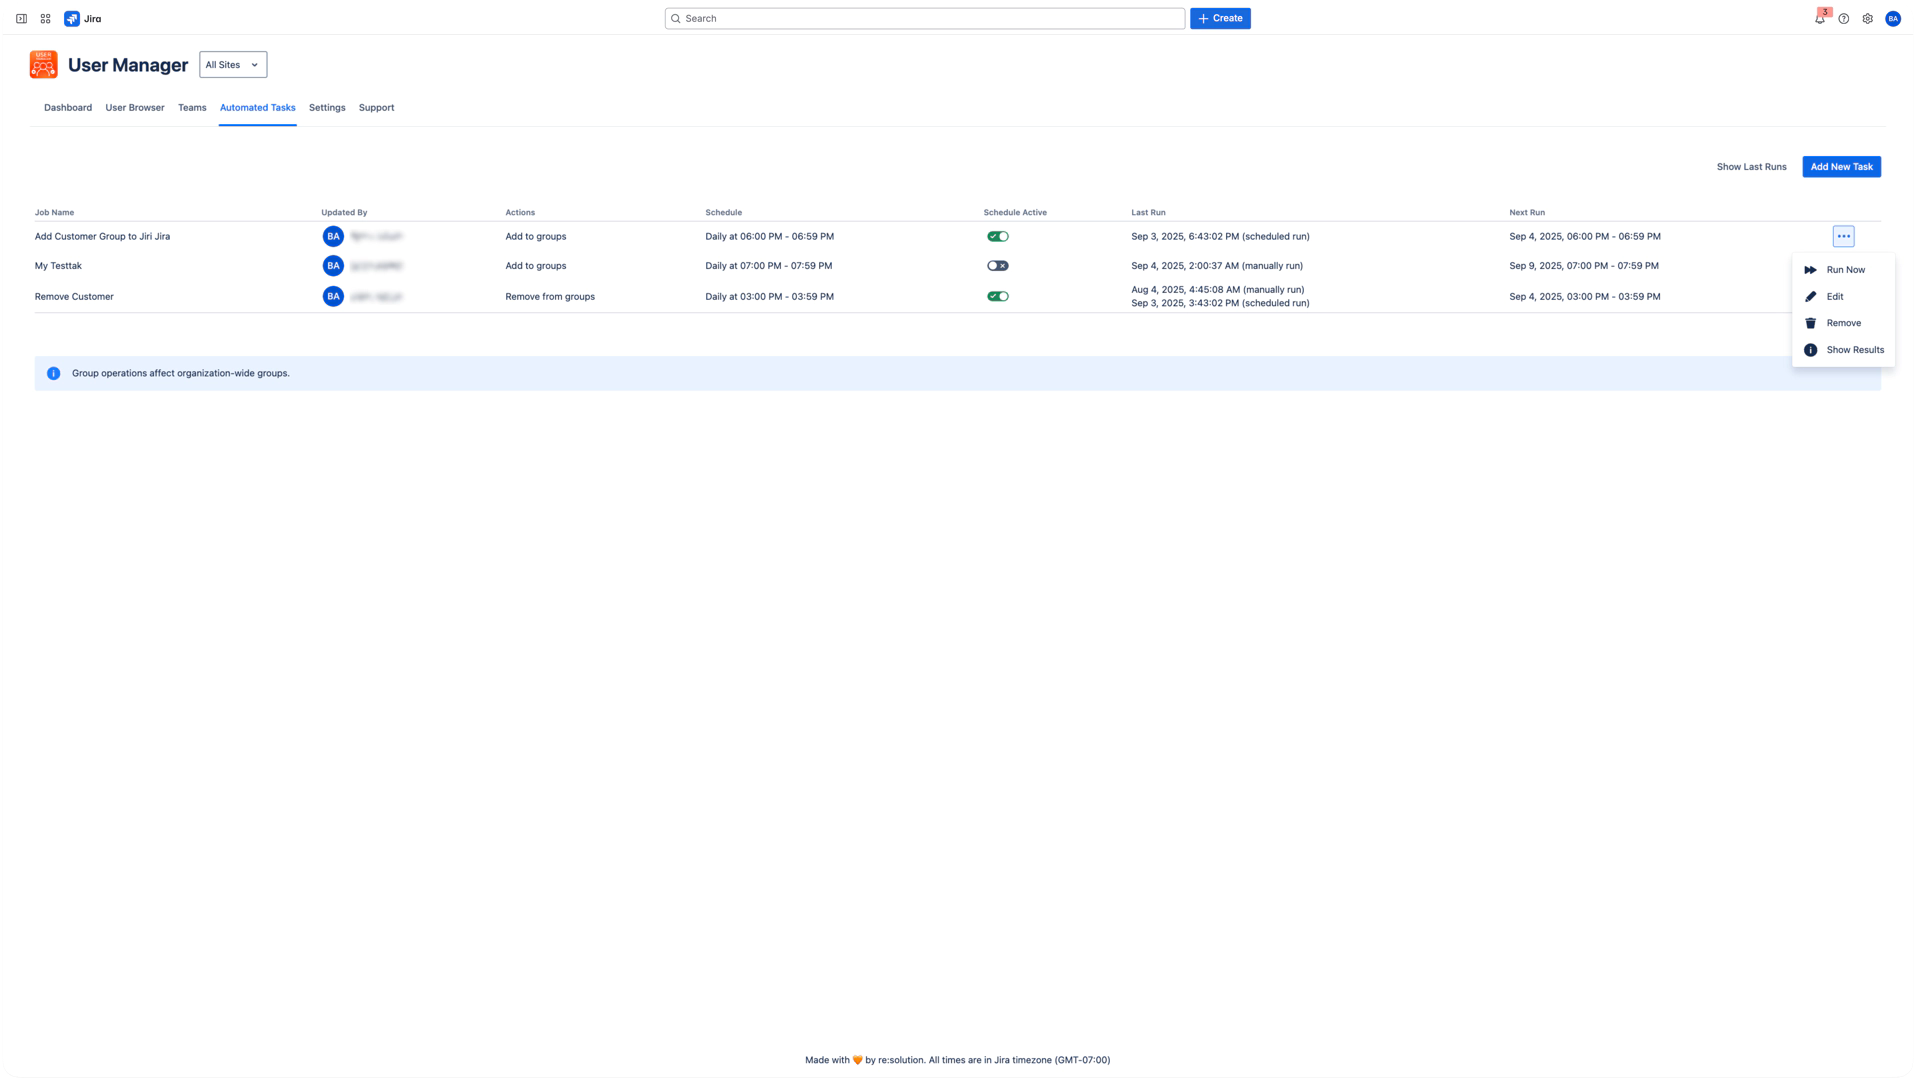
Managing Tasks
Each task in the list has an actions menu (three dots) with the following options:
Run Now - Execute the task immediately
Edit - Modify the task configuration
Remove - Delete the task
Show Results - View execution logs for this task
Show Last Runs - View execution history across all tasks
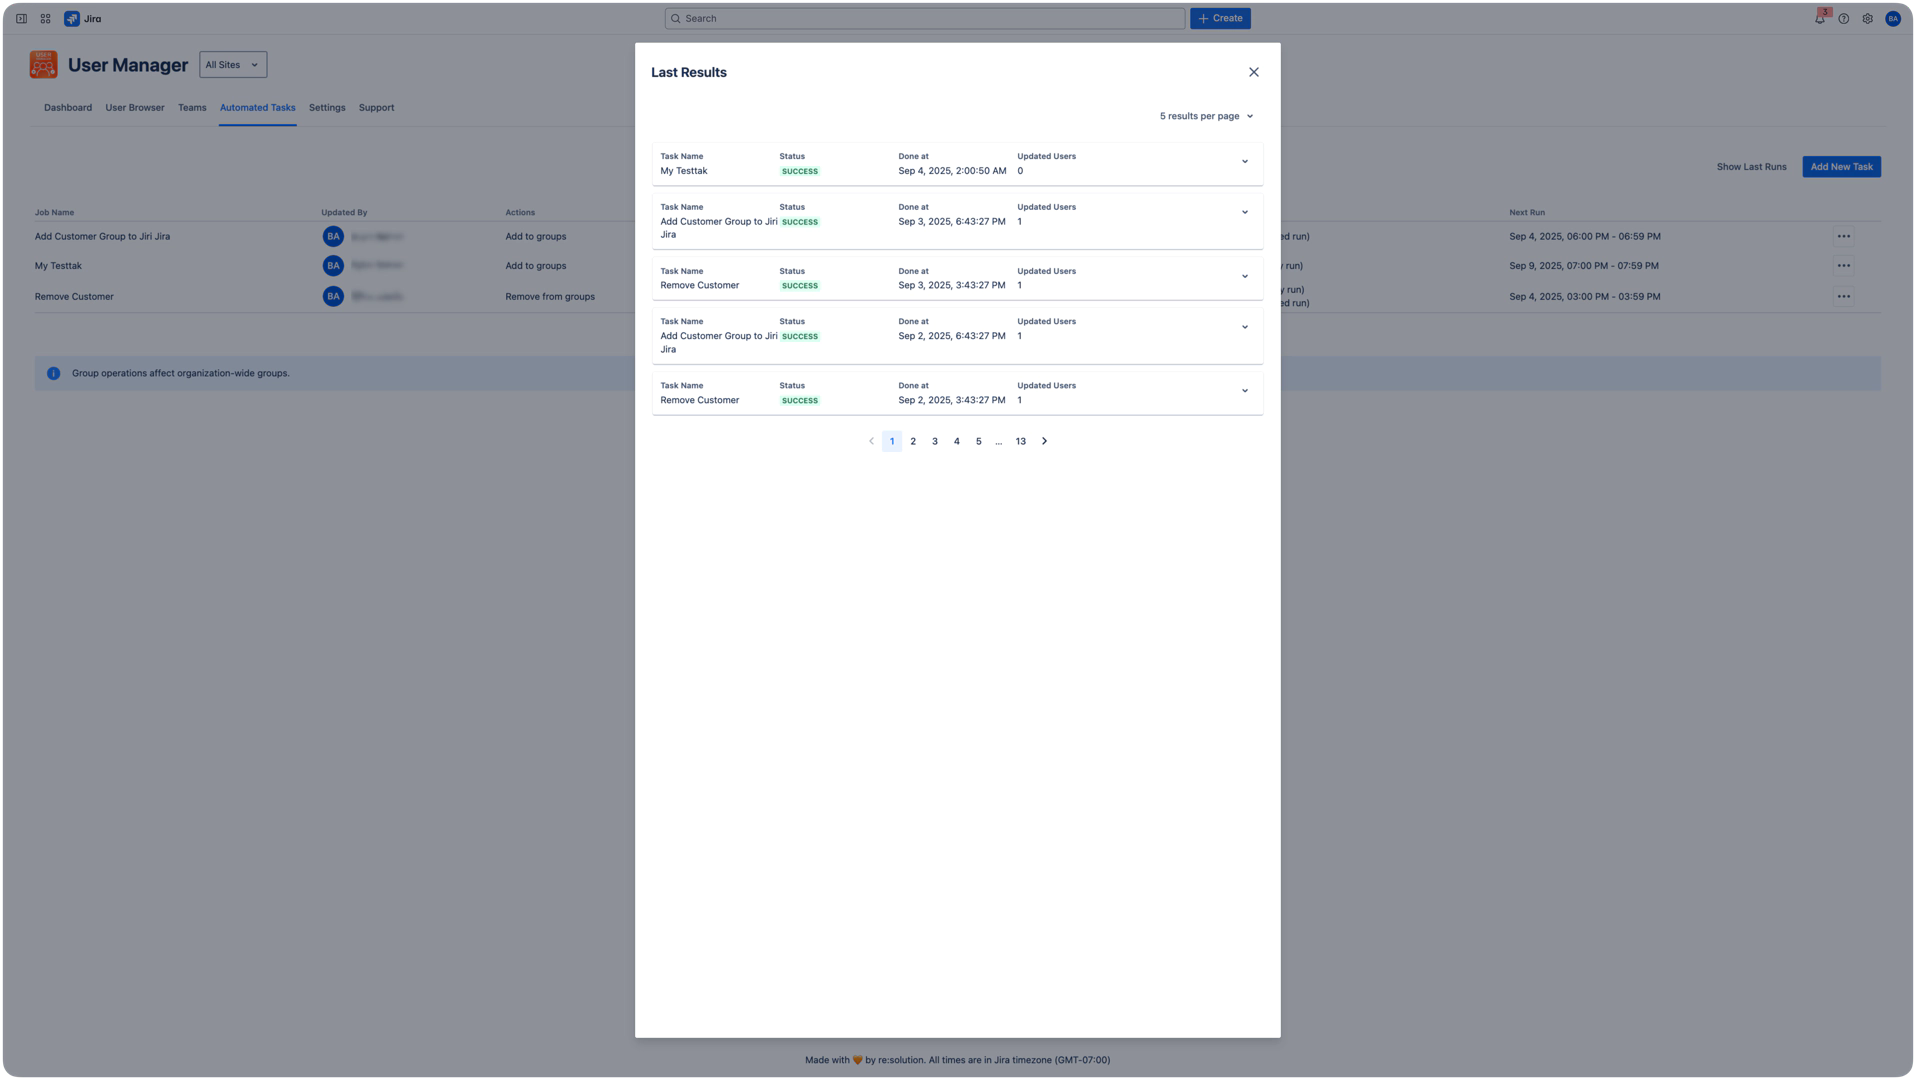
Monitoring Execution
Click Show Results on a task to view:
Execution date and duration
Success, failure, or partial status
Number of users affected
Detailed logs for each action
Click Download Result to export logs as JSON for auditing.

Click Show Last Runs to view recent execution results across all tasks.
Best Practices
Use descriptive names - Include the action and scope, e.g.
Weekly License Cleanup - Inactive 90d.Test filters first - Run the saved filter in the User Browser before assigning it to a task.
Start with manual execution - Run a new task manually and review results before enabling a recurring schedule.
Avoid overlapping tasks - Two tasks that target similar user groups can conflict. Stagger schedules or combine actions into one task.
Use off-peak hours - Schedule tasks during early morning to reduce system load.
Start with non-destructive actions - Begin with group additions or access changes. Use Suspend only after confirming the filter is correct.
Review results regularly - Check execution logs after the first few runs to verify the task behaves as expected.
Filter Dependencies
Automated tasks rely on saved filters as their trigger criteria. When managing filters in the User Browser:
Editing a filter updates the criteria for all automated tasks that use it. Verify that the modified criteria still match your automation intent.
Deleting a filter that is used by an automated task triggers a warning listing all affected tasks. Those tasks lose their trigger and stop executing until a new filter is assigned.
Copying a filter (via "Save as Copy") does not affect existing task assignments. The copy is independent.
Before editing or deleting filters, check the Automated Tasks page to review which tasks reference the filter.
Common Use Cases
Use Case | Filter | Action | Schedule |
|---|---|---|---|
License cleanup | Users inactive > 180 days | Remove app access | Monthly |
Customer conversion | Jira users inactive > 30 days | Add to "customer" group | Weekly |
New user onboarding | New users not yet in onboarding groups | Add to standard and training groups | Daily |
Security compliance | Users inactive > 180 days | Suspend user | Daily |
SCIM Group to Product Access Mapping
If your organization uses SCIM provisioning, SCIM-managed groups are read-only across all of Atlassian Cloud. You cannot modify their membership in admin.atlassian.com or in the app. Use Automated Tasks to bridge this gap:
In the User Browser, create a saved filter that targets users in a specific SCIM-managed group (using the Included Groups filter).
Create an automated task linked to that filter.
Set the action to Add to Groups and select the target product access groups (for example, jira-software-users or confluence-users).
Schedule the task to run at a regular interval (for example, daily after the sync).
This keeps your IdP as the single source of truth for user membership while the app handles product access assignments automatically. For deactivation, create a second task that filters for users not in the SCIM group and removes them from the corresponding product access groups.
Troubleshooting
Task Not Running
Check that the Schedule Active toggle is enabled.
Verify the start date is in the past.
Confirm the saved filter returns users in the User Browser.
No Users Affected
Re-test the filter in the User Browser.
Check if users already match the target state (e.g., already in the group).
Verify user status and filter criteria.
Partial Failures
Review the execution logs for specific error messages.
Check that target groups exist and are not SCIM-managed.
Organization Admins are automatically excluded from all actions.
Lifecycle actions (beta)
Automated Tasks can run the same Atlassian account lifecycle actions as Bulk Operations: Deactivate, Activate, Delete, and Cancel Delete an account, and Remove User from the organization. Use them to schedule recurring cleanup of managed accounts.
These are beta features. The Atlassian platform does not yet expose a reliable signal for how a user was provisioned, so User Manager cannot automatically decide which actions are valid for each account before you run them. For now the action is attempted and any failure is surfaced in the process log: a blocked action returns a clear error and the user is left unchanged, so it never silently succeeds. Once Atlassian exposes a reliable provisioning-source signal, action selection will become smarter and actions that cannot succeed for an account type will be disabled before you run them.
When you choose a terminal action such as Deactivate, the action selector becomes single-select and the other actions are disabled, the same way as in Bulk Operations. Beta lifecycle actions cannot be combined with other actions yet.
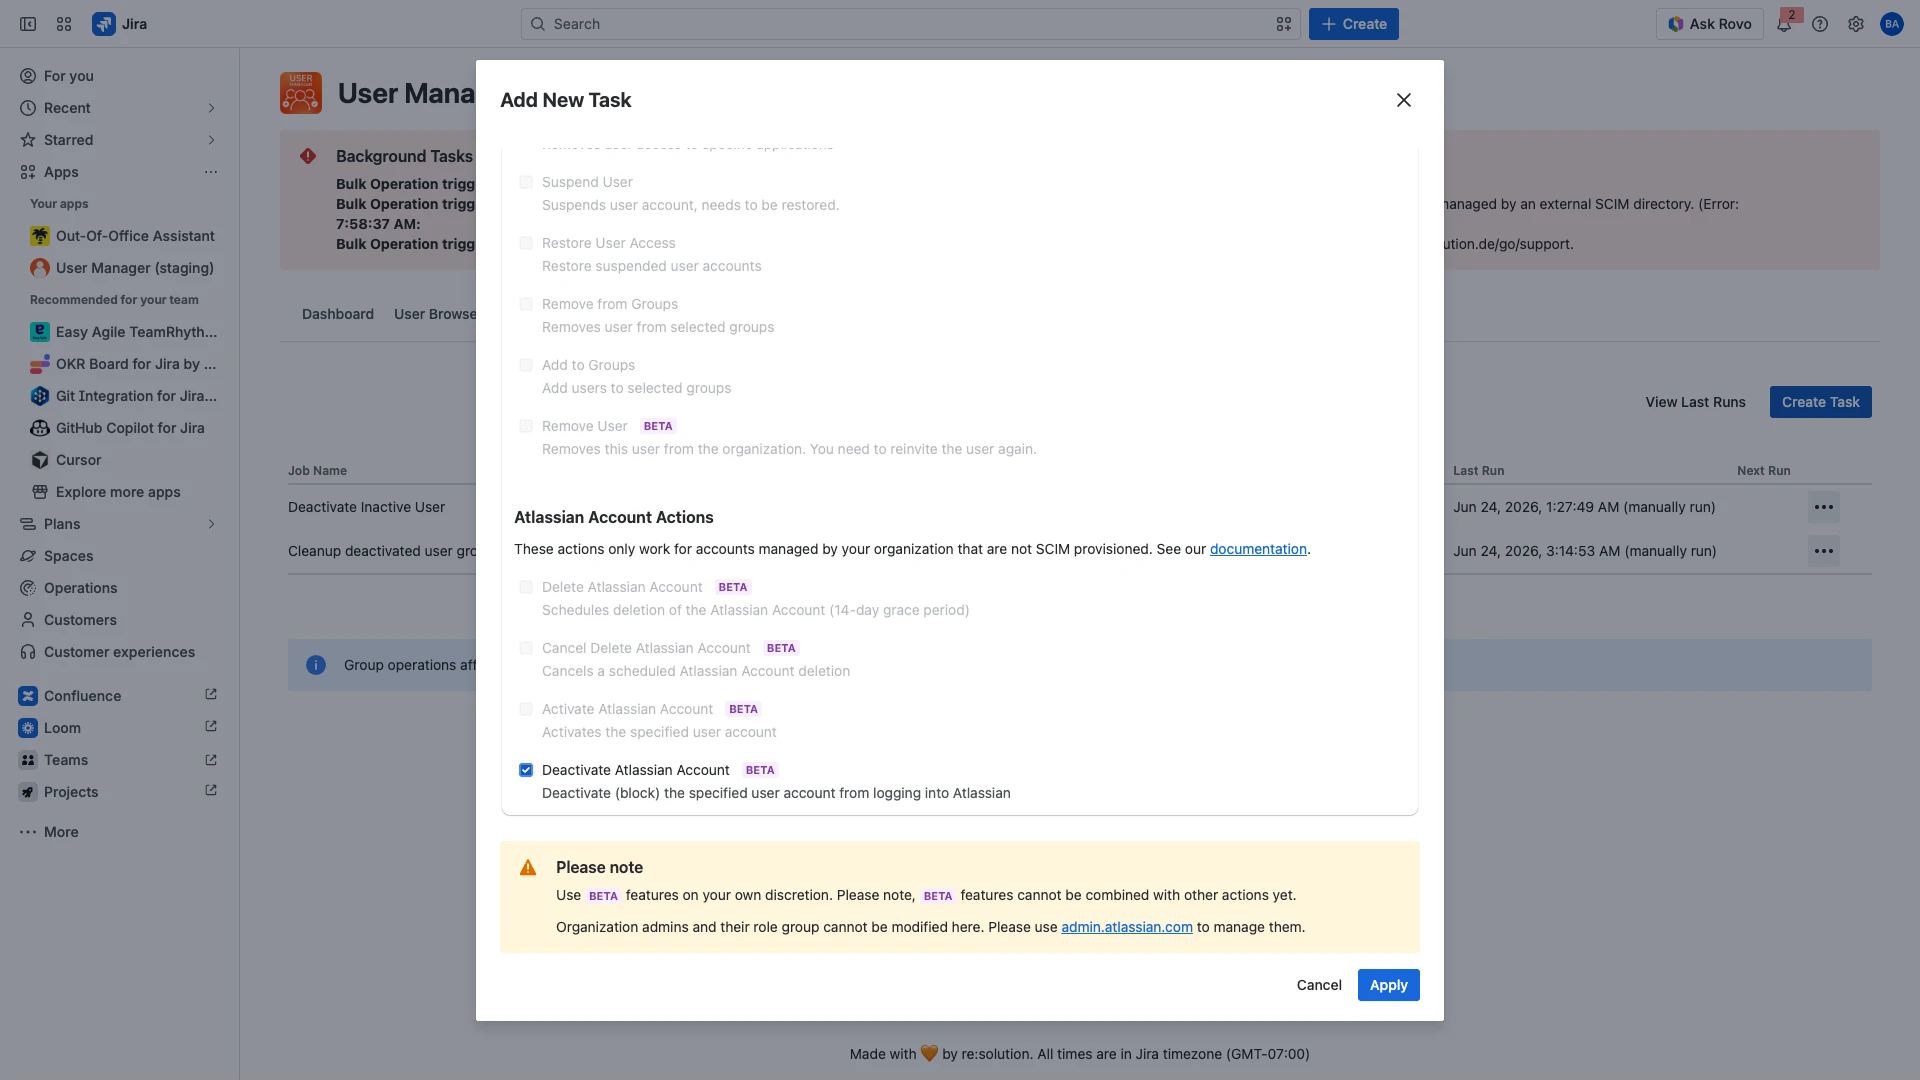
As with Bulk Operations, the result depends on how each account is managed: managed accounts can be deactivated, deleted, and removed; SCIM-provisioned accounts are blocked and must be managed in your identity provider; external accounts cannot be deactivated or deleted. Review the task results to confirm the outcome. For the full account-type behavior and how to read the results, see Performing Bulk Operations.
Run these actions only when you are sure the affected users are managed accounts that can be safely deactivated or deleted. Deactivating or deleting an Atlassian account affects the user across all Atlassian organizations the account belongs to.
Related Pages
Searching and Filtering - Create saved filters for tasks
Performing Bulk Operations - Available actions for automation
Atlassian Automation Webhooks - Get notified on task completion
Best Practices & Scenarios - Automation best practices