
Out of Office Quick Start Guide
Overview
This guide helps you quickly create your first absence rule using Out of Office Assistant. You’ll learn the essential steps to set up automated issue assignment when you’re away from work.
What You’ll Need
Jira Access: You must be logged into your Jira Cloud instance
Basic Permissions: Browse Projects permission (minimum)
Installation: Out of Office Assistant must be installed by your Jira administrator
Time: 5 minutes of focused attention
Success Criteria
By the end of this guide, you will have:
✅ Accessed the Out of Office Assistant interface
✅ Created your first absence rule with start date
✅ Set up either a coverer, approval delegation, or custom message
✅ Verified your rule appears in the rules table
✅ Understood how to manage and modify your rules
Step 1: Access Out of Office Assistant
Navigate to the App
Open the Apps menu in your Jira navigation bar
Look for “Out-Of-Office Assistant” in the apps dropdown
Click on Out-Of-Office Assistant to open the main interface
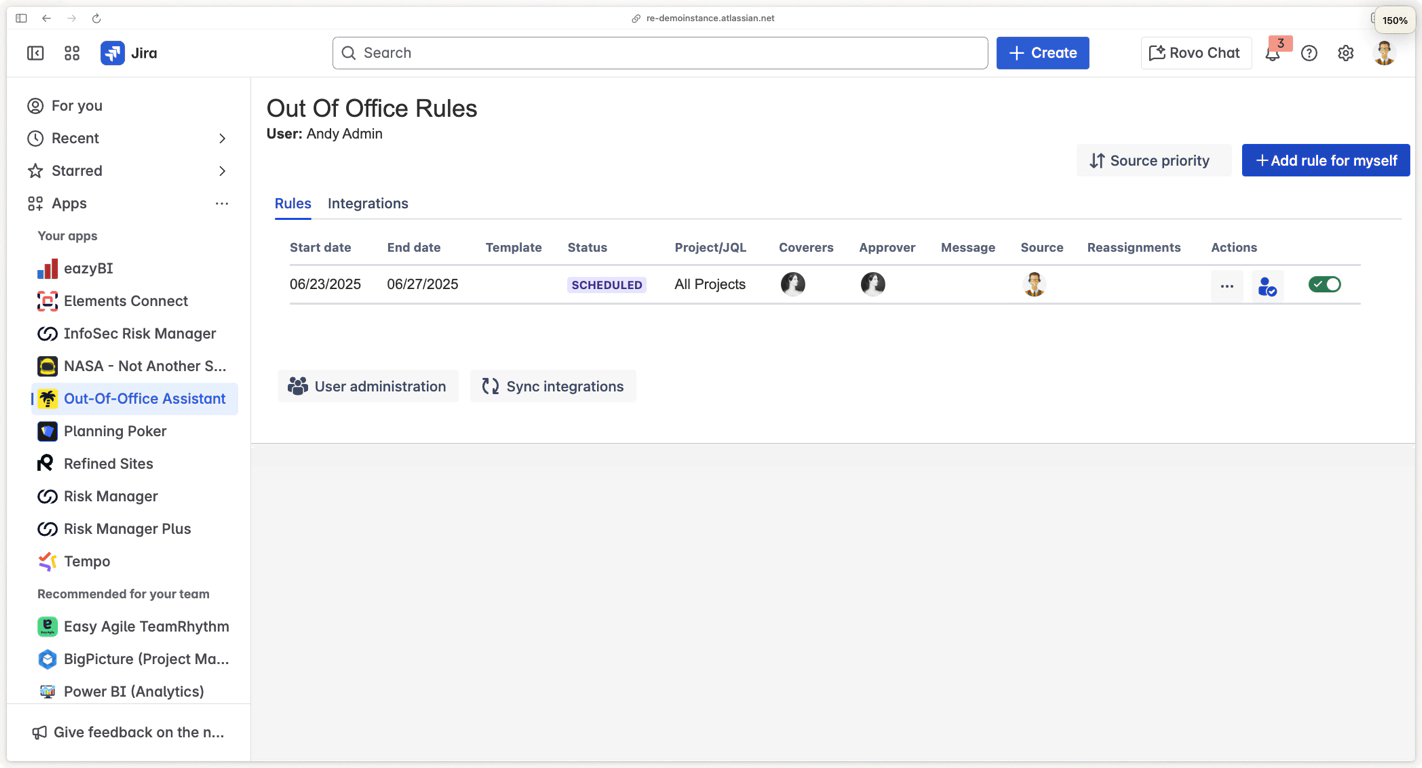
Interface Overview
The main interface displays:
User Information: Shows your current logged-in user (e.g., “User: Andy Admin”)
Rules Table: Displays all your existing absence rules
Add Rule Button: Blue “Add rule for myself” button in the top right
Tabs: Rules and Integrations tabs for different functions
Step 2: Create Your First Rule
Start Rule Creation
Click the “Add rule for myself” button (blue button in top right)
Rule creation form opens with the heading “Schedule your Out-Of-Office rule”
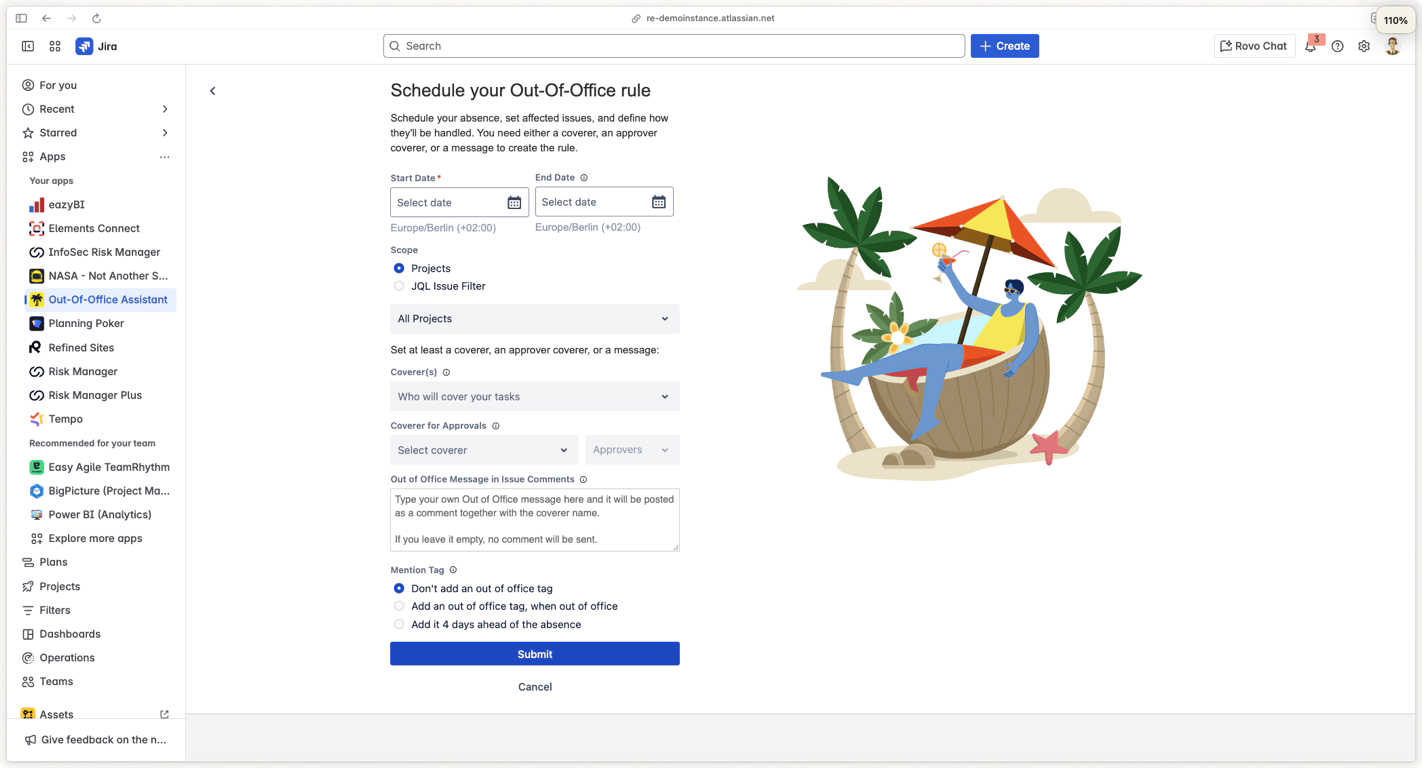
Required Information
The form requires only one essential element:
Start Date: When your absence begins (required field marked with *)
At least one of: Coverer, Approval Coverer, or Custom Message.
Step 3: Set Your Absence Dates
Configure Start Date (Required)
Click the Start Date field (marked with red asterisk *)
Select your absence start date using the date picker
Time defaults to 12:00 AM in your timezone (Europe/Berlin in example)
Configure End Date (Optional)
Click the End Date field if you have a specific return date
Leave empty for indefinite absence (until you manually deactivate)
Note: End date shows info icon (ℹ️) with additional details
Timezone Information
Dates display your local timezone (e.g., “Europe/Berlin (+02:00)”)
Rules activate and deactivate based on your configured timezone
Contact your admin if timezone appears incorrect
Step 4: Choose Your Project Scope
Default Scope: All Projects
The form defaults to “All Projects” scope, which means:
Your rule applies to all Jira projects you have access to
Issues assigned to you in any project will be affected
Recommended for most users starting their first rule
Alternative: JQL Filter (Advanced)
For advanced users:
Select “JQL Issue Filter” radio button
Enter custom JQL to target specific issues
Example:
project = "My Project" AND assignee = currentUser()
Recommendation: Start with “All Projects” for your first rule, customize later as needed.
Step 5: Configure Issue Handling
You must configure at least one of the following options (Exception: Status-only rules)_
Option A: Assign a Coverer (Most Common)
Click the “Coverer(s)” dropdown
Start typing a colleague’s name who will handle your issues
Select from the dropdown when their name appears
Multiple coverers: Add additional people for round-robin assignment
What happens: Issues assigned to you will be reassigned to your selected coverer(s).
Option B: Set Up Approval Delegation (JSM Projects)
Click “Coverer for Approvals” dropdown
Select a colleague who can approve requests in your absence
Choose approvers from the secondary dropdown if needed
What happens: Approval requests in Jira Service Management will be delegated to your selected colleague.
Option C: Custom Message Only
Purpose: Custom message posted to issue comments
Type a message in the “Out of Office Message” text area
Example: “I’m currently out of office until [date]. For urgent matters, please contact [colleague] or email [backup email].”
What happens: Your message will be posted as a comment on issues assigned to you, but issues remain assigned to you.
Step 6: Additional Options (Optional)
Out of Office Message
Purpose: Custom message posted to issue comments
When used: Works with or without coverers
Mention Tag
Choose from three options:
Don’t add tag (default): No special tagging
Add tag when out of office: Tags added only during active absence
Add tag 4 days ahead: Early warning for stakeholders
Recommendation: Use “4 days ahead” for planned vacations to give colleagues advance notice.
Step 7: Submit Your Rule
Final Review
Before submitting, verify:
✅ Start date is correct (most critical field)
✅ At least one handling method is configured (coverer, approval delegation, or message)
✅ Project scope matches your needs (All Projects vs. specific JQL)
Submit and Verify
Click the “Submit” button at the bottom of the form
Return to main interface automatically
Check rules table for your new rule entry
Rule Status Indicators
Your new rule will show:
Status: “Scheduled” (if start date is future) or “Active” (if start date is today/past)
All configured details: Dates, scope, coverers, etc.
Actions: Menu options to edit, disable, or delete the rule
Step 8: Test and Verify
Immediate Verification
Check the rules table - your rule should appear as a new row
Verify details - start date, scope, and coverers display correctly
Status check - rule shows as “Scheduled” or “Active”
Test Assignment (Optional)
If your rule is active and you want to test:
Create a test issue or have a colleague assign an issue to you
Check reassignment - issue should automatically move to your coverer
Verify comments - your custom message should appear if configured
Troubleshooting Common Issues
Rule Creation Problems
“Submit button disabled”:
Verify start date is selected
Ensure at least one handling method is configured (coverer, approval, or message)
“No users in coverer dropdown”:
Check you have permissions to see other users
Try typing full names
Contact your Jira administrator for user access issues
“JQL validation error”:
Switch back to “All Projects” scope if JQL is complex
Test your JQL in Jira’s issue search before using in rules
Rule Not Working
Issues not reassigning:
Check rule status is “Active” (not “Scheduled”)
Verify you have issues actually assigned to you
Confirm coverer has permissions to be assigned issues in relevant projects
Messages not appearing:
Ensure you configured a custom message (field not empty)
Check issue comments for your out of office message
Verify you have permissions to comment on the issues
Next Steps
After creating your first rule:
Immediate Actions
Set up calendar integration - Microsoft Outlook or Google Calendar
Configure mobile activation - Slack Integration for on-the-go management
Explore advanced features - Rule templates, JQL filters, and bulk operations
Learn More
Complete End User Guide - Comprehensive feature documentation
Rule Configuration Guide - Advanced rule setup options
Integration Guides - Connect with your calendar and communication tools
Common Workflow Examples
Vacation Planning Workflow - Advanced vacation setup
Sick Leave Activation - Emergency rule activation
Team Coordination - Multi-person absence management
Support and Help
Getting Assistancee
App Documentation: Complete guides at wiki.resolution.de
Your Jira Admin: For installation, permissions, and configuration issues
Resolution Support: resolution.atlassian.net/servicedesk
Quick Reference
Action | Button/Location | Result |
|---|---|---|
Create new rule | “Add rule for myself” (blue button) | Opens rule creation form |
Edit existing rule | Menu button in rules table | Opens edit form with current settings |
Disable rule temporarily | Toggle switch in Actions column | Rule becomes inactive without deletion |
Delete rule permanently | Menu → Delete option | Rule removed completely |
View rule details | Click anywhere in rule row | Shows complete rule configuration |
Quick Start Status: ✅ COMPLETE
Time to Complete: 5 minutes or less
Next Step: Interface Tour and Navigation Guide
Need Help: Contact your Jira administrator or visit Resolution support