
License Optimizer And SSO
Introduction
Due to technical limitations, License Optimizer can't, by default, add users to the group that provides application access during SSO authentication. However, it will still work when the following prerequisites are met.
If you need help getting License Optimizer to work with SSO, please contact our support team. You can create a ticket in our support portal.
When/Where does it work out of the box?
Jira with Jira Service Management installed
Because of the nature of Jira Service Management and its service portal for unlicensed customers, a side effect is that License Optimizer can see which user is logging in and add them to the license group. Without JSM, you need to see if the following requirement is met.
Jira Software/Core with SAML2-based SSO
On a Jira instance without JSM, License Optimizer will work if the following requirements are met:
SSO is SAML2-based (OIDC won’t work)
The SAML response is unencrypted, which is typically the case if you’re setting up Atlassian’s built-in SSO
The NameID attribute has the name/ looks like
<saml2:NameID>username@company.com</saml2:NameID>
<NameID>username@company.com</NameID>
The username in the SAML response matches the user in Jira, which is typically also the case when using Atlassian’s built-in SSO
Confluence
As of now, SSO on Confluence should always work with License Optimizer.
What should I do if none of the above works?
If none of the above works, you need to configure your SSO app, provided it supports the required feature. It doesn't have to be a SAML2-based SSO app; it could also be an app that uses OpenID or OAuth.
The important thing is that the app needs to support adding groups to a user during sign-on, since we need to
Add the users to the Allowed Users Group (only required for new users or existing ones who have never been optimized so far, but should be)
Add the users to the License Group
The following sections describe how to do that, depending on the authentication app and its provisioning method.
We can't explain this in detail for every app on the marketplace, so if you have any questions, don't hesitate to reach out to our support team for help.
Atlassian Built-In SSO
First, remember that this usually works out of the box with SAML, not OIDC. Atlassian SSO only supports adding users to groups during login when configured for Just-in-time user provisioning. If that's the case, you must ensure that the new group that provides application access (configured in the License Group step) exists on the identity provider side and that users are assigned to it. The Allowed Users Group only needs to be added for new users created during sign-on and for those you want to optimize.
Our Resolution SSO App
Assigning a group to users during SSO can be done in various ways, depending on whether you are using SAML SSO with Just-In-Time Provisioning or User Sync.
You can do that even if you haven't configured any user- and group-provisioning. In that latter case, please refer to the next part already.
If you can't or don't want to grant application access to everyone logging in via SSO, you need to configure the Attribute Mapping options.
Please refer to this section on how to do that.
If you already use User Sync for provisioning, please refer to this section.
Using Update from SAML attributes (Just-In-Time Provisioning)
To enable or change these settings, please do the following:
Open the SSO configuration page and the identity provider tab
Scroll to the User Creation and Update section
Make sure that the User Update Method is set to Update from SAML attributes
A bit further down below, User Creation and Update from SAML Attributes,
Make sure that Update users not created by this app is checked (1) as pictured below
Here is a bit of background: (1) Make sure that even users who have not been created during login with our SAML SSO app are updated/ added to the group.
(2) and (3) can stay as they are because if you haven't created users so far, you don't need to start with that now, just for the license optimizer.

The final step is to add both the Allowed Users Group and the License Group to the Always add users to these groups group picker:
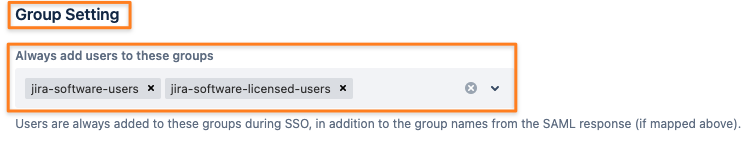
If you want to optimize only a subset of users signing in via SSO, add only the License Group and manage the members of the Allowed Users Group yourself.
Using Update from SAML attributes (Just-In-Time Provisioning) with Group Transformations
SAML SSO >= 4.x
Open the SSO configuration page and the identity provider tab
Scroll to the User Creation and Update section
Make sure that the User Update Method is set to Update from SAML attributes
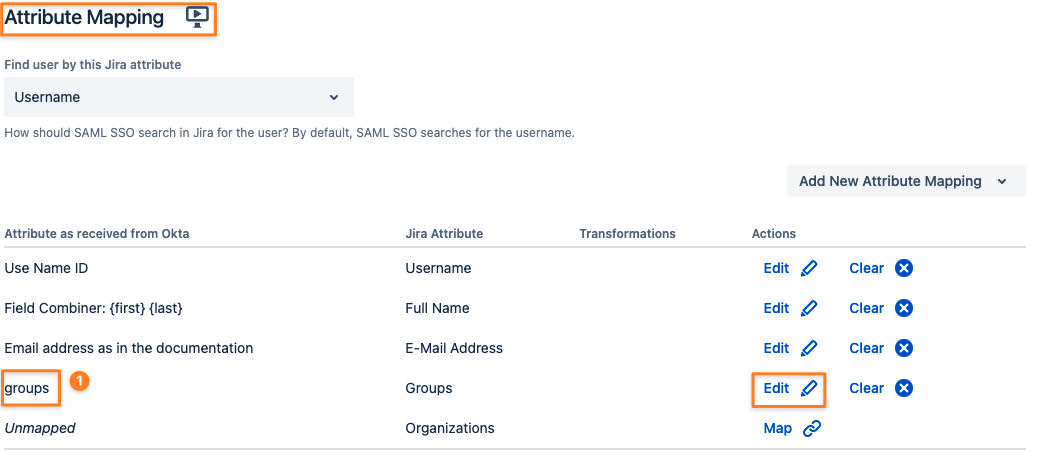
Transformations can be applied to the attribute mapping table, which is also available in the User Creation and Update section.
It provides control over how to deal with groups sent by the IDP. Since users may belong to different groups, you can conditionally assign them as needed.
If the Groups attribute is not mapped, you'll see “Map” instead of “Edit” in the picture below.
(1) The group attribute sent by your IDP might be a different one for you
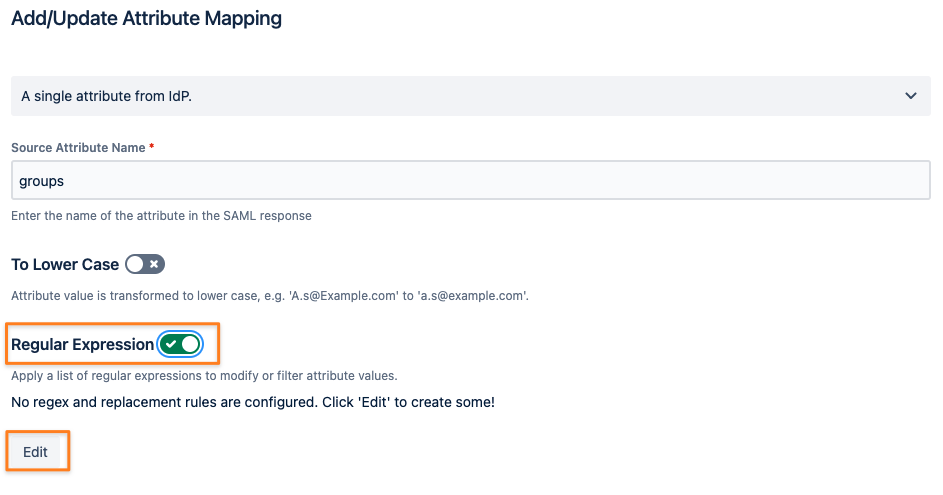
By editing the mapping, you can transform group names sent in the SAML response into the license group name (i.e., if you can't create the group for some reason with that name on the IdP)
You can even transform one group name from the IdP into one or more other groups using Groovy code (read here, only SAML SSO 4 and later).
However, a regular-expression transformation will likely suffice.
After clicking the Edit or Map button for the group mapping first, enable Regular Expression and click Edit below it:
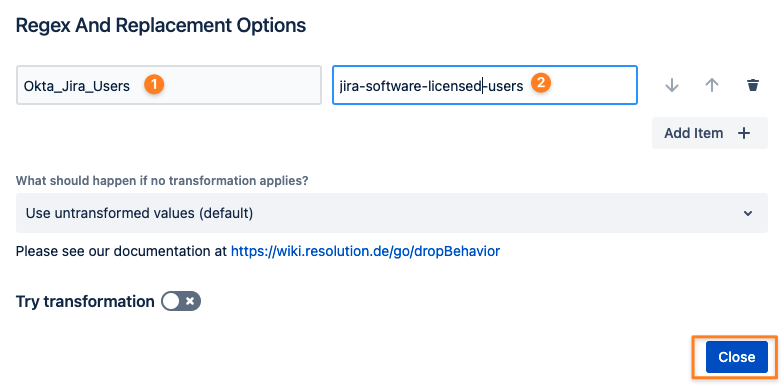
Click Add Item +

Transform the group name on your IdP (1) into the License Group name (2):
SAML SSO <= 3.6.5
Open the SSO configuration page and the identity provider tab
Scroll to the User Creation and Update section
Make sure that the User Update Method is set to Update from SAML attributes
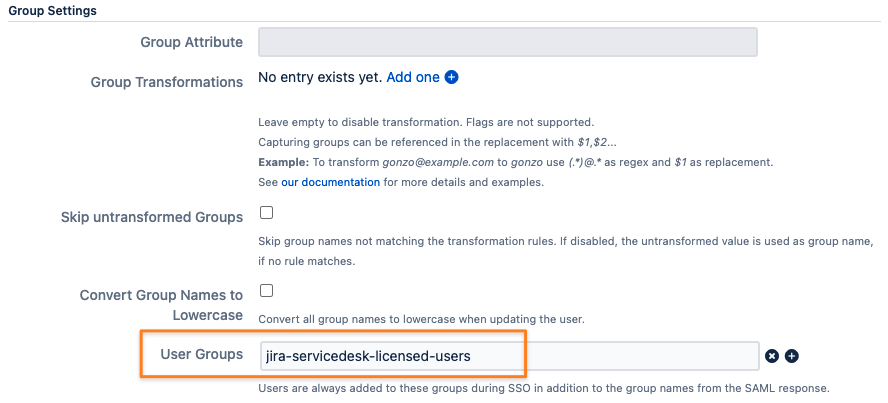
Group transformations can be applied in the Group Settings section: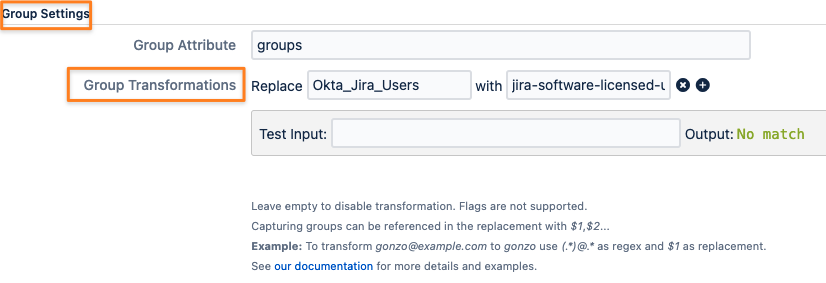
This is all you need to do to ensure that users are getting added to the License Group during login.
Remember:
You only need to add users to the License Group and the Allowed Users Group if you are creating users during login.
Provisioning With SAML SSO and User Sync
When using User Sync as part of SAML SSO, here is what you need to do:
Change the User Update Method in your SAML SSO configuration so that you can assign the License Group during Single Sign-On
Make sure that User Sync does not remove the License Group during scheduled synchronization
Make sure User Sync assigns the Allowed Users Group to the users you want to optimize
Please refer to the version-specific instructions below, we are using an Azure AD User Sync connector in our examples but it could be any of the other connector types.
Why do we need to apply these changes?
License Optimizer can only optimize users it knows by name
Before login, this information is not available yet
With the SAML SSO change, we add the user logging in to the group providing application access
With the User Sync changes explained below, we also make sure that the group is not removed again during the scheduled sync and let License Optimizer deal with that instead
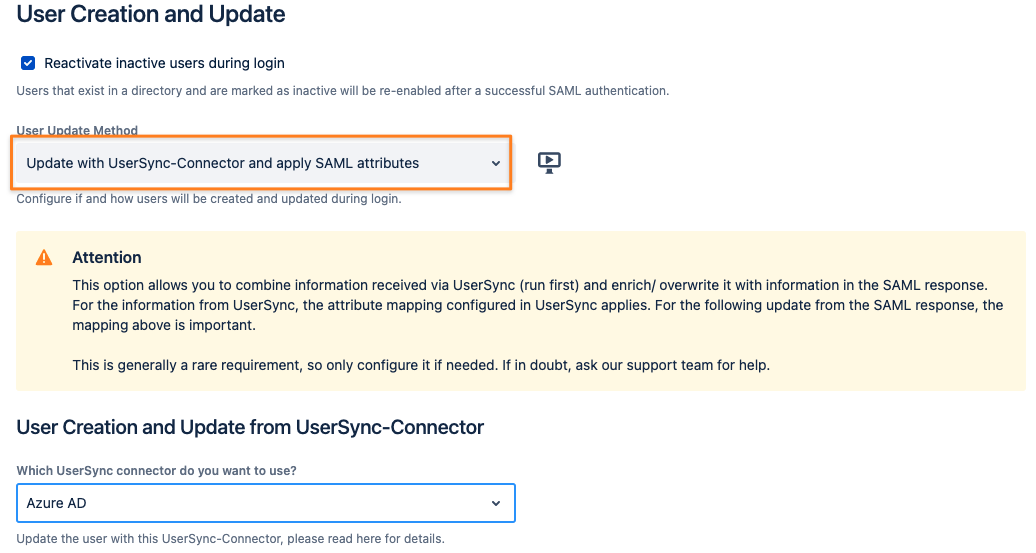
SAML < 5
For the few SAML SSO 4.x releases, some settings might look slightly different.
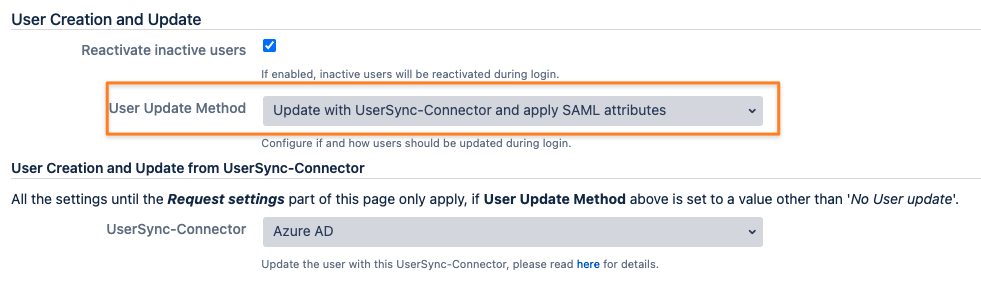
First, adjust your SAML SSO configuration by scrolling down to User Creation and Update in the Identity Providers tab of the config.
Change the User Update Method to Update with UserSync-Connector and apply the SAML attributes.

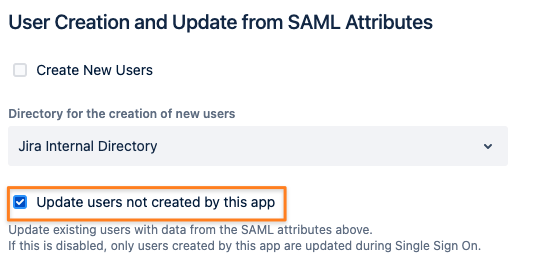
make sure that under User Creation and Update from SAML Attributes, below the above section, is as pictured below
You don't need to create new users; User Sync does that already
Just check the Update non-SAML Provisioned Users box

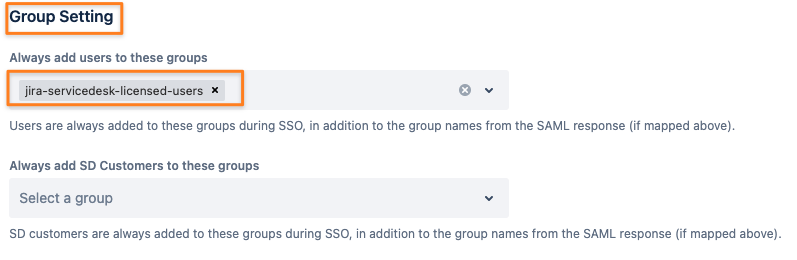
Scroll further down to Group Settings and add the License Group under User Groups:
Save the SAML SSO configuration changes.
Now, it's time to adjust the User Sync connector.
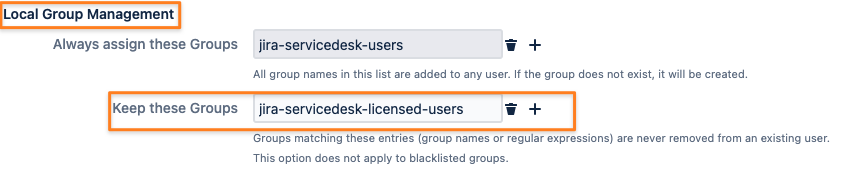
Edit your User Sync connector and click on the Show Advanced button
Scroll down to Local Group Management and add the License Group to the Keep these Groups list
Optional: In the screenshot below, the connector also adds the Allowed Users Group to everybody being synced; that might be different for you if you can't/ want to optimize everybody being synced
You can skip that if you already have the wildcard expression .* added
Optional: You can read more about group management with User Sync in our knowledge base
Save your User Sync connector changes.
SAML >= 5
First, adjust your SAML SSO configuration by scrolling down to User Creation and Update in the Identity Providers tab of the config.
Change the User Update Method to Update with UserSync-Connector and apply SAML attributes:
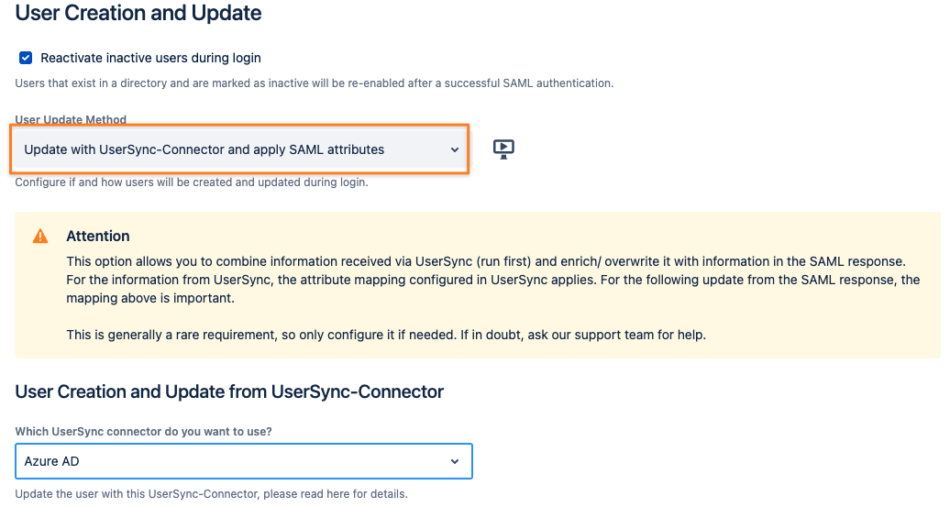
Scroll a bit down and make sure that under User Creation and Update from SAML Attributes, below the above section, is as pictured below
You don't need to create new users; User Sync does that already
Just check the Update non-SAML Provisioned Users box
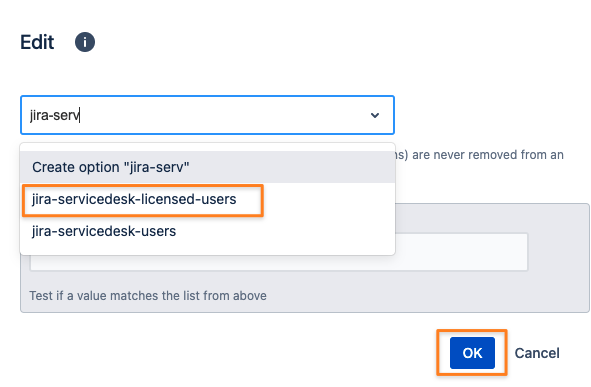
Scroll a bit down to Group Setting and add the License Group under Always add users to these groups:
Now, it's time to adjust the User Sync connector.
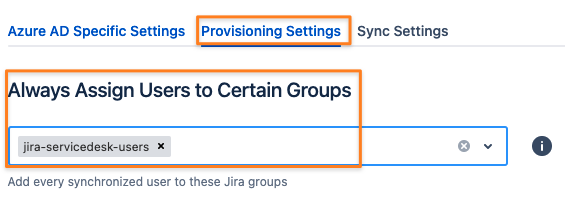
Edit your User Sync connector and switch to the Provisioning Settings tab
Scroll down to the Group Management/ Never Remove Users From These Groups field and add the License Group to it
You can skip that if you already have the wildcard expression .* added

Optional: adding users to the Allowed Users Group depends on whether you want to optimize everybody being synced or not
If you want, add the Allowed Users Group group to Always Assign Users to Certain Groups at the top of the Provisioning Settings tab
If not, you need to use the User Sync connector's attribute mapping and its Group attribute to conditionally add the group to some of your users.
You can read more about group management with User Sync in our knowledge base
Save your changes