Okta SCIM 2.0 configuration
User Sync Configuration
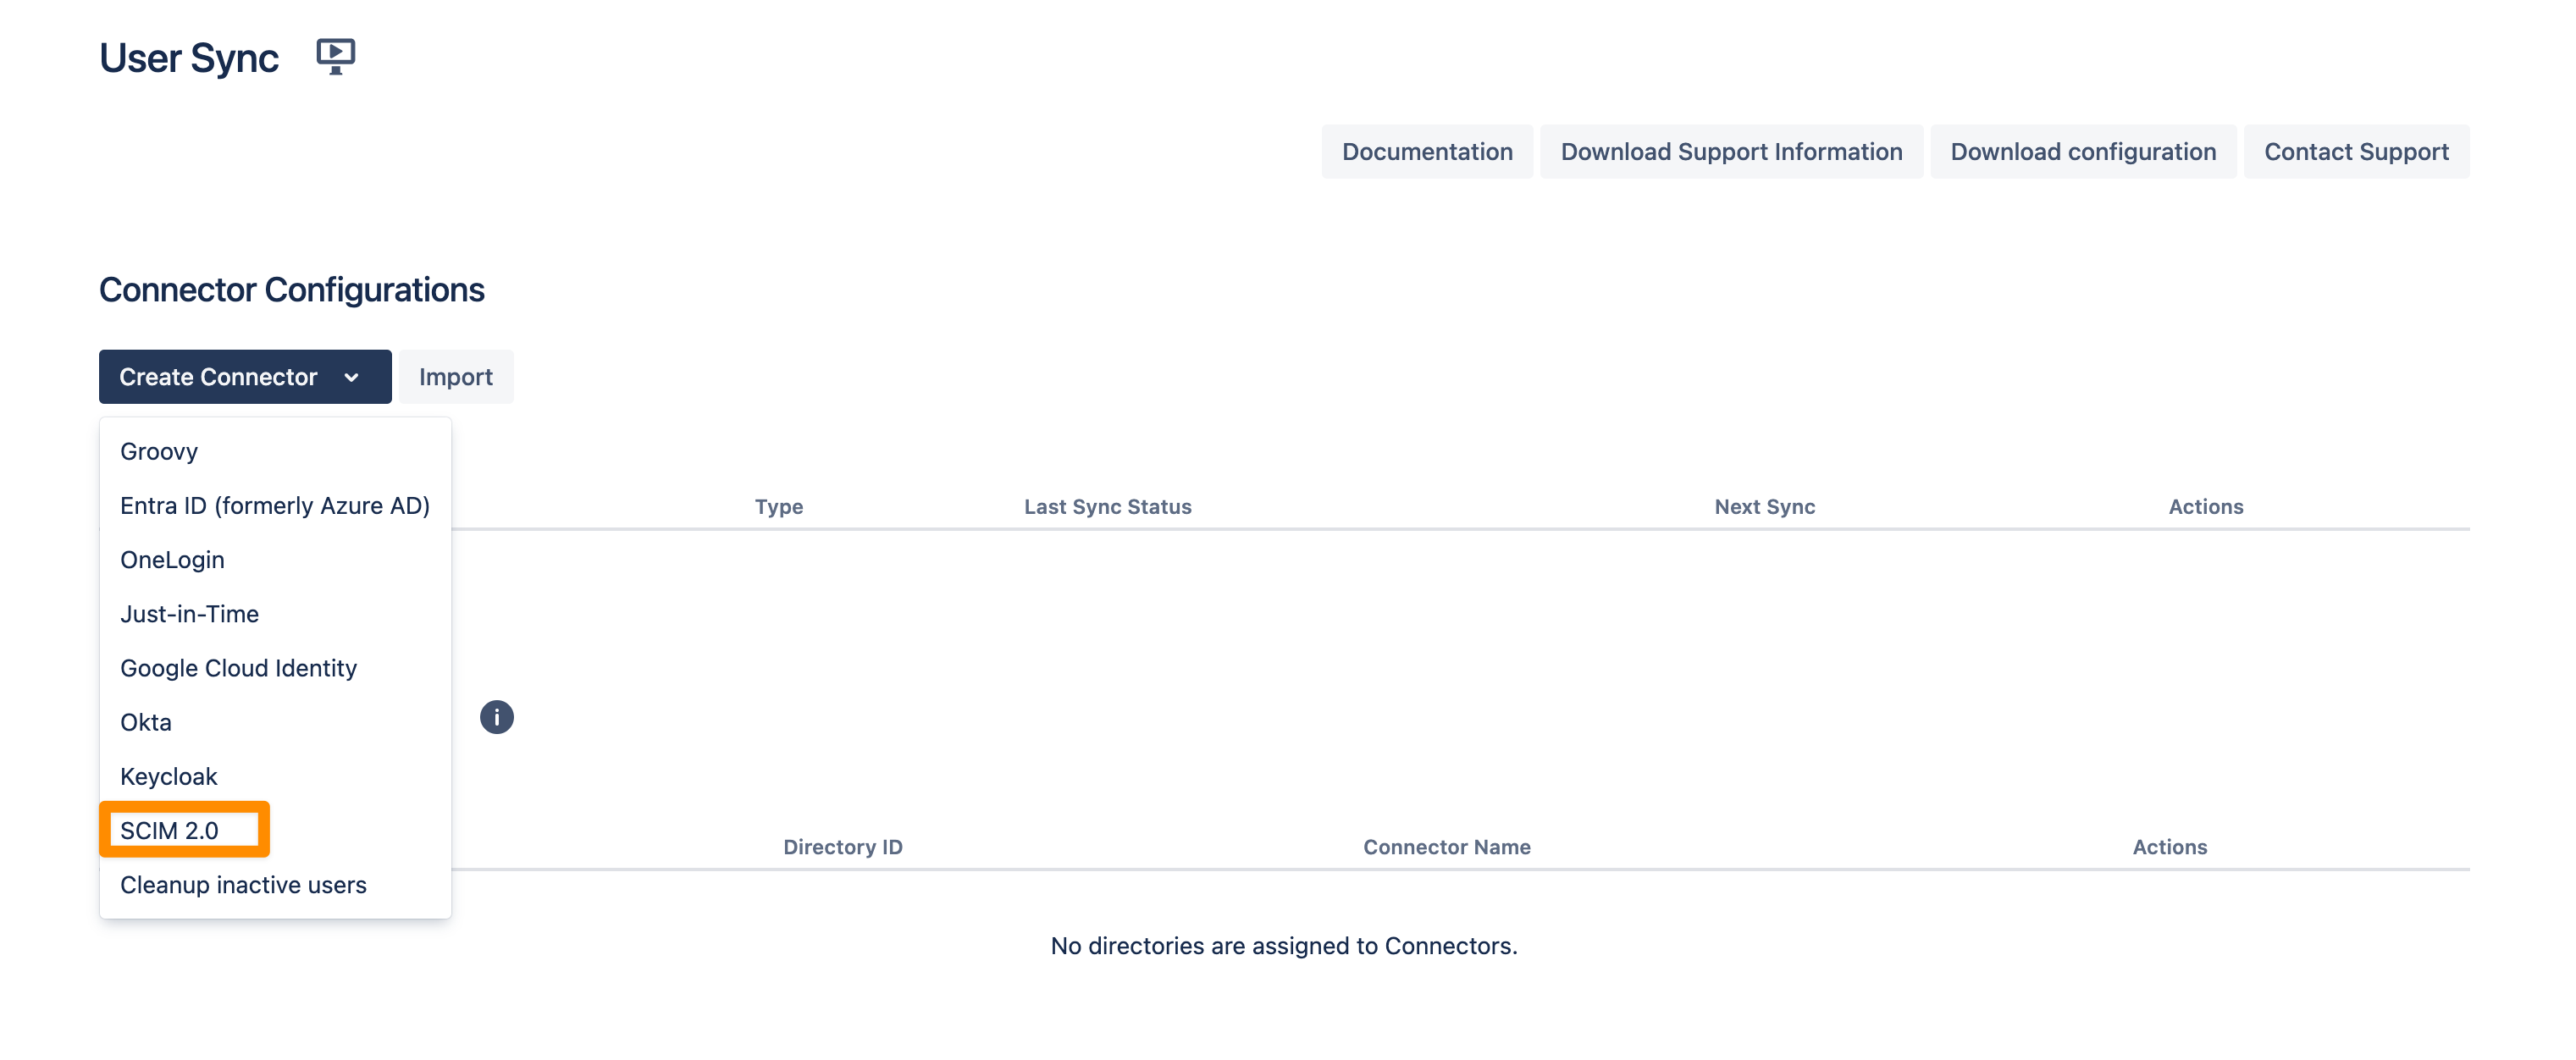
Go to your Atlassian product and navigate to the User & Group Sync settings. Click Create Connector and choose SCIM 2.0.
You can change the Name of your SCIM 2.0 Connector. Copy the SCIM Base URL and the Bearer Token. We will need both later for the configuration of the IdP SCIM application.
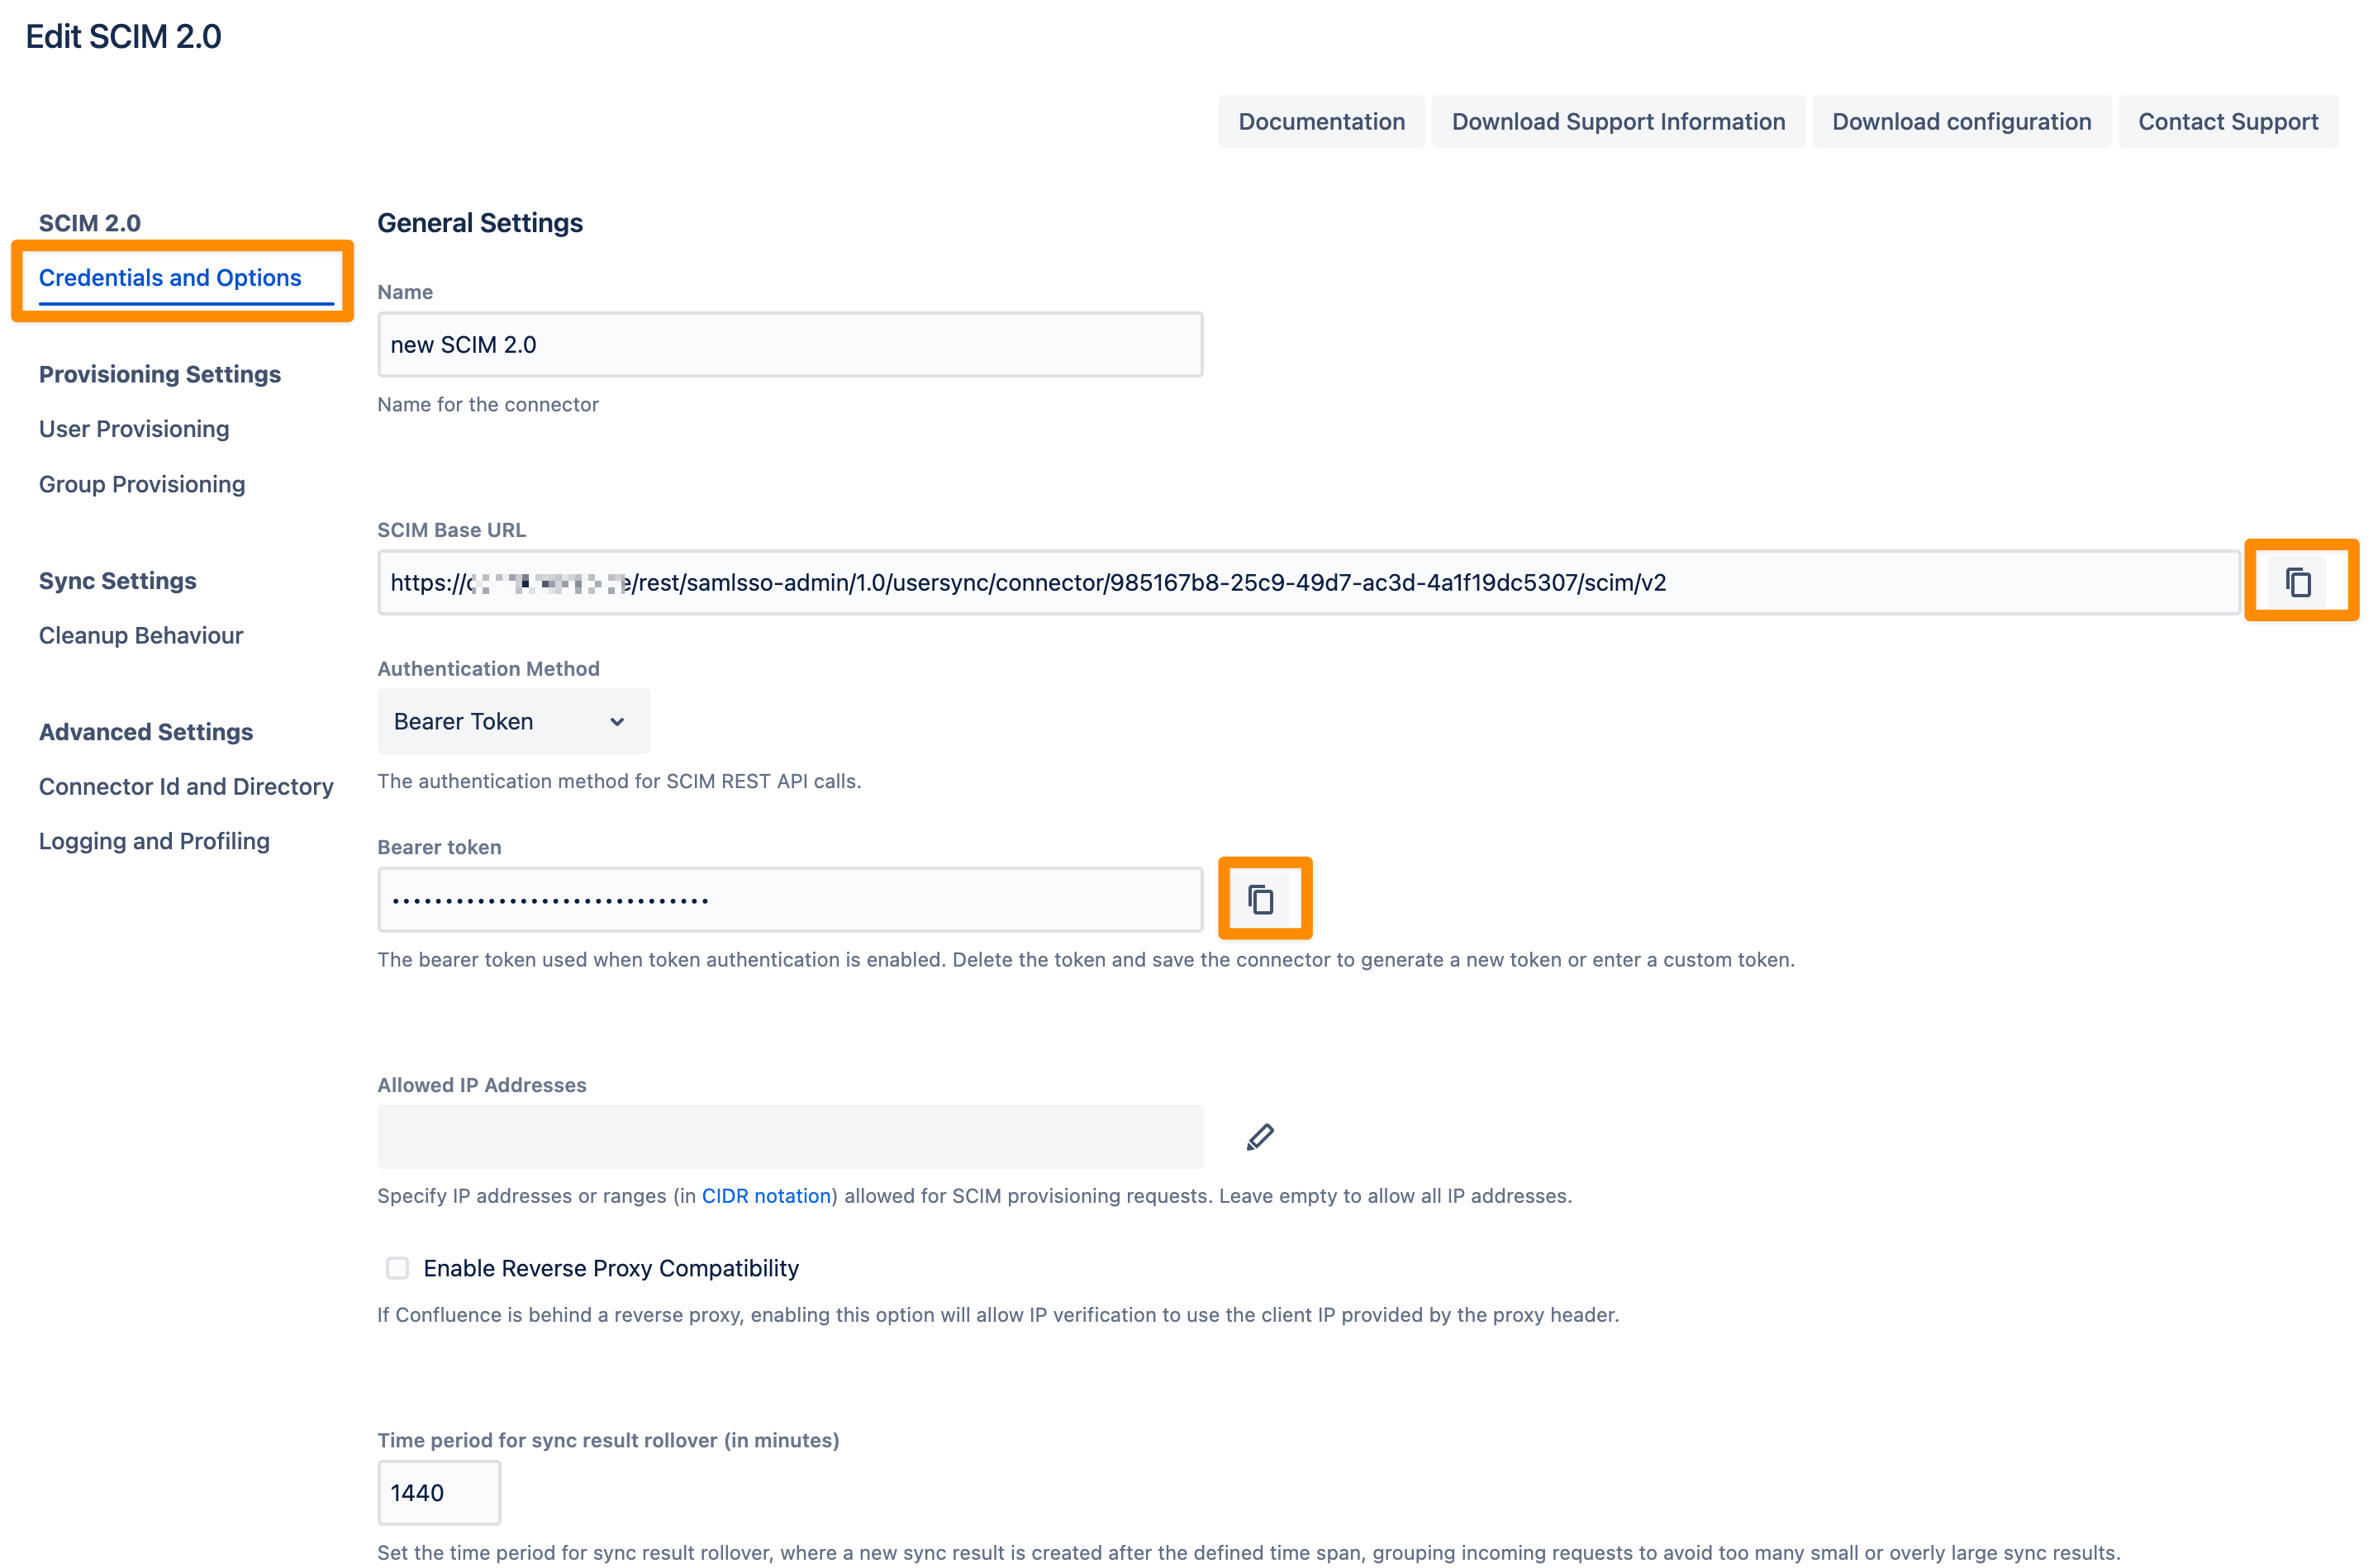
Don't forget to save "Save and Return" your settings!
We will have a look at the 'Provisioning' and 'Sync' settings later. However, first, we create an Application (SCIM client) in your Okta admin portal.
Okta (SCIM Configuration)
Follow the instructions below to set up provisioning of users from Okta to your Atlassian instance using SCIM v2.
For the remainder of this tutorial, we assume that you already have a configured SAML application using the re:solution SAML SSO plugin. This application will be used to configure SCIM as the provisioning method.
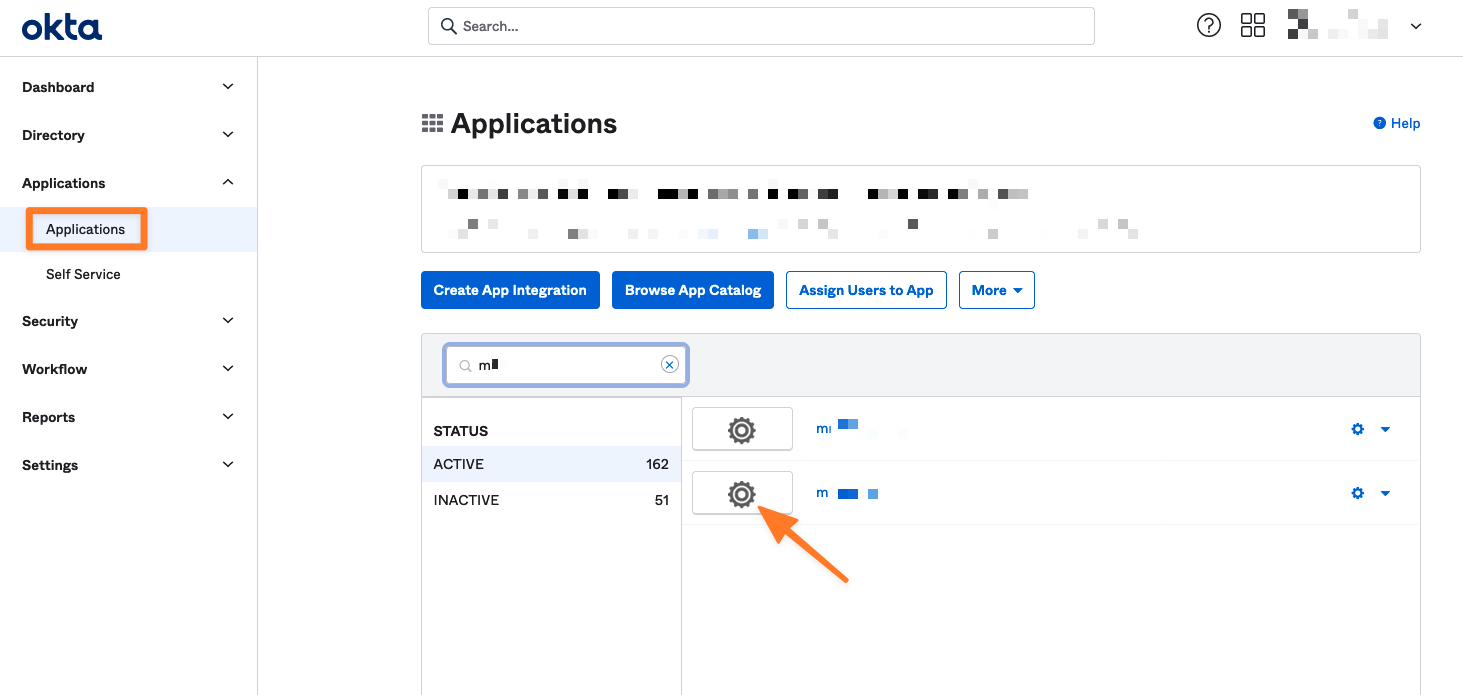
Open the Okta admin portal
Select Classic UI and then Applications
choose your Application
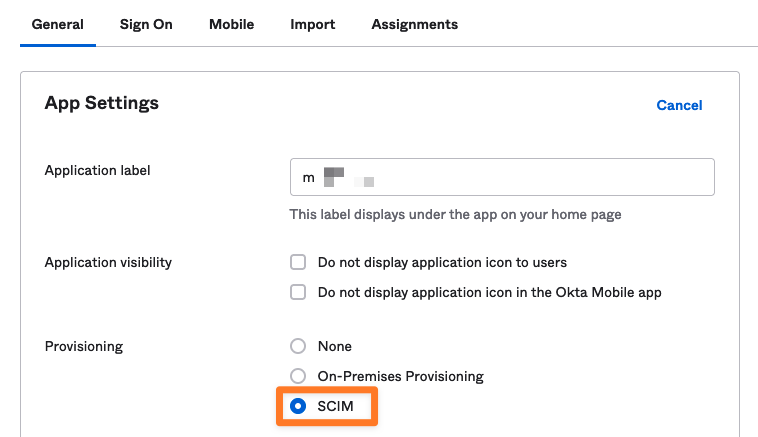
Enable SCIM provisioning
Now go back to the application settings (General). Click Edit and enable SCIM provisioning. Click Save
Configure the SCIM connector
To configure the SCIM connection:
Navigate to the Provisioning tab and click Edit.
SCIM Base URL: Copy the SCIM Base URL from your User Sync connector setup and paste it into the SCIM connector base URL field.
Unique Identifier: Enter
userNamein the Unique identifier field for users.Authentication Mode: Select HTTP Header.
Bearer Token: Copy the Bearer token from your User Sync connector setup and paste it into the Bearer token value field.
Provisioning Actions: Enable the following:
Push New Users
Push Profile Attributes
Push Groups
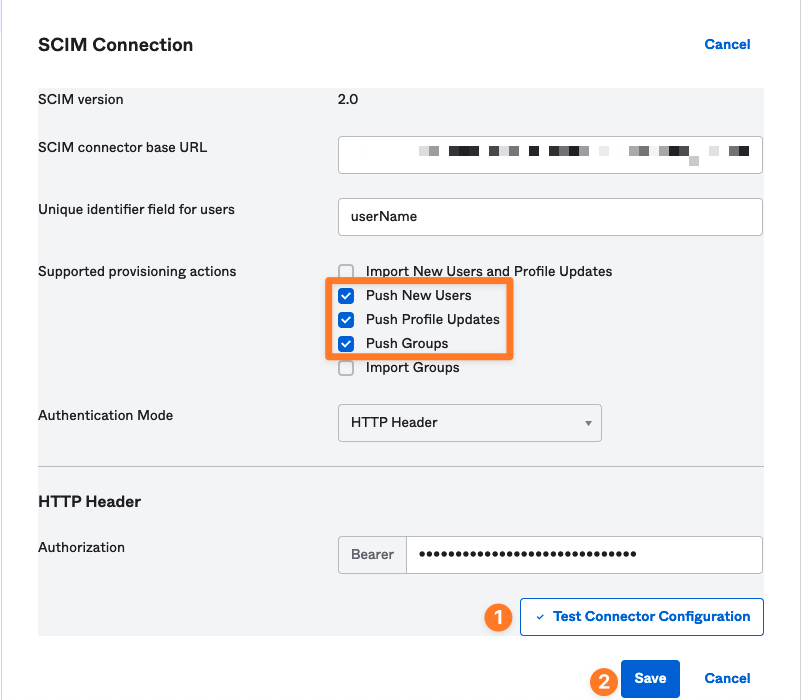
Click Test Connector Configuration, then Save
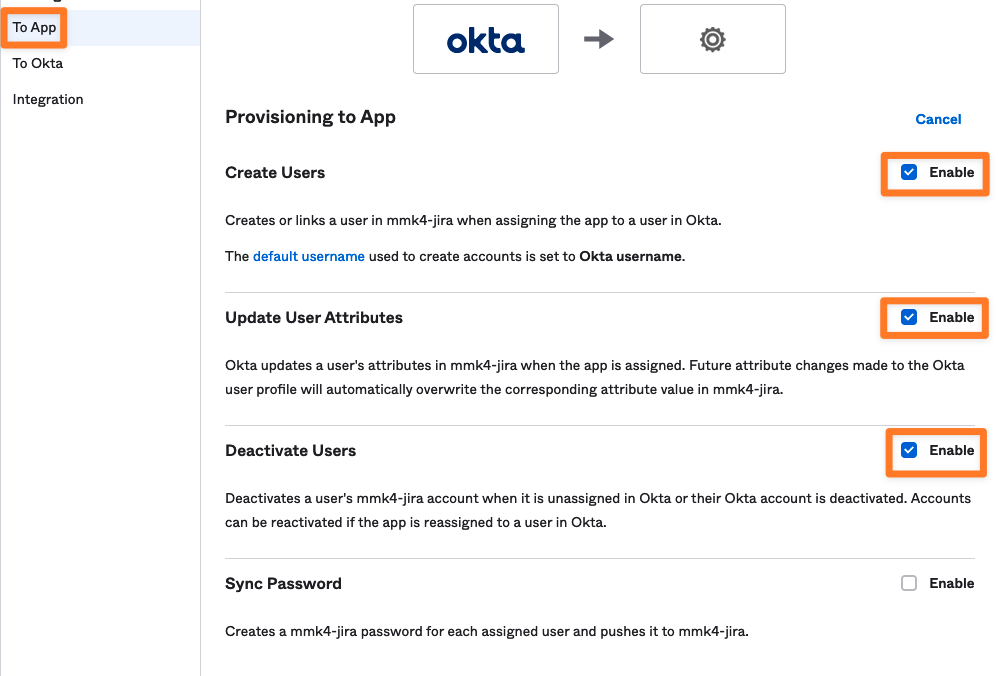
Configure To App settings
In the To App settings, enable the following options:
Create Users
Update User Attributes
Deactivate Users
Leave Sync Password unselected.
No changes are needed in the Attribute Mapping settings on this screen.
Click Save.
At this point, any user or group assigned to the SCIM application in Okta will be provisioned to your Atlassian instance.
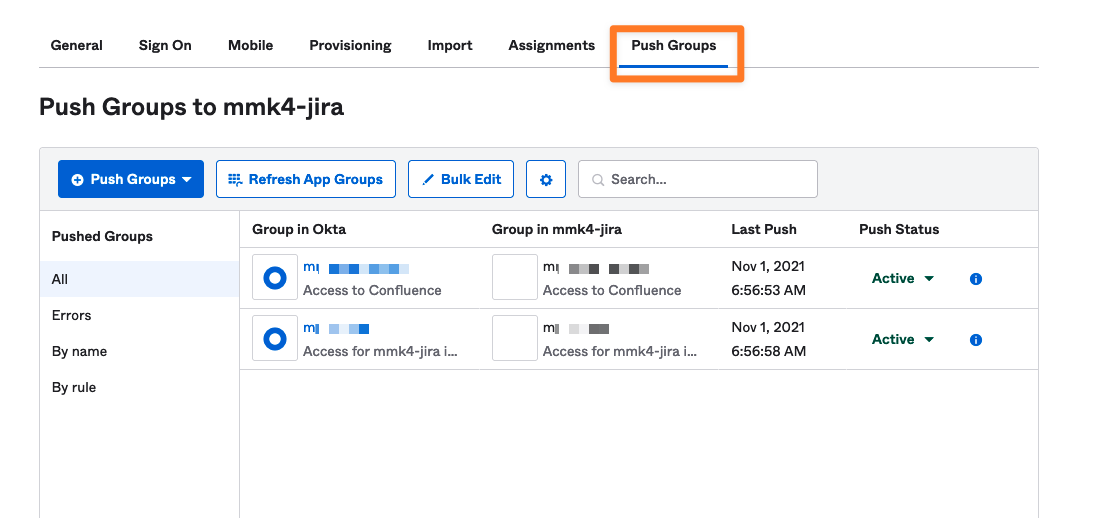
Push Groups
To explicitly specify the groups to provision:
Navigate to the Push Groups tab.
Click the Push Groups button.
Add groups using one of the following methods:
By Name: Enter group names manually.
By Rule: Define rules to include multiple groups.
After adding groups, you can:
Push Immediately or
Manually Activate each group when ready.
In the example screenshot, two groups were added by name.
SCIM is now configured and operational.
User Sync fine-tuning
Back to our SCIM 2.0 User Sync Connector. Let's have a look at the Provisioning Settings tab first.
You can configure three main sections in the User Provisioning settings.
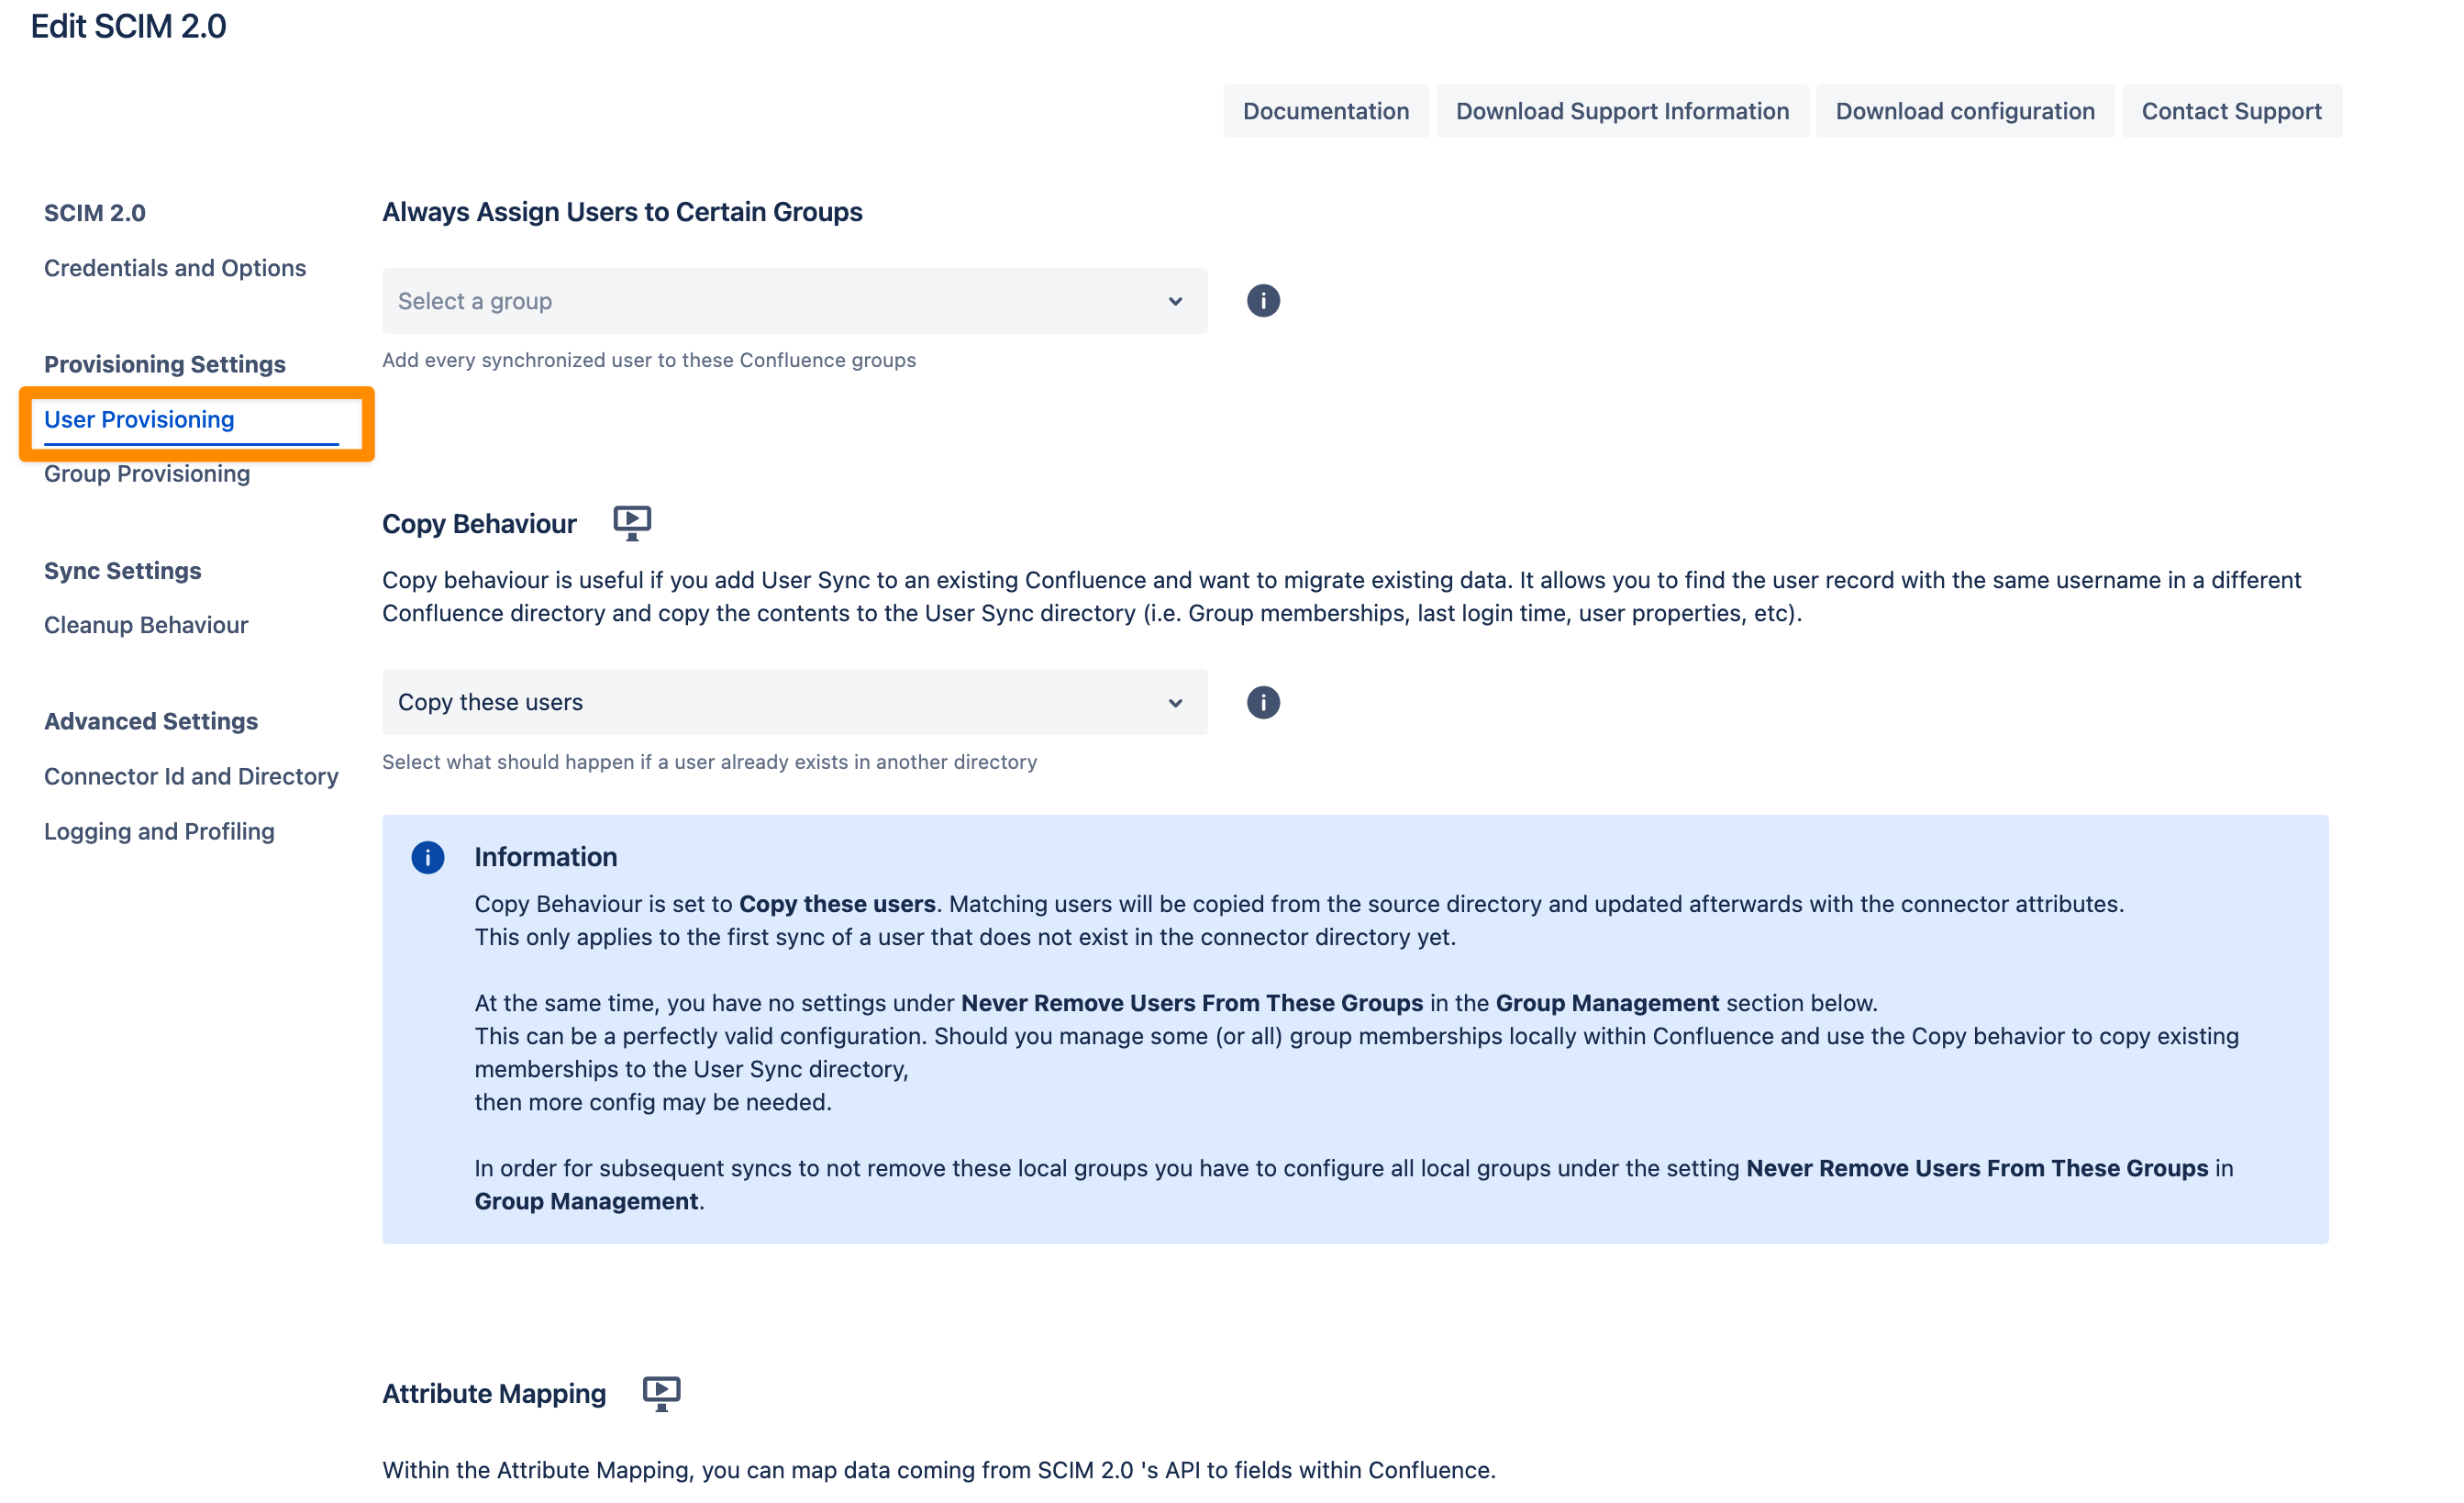
Always assign Users to certain Groups
This setting adds every synchronized user to the specified groups, such as an application access group like jira-users.
Group assignments are re-applied during every sync.
If you manually remove a user from one of these groups, they will be re-added in the next sync.
For more advanced use cases, you can use attribute mapping transformations to customize group assignments.
Copy Behaviour
Copy behavior is helpful when integrating User Sync into an existing Atlassian application (e.g., Jira or Confluence) with pre-existing data.
It identifies user records with the same username in a different application directory.
Relevant data such as group memberships, last login time, and user properties are copied to the User Sync directory.
This ensures smooth data migration while maintaining user information.
Attribute Mapping
Attribute Mapping allows you to map data from SCIM 2.0’s API to fields in your Atlassian application.
Use advanced functions to transform, filter, or modify incoming SCIM 2.0 data before applying it.
This enables greater flexibility when aligning external data with your Atlassian application's structure.
Group Provisioning
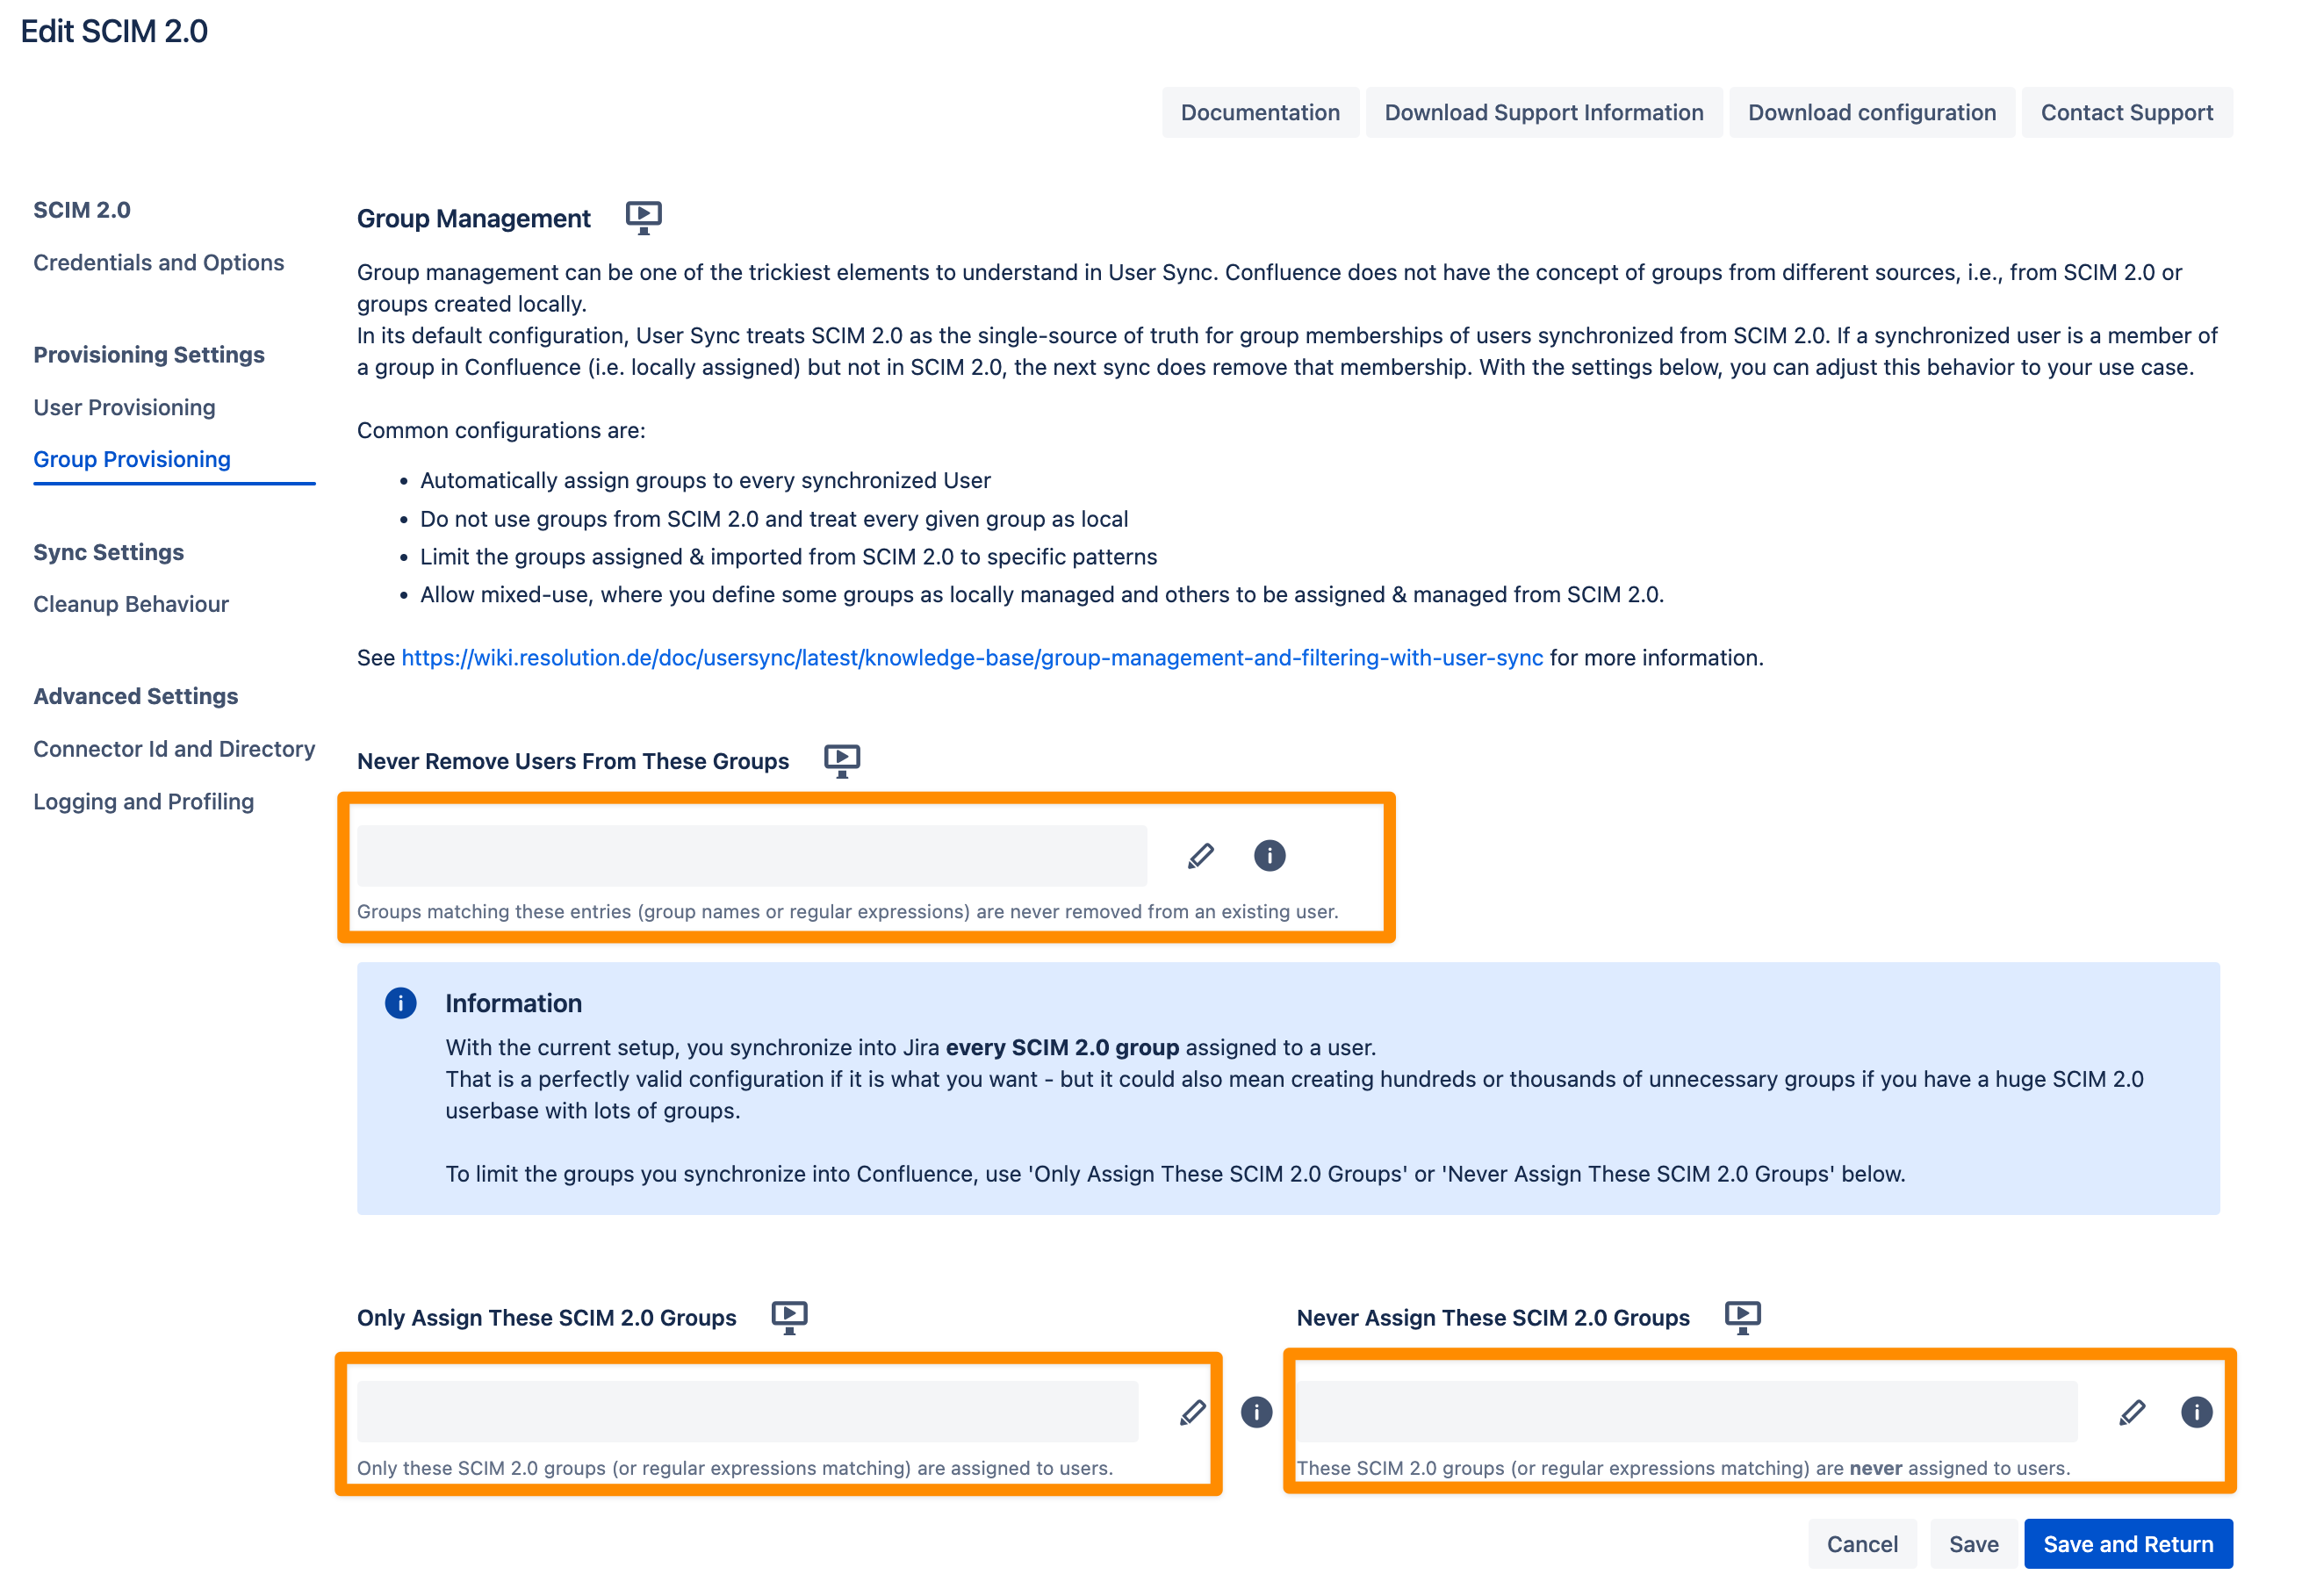
Group management in User Sync can be complex, especially since Atlassian does not differentiate between groups from SCIM 2.0 and locally created groups.
By default, User Sync considers SCIM 2.0 as the single source of truth for group memberships. This means:
If a user synchronized via SCIM 2.0 is assigned to a local group but not to that group in SCIM 2.0, the next sync will remove the local group membership.
To customize this behavior, you can adjust the settings to suit your use case:
Automatically assign groups to every synchronized user.
Ignore SCIM 2.0 groups and treat all groups as local.
Restrict imported groups from SCIM 2.0 using specific patterns.
Mixed group management: Manage some groups locally and others via SCIM 2.0.
These settings allow you to control how the plugin manages groups received from the Identity Provider (IdP):
Never Remove Users from These Groups
Control which groups User Sync will not remove users from, even if the group is not reported by SCIM 2.0.
Use this for groups you manually assign within Jira to ensure they remain intact.
Only Assign These Groups
Specify group names to whitelist groups from the IdP.
Only the groups listed here will be assigned to users; all other groups sent by the IdP will be ignored.
You can use regular expressions to match multiple group names (e.g.,
jira-.*matches all groups starting withjira-).
Never Assign These Groups
Specify group names to blacklist groups from the IdP.
Groups listed here will never be assigned to users; all other groups sent by the IdP will still be assigned.
Regular expressions are supported (e.g.,
jira-.*matches all groups starting withjira-).
Note: You can use both the whitelist (Only Assign These Groups) and blacklist (Never Assign These Groups) options together. In this case:
The plugin will first check the Only Assign These Groups field (whitelist).
Then it will apply the Never Assign These Groups field (blacklist) to exclude any matching groups.
Note
Using .* in "Never Remove Users From These Groups" and .* in "Never Sync These SCIM 2.0 Groups" will synchronize only user data from SCIM 2.0 while excluding all group memberships. This setup functions similarly to a "remote directory with local groups", as seen in Atlassian LDAP connections.
See https://wiki.resolution.de/doc/usersync/latest/knowledge-base/group-management-and-filtering-with-user-sync for more information.
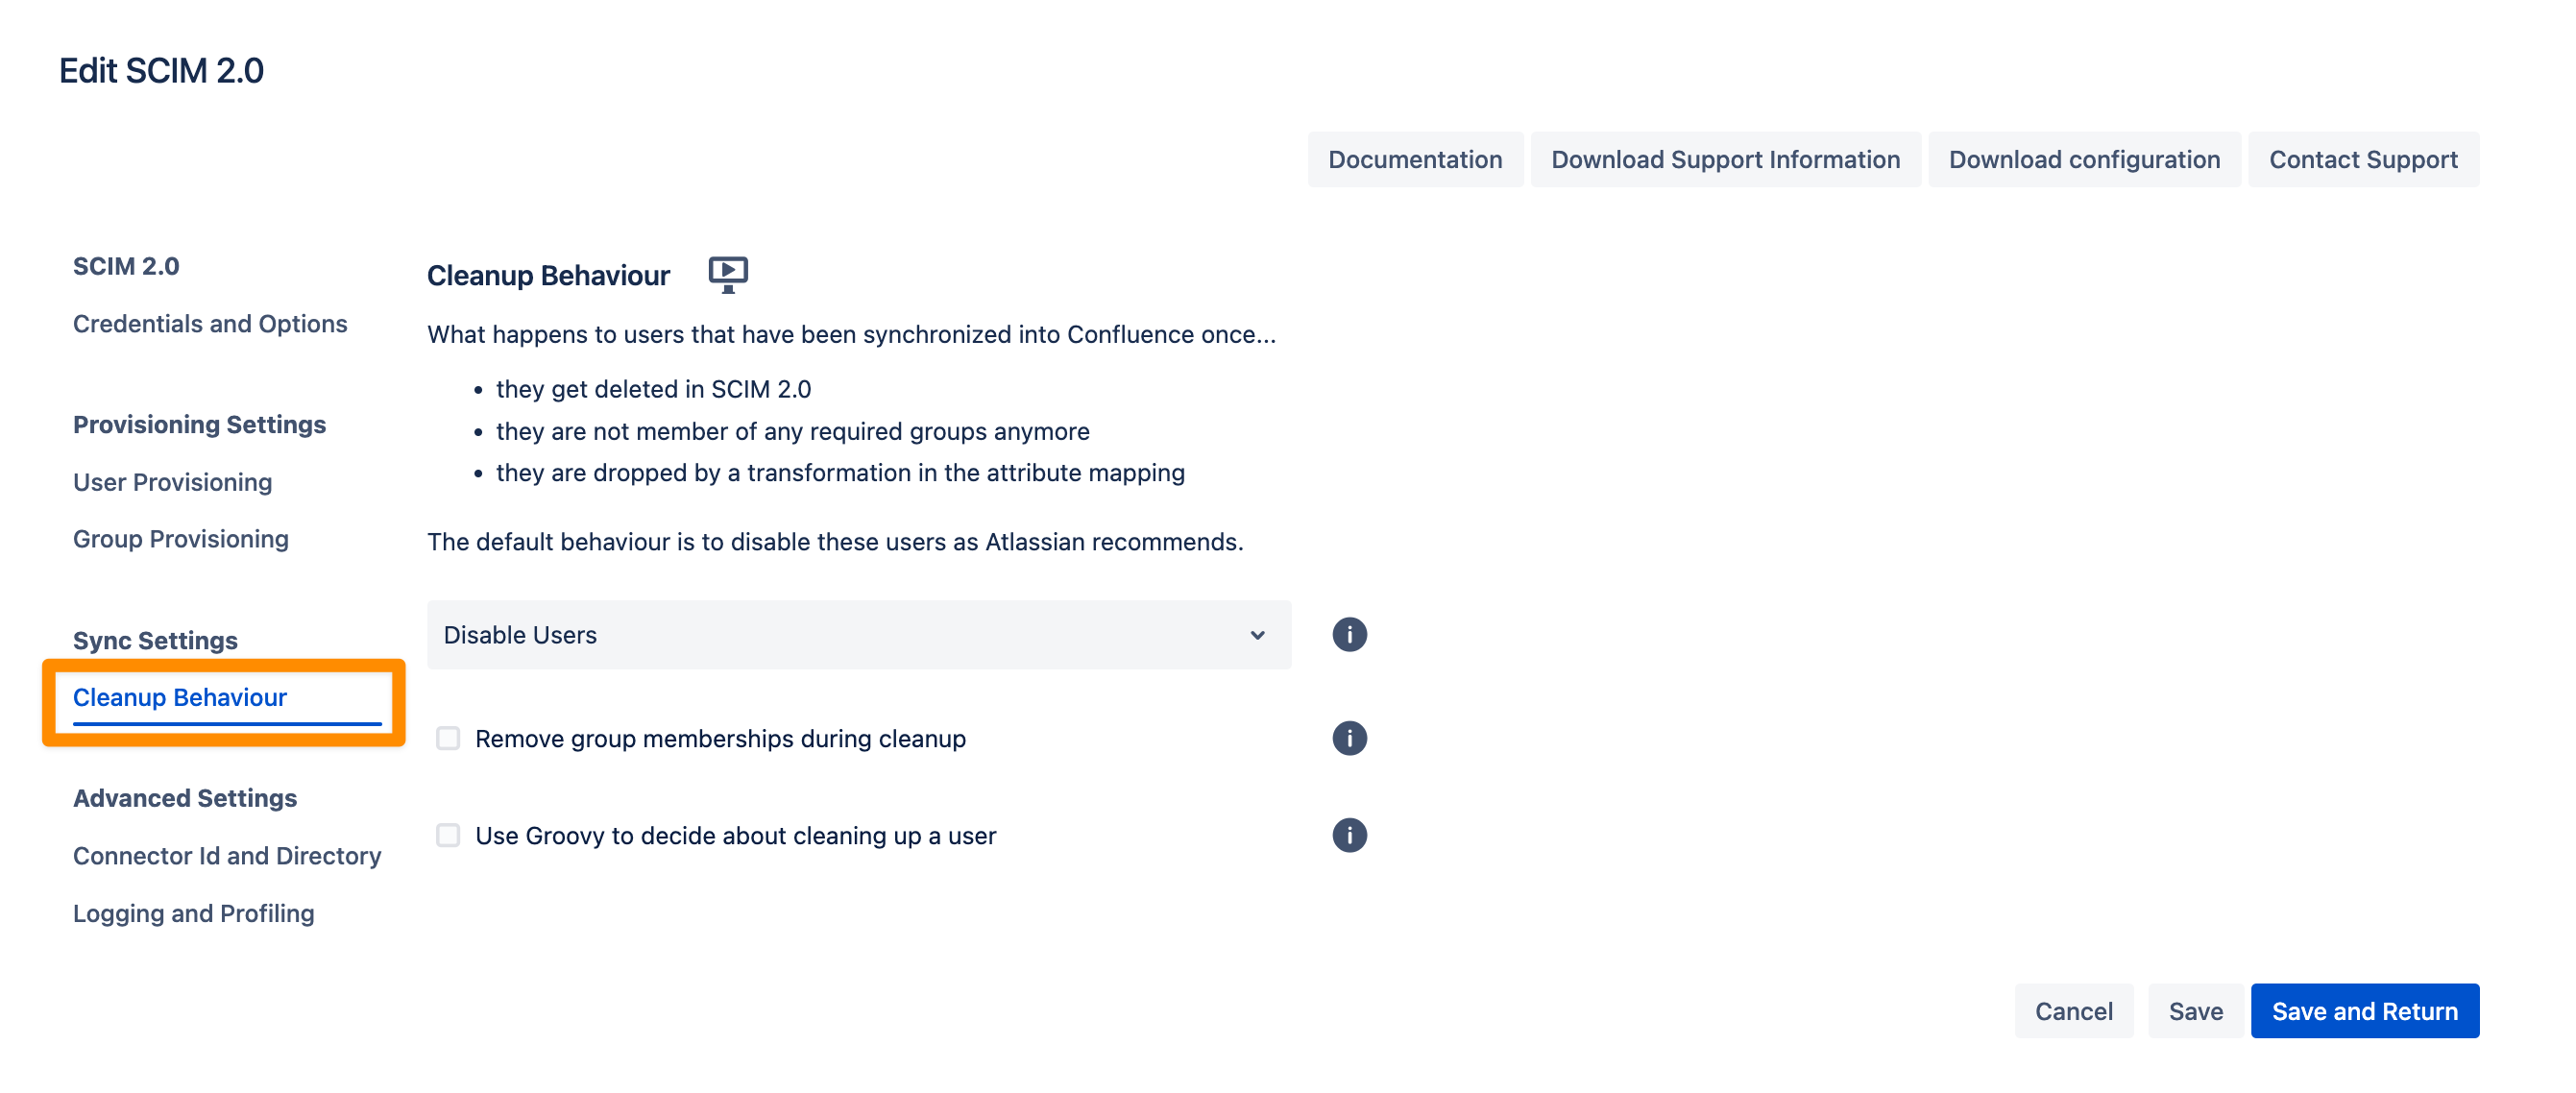
Cleanup Behavior
The Cleanup Behavior allows you to configure what happens to users who were previously synchronized into your Atlassian application but:
Are deleted in SCIM 2.0,
Are no longer members of any required groups, or
Are dropped due to a transformation in the attribute mapping.
By default, the behavior is to disable these users, as recommended by Atlassian.
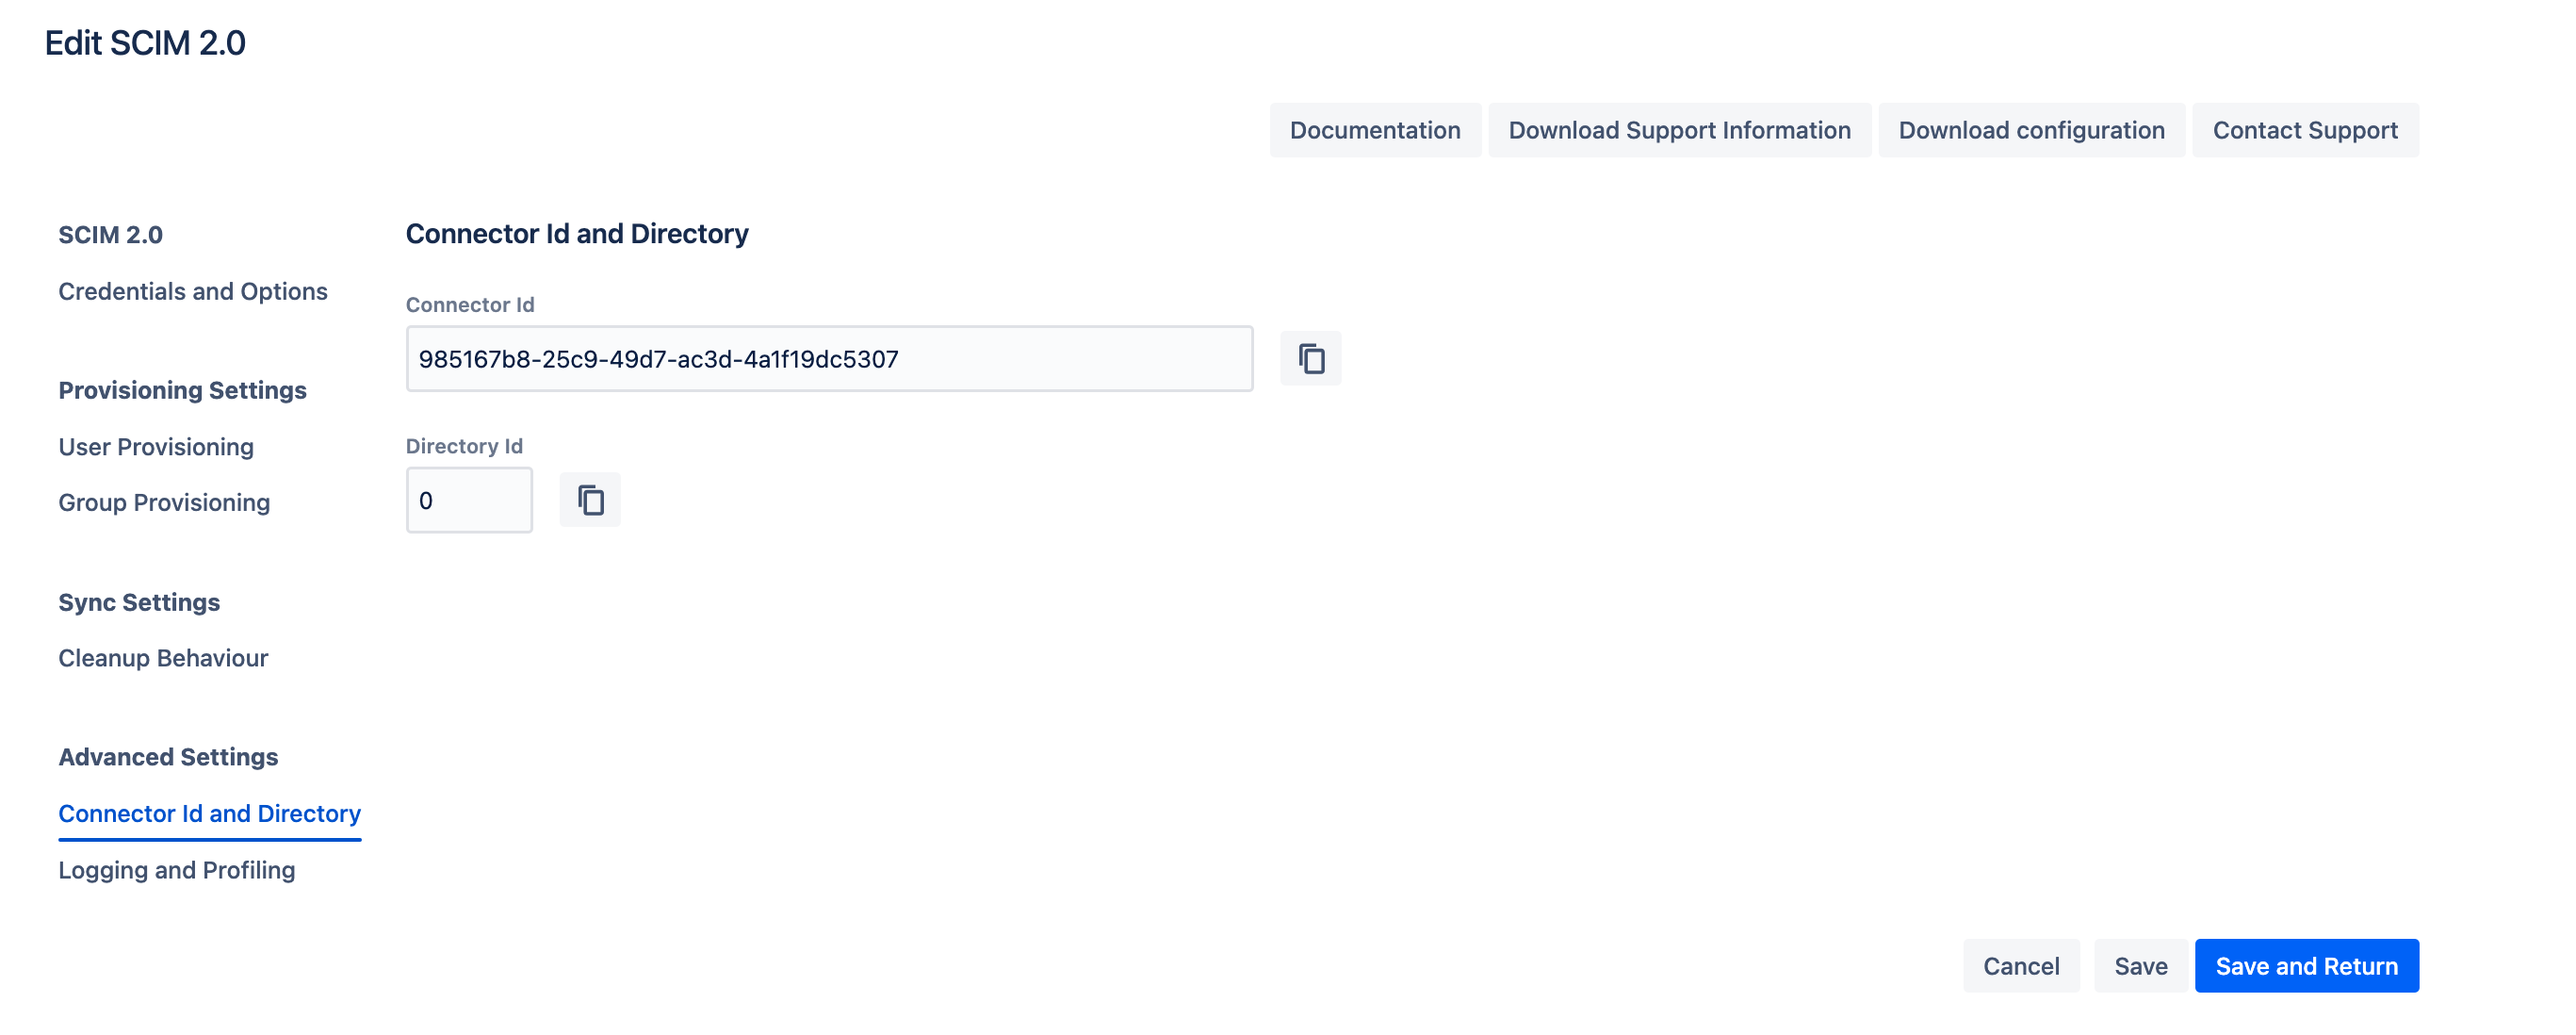
Connector Id and Directory
Below are key details related to the SCIM Connector:
Connector ID: A unique identifier used for REST API calls.
Directory ID: The directory ID used by the SCIM Connector, also applicable for REST API calls.
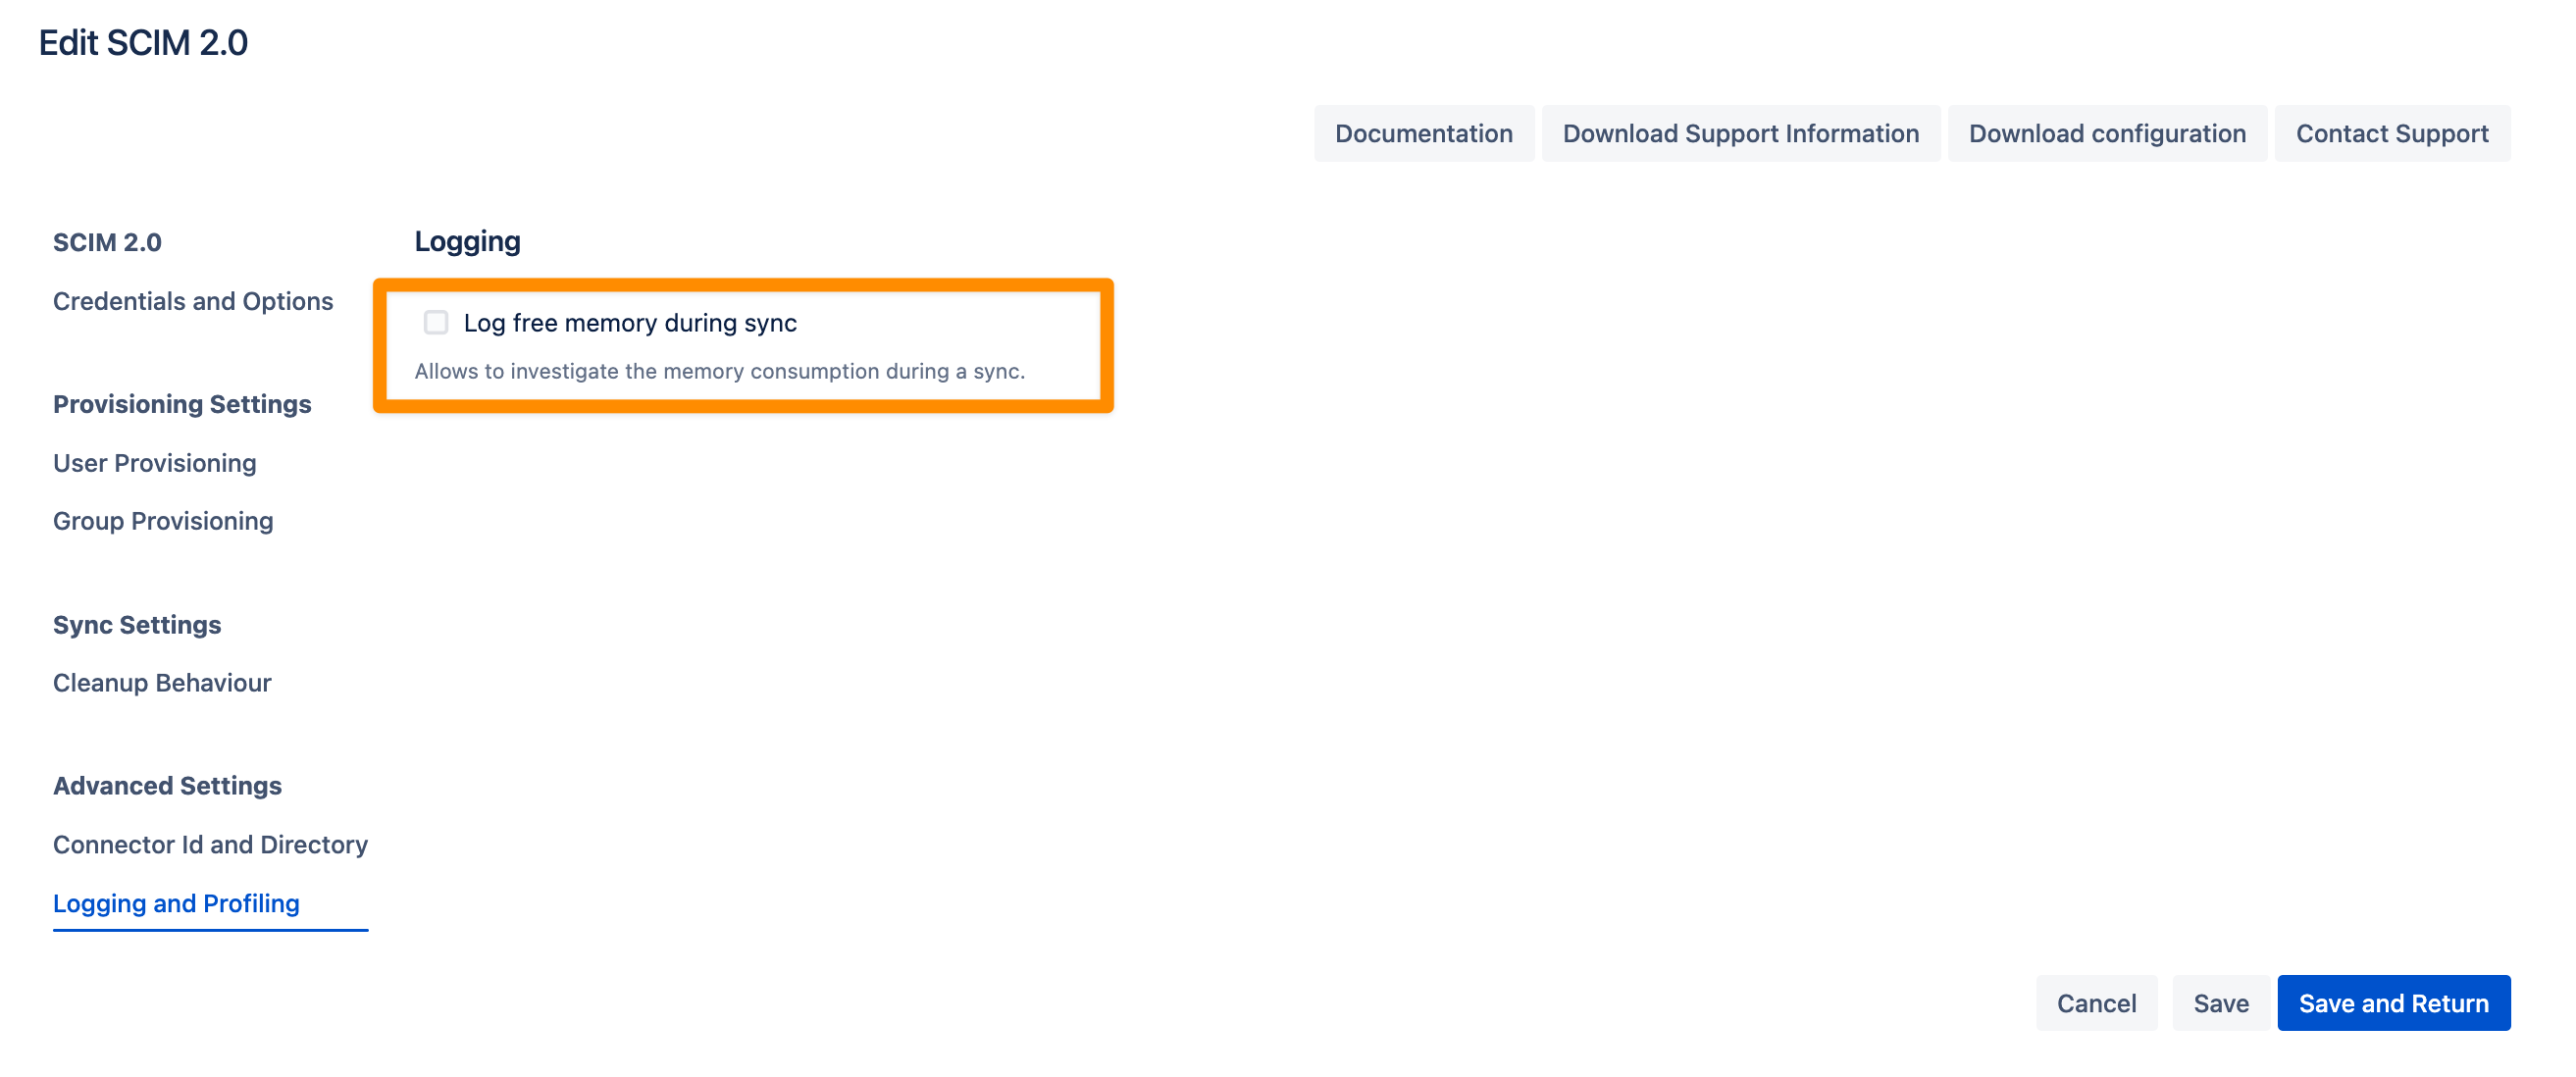
Logging and Profiling
The following setting can assist with troubleshooting:
Log Free Memory During Sync:
When enabled, this option displays the memory consumption and utilization during the sync process. You can view this information in the sync status logs.