Important Update Effective February 1, 2024!
Due to recent changes in Jira and Confluence, we've made the tough decision to discontinue the OpenID Connect (OIDC)/OAuth app and no longer provide new versions for the newest Jira/Confluence releases as of January 31, 2024.
This is due to some necessary components no longer shipping with Jira/Confluence, which would require some extensive rewrites of the OIDC App.
Important Update! This app will be discontinued soon!
Due to recent changes in Jira, which no longer ships with some components required for our Read Receipts app to run, we've made the tough decision to discontinue the app, as of Februar 5, 2025.
Important Update! This app will be discontinued soon!
We've made the tough business decision to discontinue the app, as of January 11, 2025.
Setup SAML SSO with Azure AD (Confluence)
Our SAML Single Sign On for Confluence is now officially listed on Azure AD gallery.
Now customers who purchased our plugin can also use it with the Free Edition of Azure AD. Check out more detailed information here.
Check out our Plugin and Setup Guide in Azure AD Gallery:
SAML SSO for Confluence by resolution GmbH
Step-by-Step Setup Guides to setup our SAML plugin for Confluence with Azure AD
This guide describes how to complete the initial setup for Confluence Single Sign On Azure AD, applicable from plugin version 0.14.5. If you need any further support please feel free to contact us here.
Prerequisites
Confluence must be accessible via HTTPS
See https://confluence.atlassian.com/display/DOC/Running+Confluence+Over+SSL+or+HTTPS for instructions. This is necessary because Azure AD accepts only HTTPS-URLs for SAML endpoints.
Azure Active Directory Premium
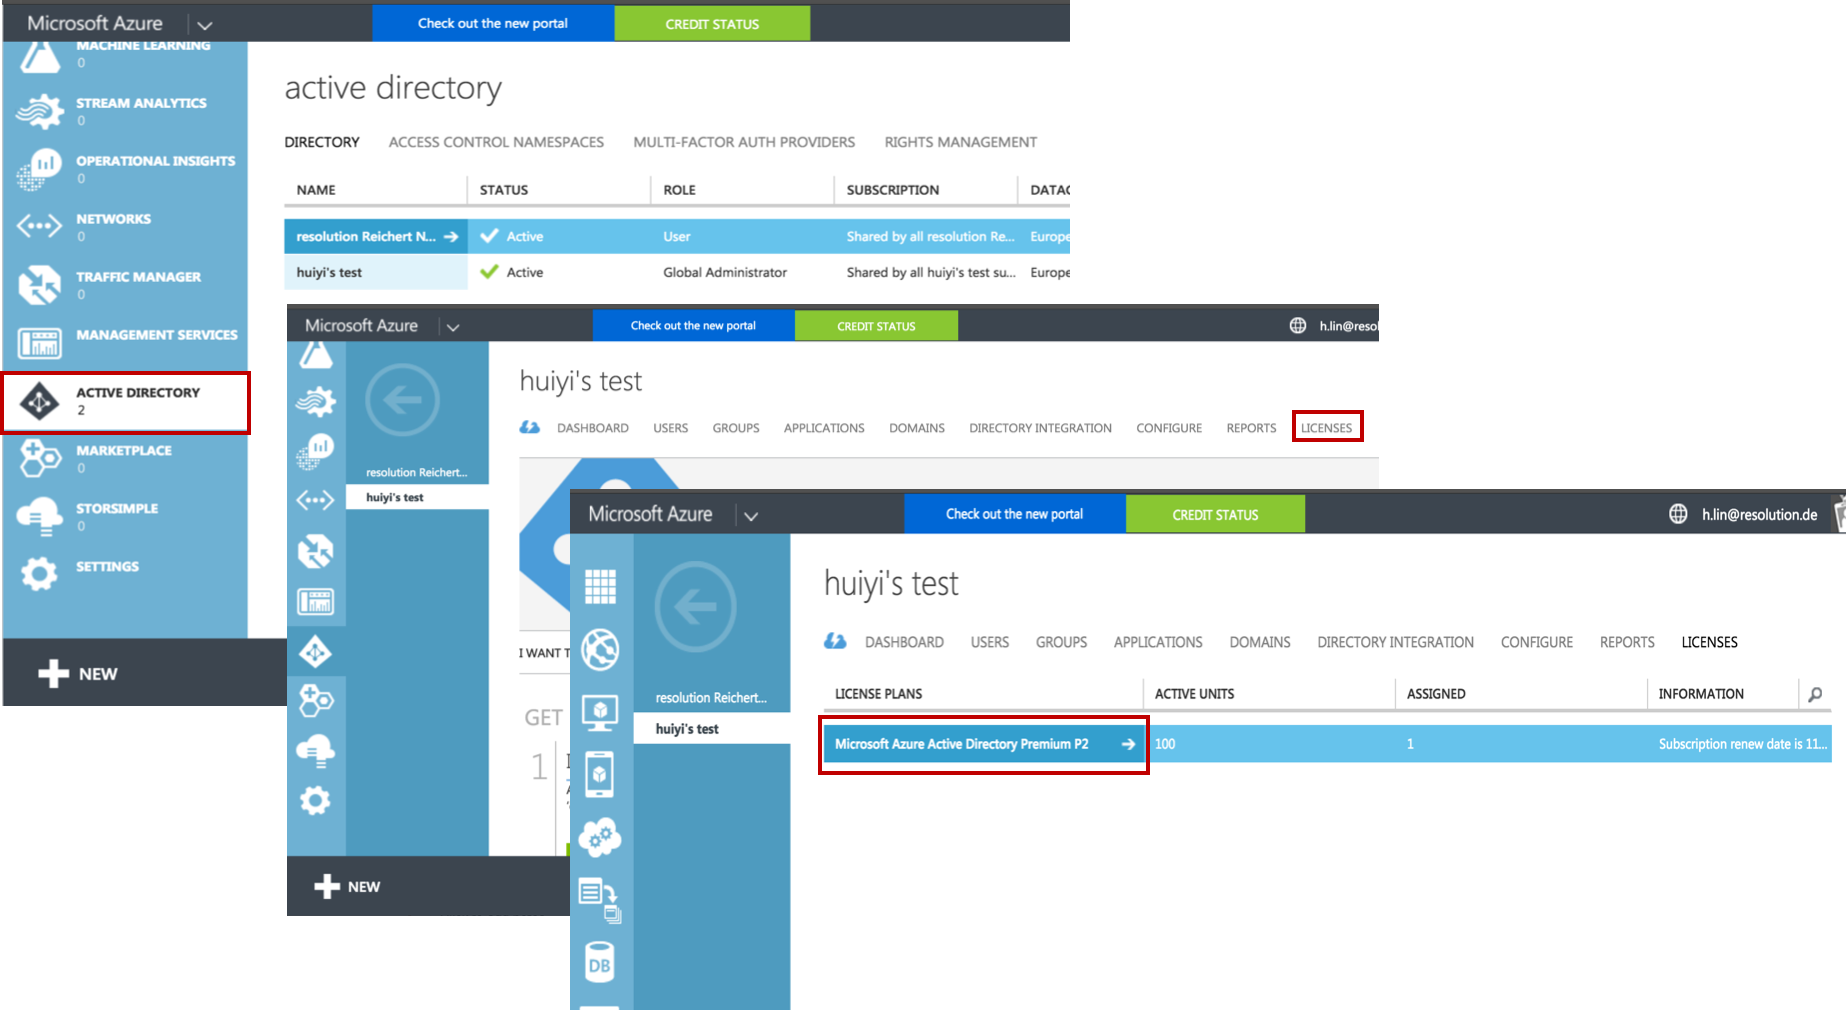
If you already have an Azure AD account, but are not sure if your premium account is enabled
After signed in to your Azure AD account, click on Active Directory and choose the directory you want to use with SAML Single Sign On. After your chosen directory opened up, click on Licences on the right side. Then, under the Licence Plans you will see the licence type you have - Microsoft Azure Active Directory Premium, if it is enabled. Otherwise, see video provided above to enable it.
Installation Procedure
| Step 1: Install the plugin | Step 2: Setup the Azure AD (Substep A-D) | |
|---|---|---|
Step 4: Test | Step 5: Enable login redirection |
Step 1: Install the plugin
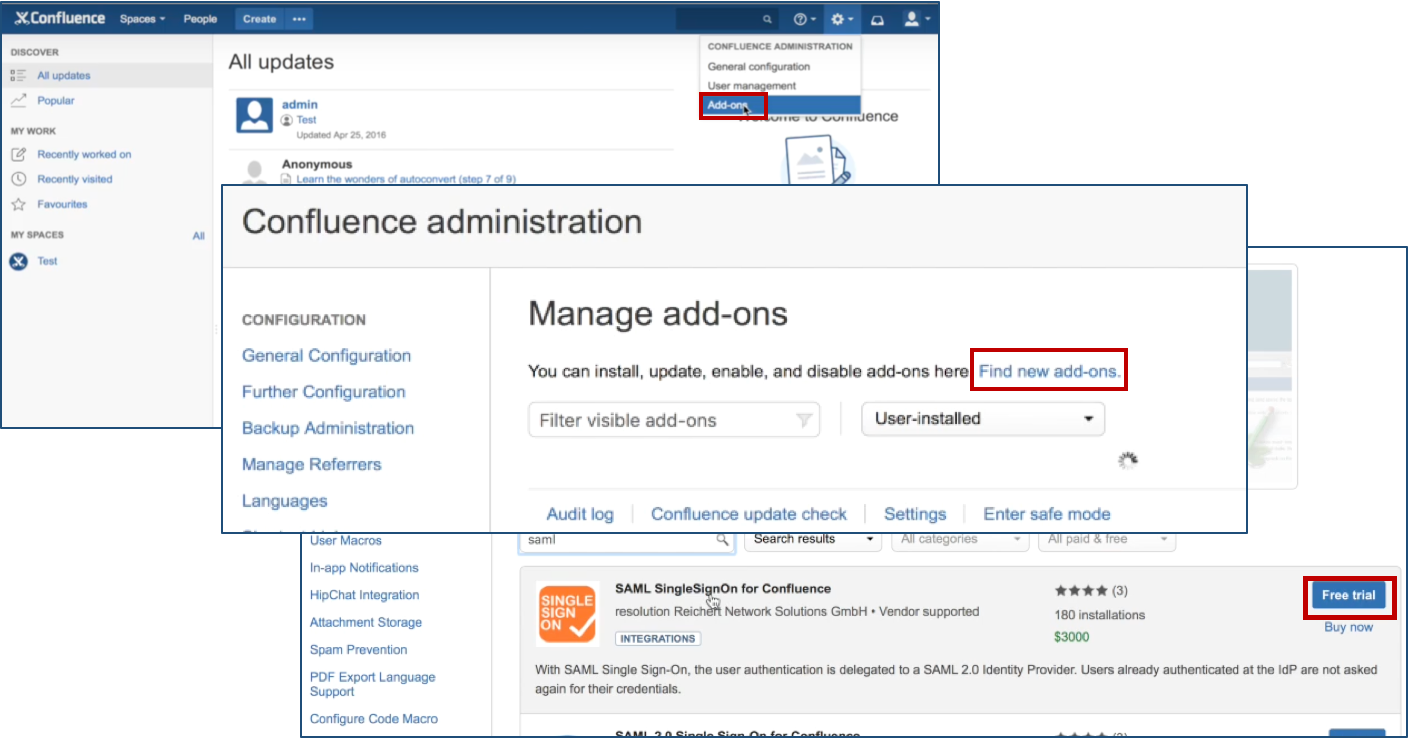
- Click Add-ons under Confluence Administration on the top right corner of your Confluence interface. Then, choose Find new add-ons and you will be taken to Atlassian Marketplace. Search for SAML SSO and click on Free Trial to install.
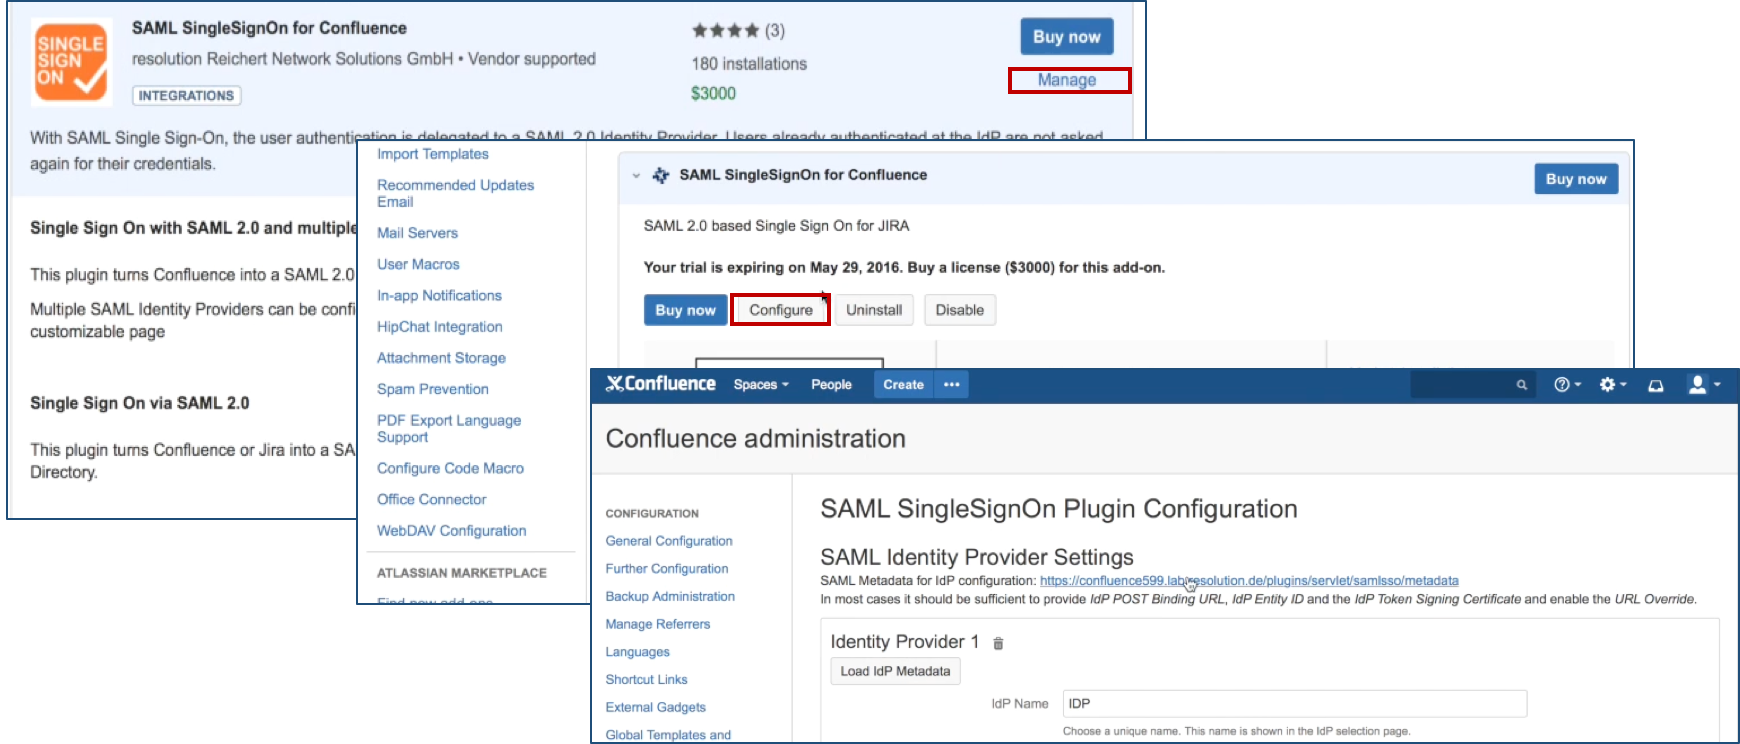
- After installation succeeded, click on Manage, then choose Configure. Now, you are on the plugin configuration page.
Step 2: Setup the Azure AD
Step 2 will be completed in Azure AD.
Substep A : Select your directory and start application dialog
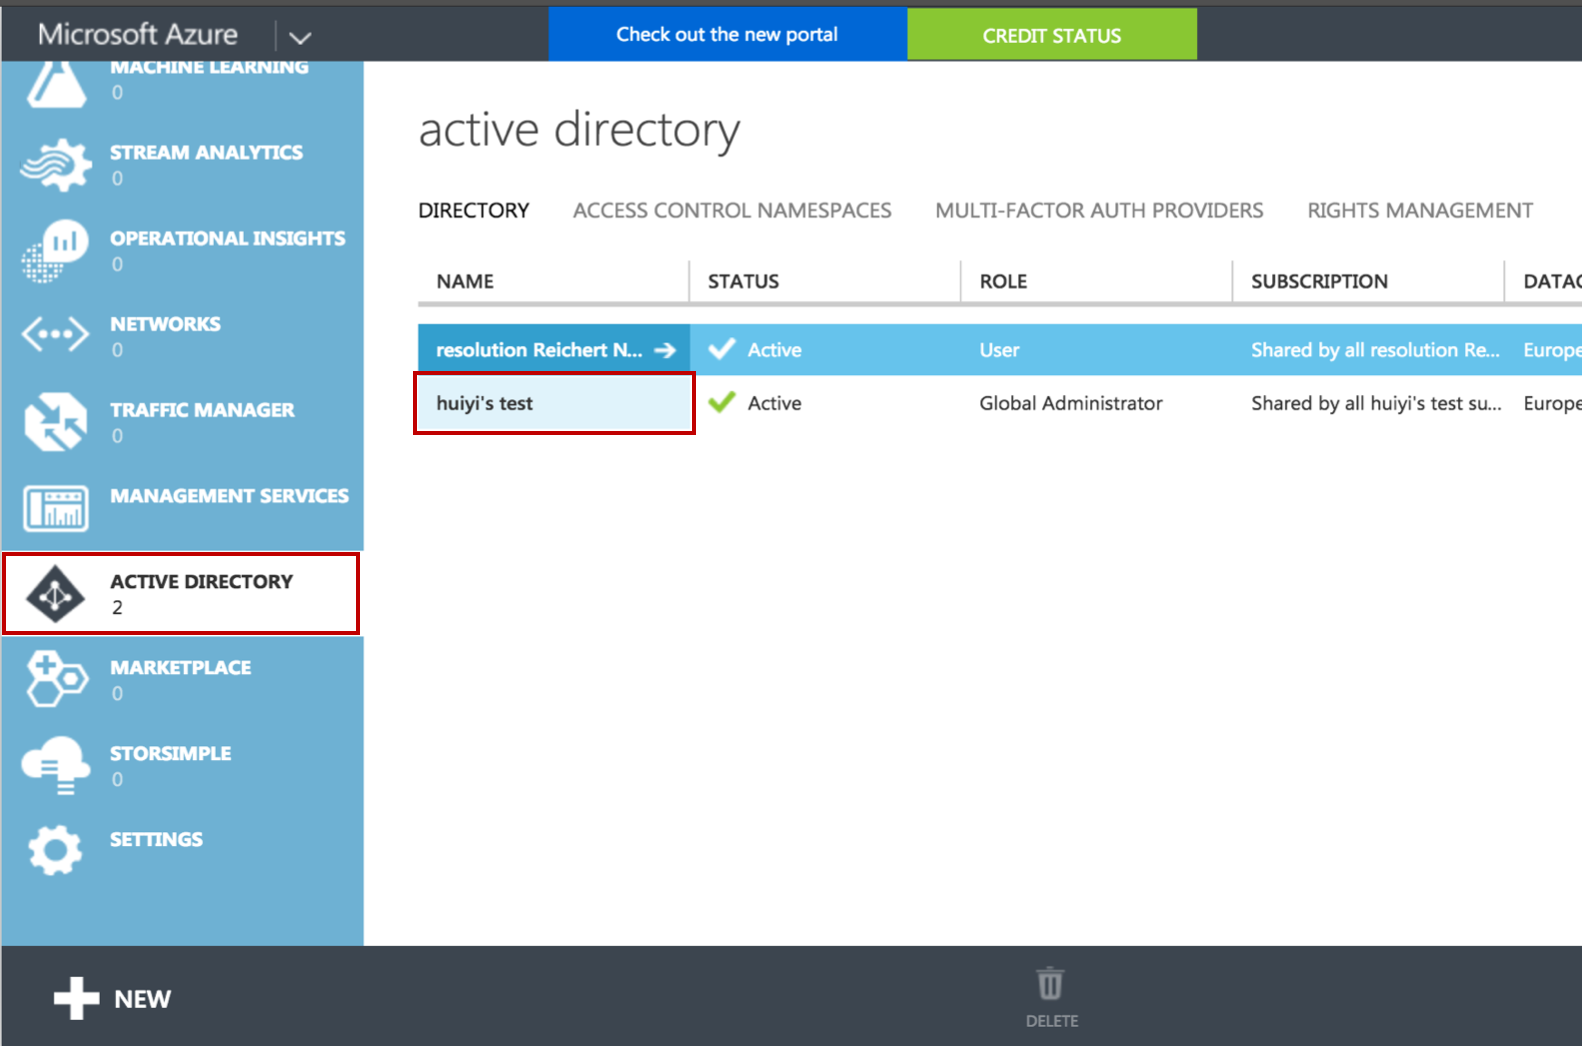
- Go to https://manage.windowsazure.com and login with your credentials.
- Select Active Directory on the left navigation panel, and select the directory that you want to use with SAML Single Sign On.
- Click on APPLICATIONS, then click on ADD to start a new application dialogue
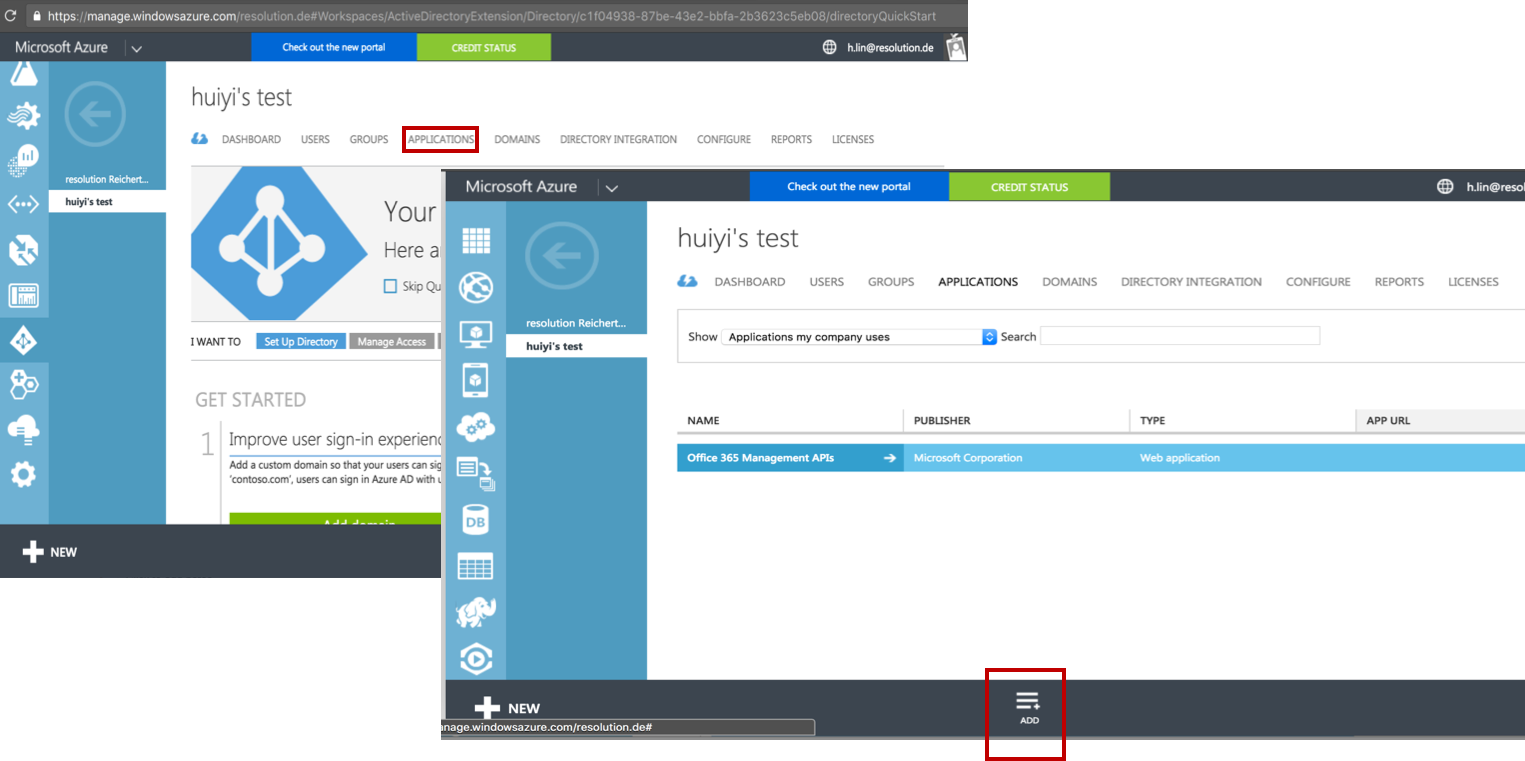
Substep B: Add a new application
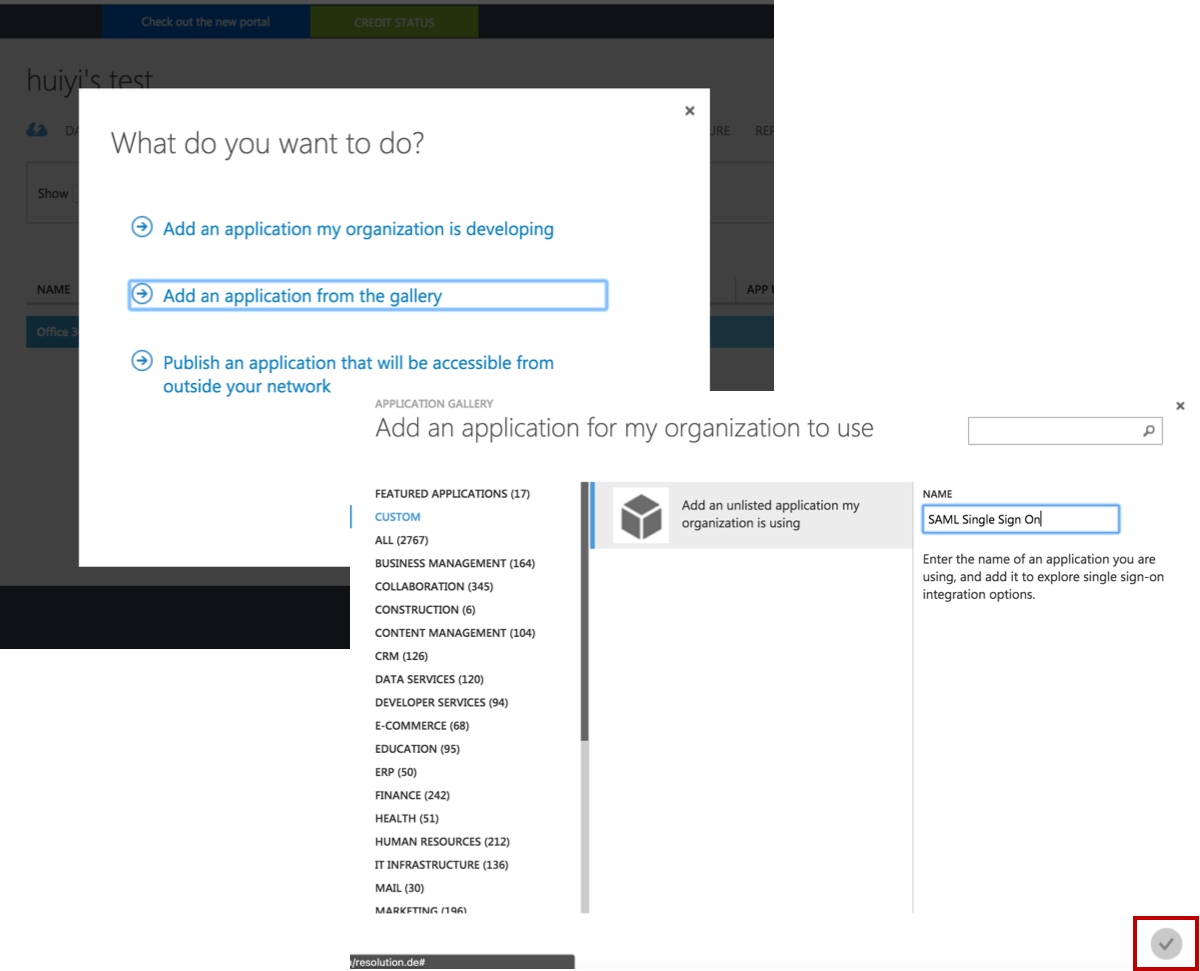
- Click on Add an application from the gallery.
- Select Custom on the left navigation panel, and click Add an unlisted application my organization is using.
- Then, fill in a name of your choice, e.g.. SAML Single Sign On in the NAME field.
- Click on the Finish button at the bottom to add the application to your directory.
Substep C: Configure the new application
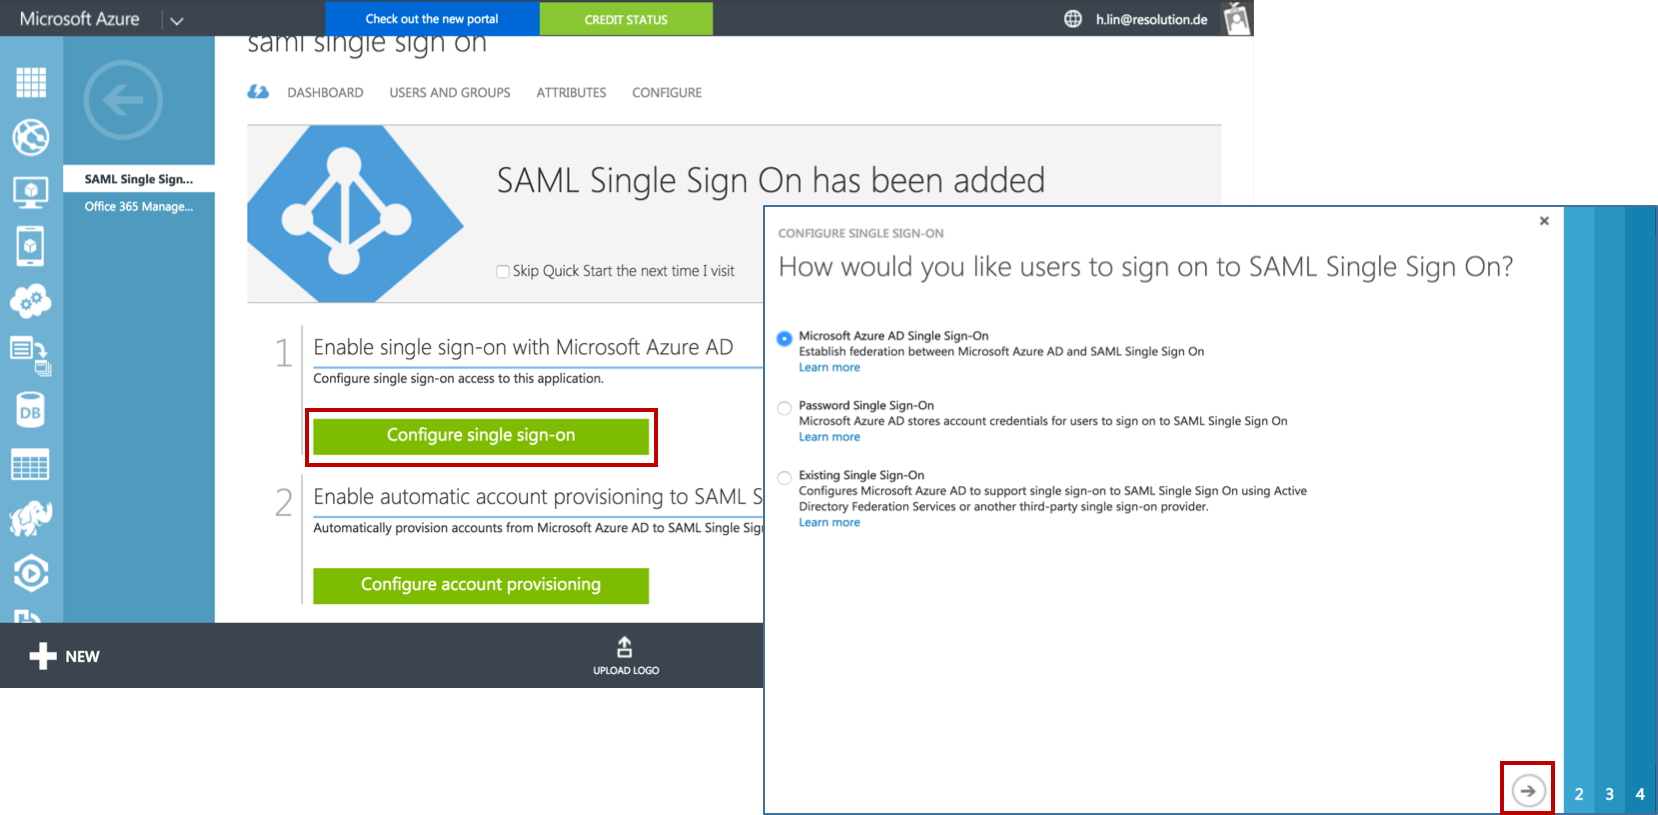
- Click on Configure Single Sign On. In the Pop-up window choose select Microsoft Azure AD Single Sign-On, then click on Next.
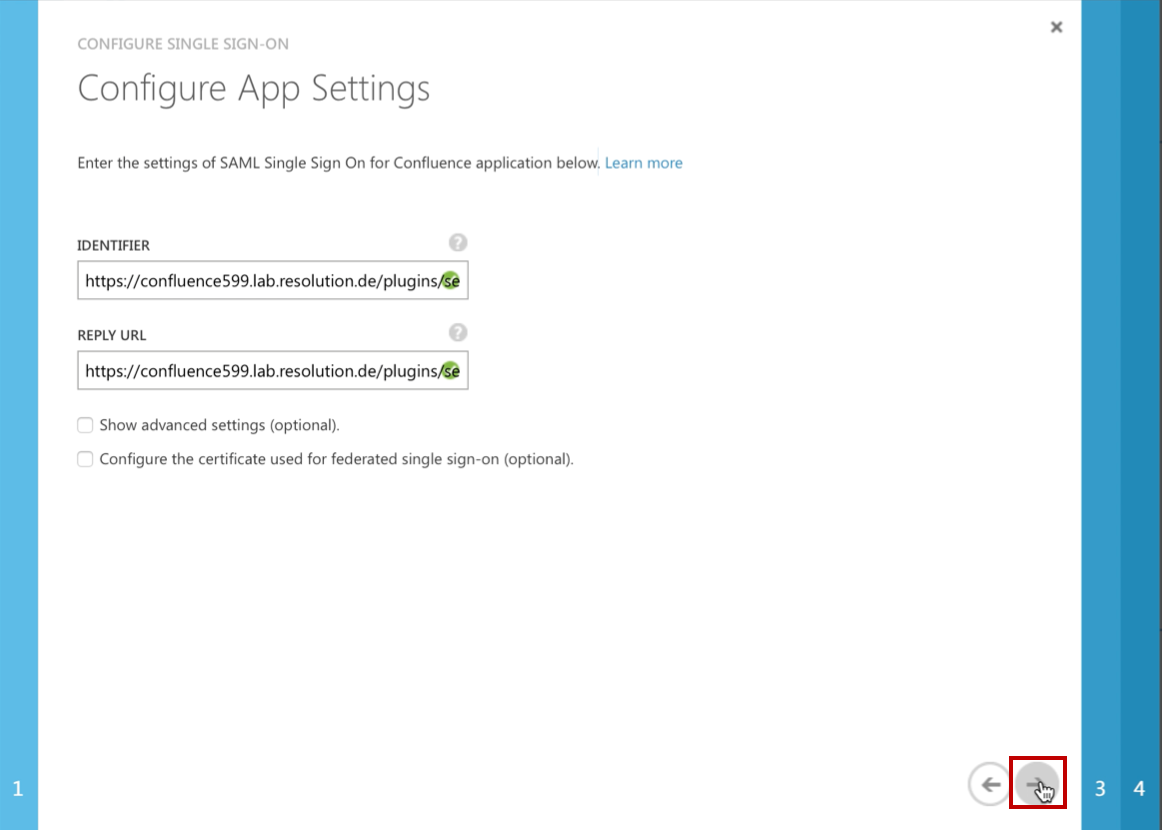
- In the IDENTIFIER and REPLY URL fields please fill in your Confluence SAML Single Sign On URL :
https://<your-confluence>/plugins/servlet/samlsso. (e.g. https://confluence599.lab.resolution.de/plugins/servlet/samlsso) - Click Next.
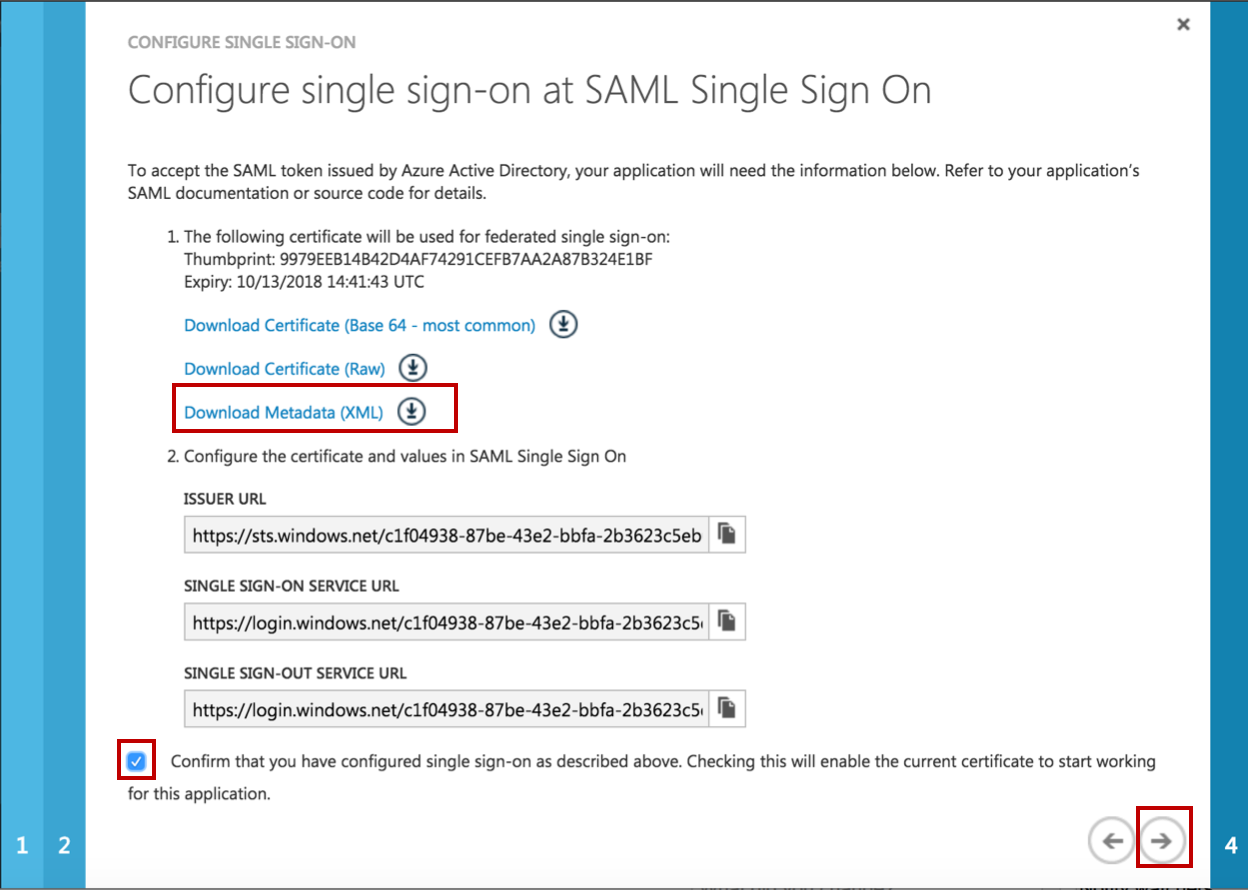
- Click on Download Metadata (XML) to download the FederationMetadata.xml. We will configure the SAML Single Sign On with the Metadata from Azure AD in Step F.
- Check the Checkbox Confirm that you have configured... .
- Click on Next.
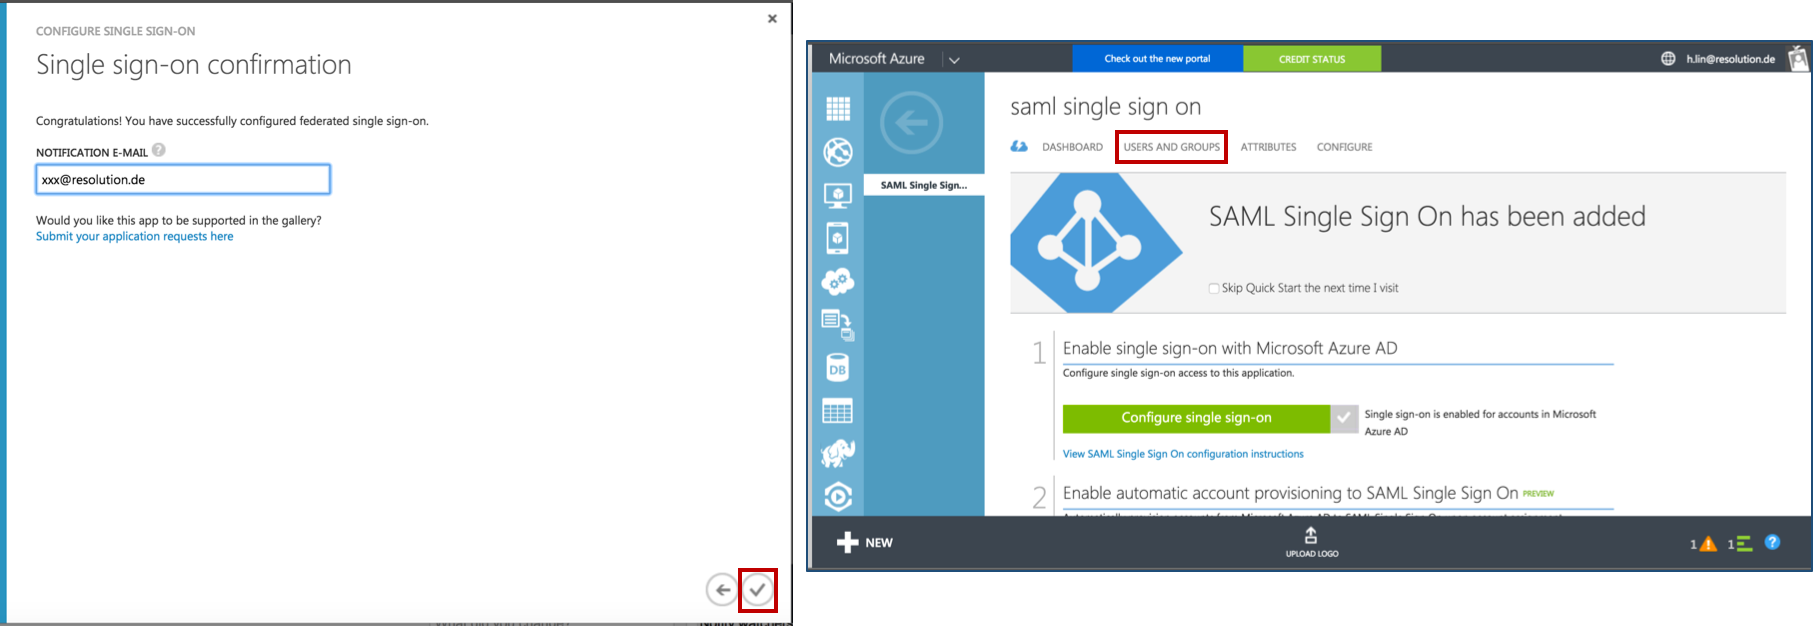
- Fill in a NOTIFICATION E-MAIL for which you want to get notifications for this application.
- Click Finish to complete the application configuration. Then you come back to the overview page of SAML Single Sign On and continue with Substep D to grant user access.
Substep D: Grant access to users
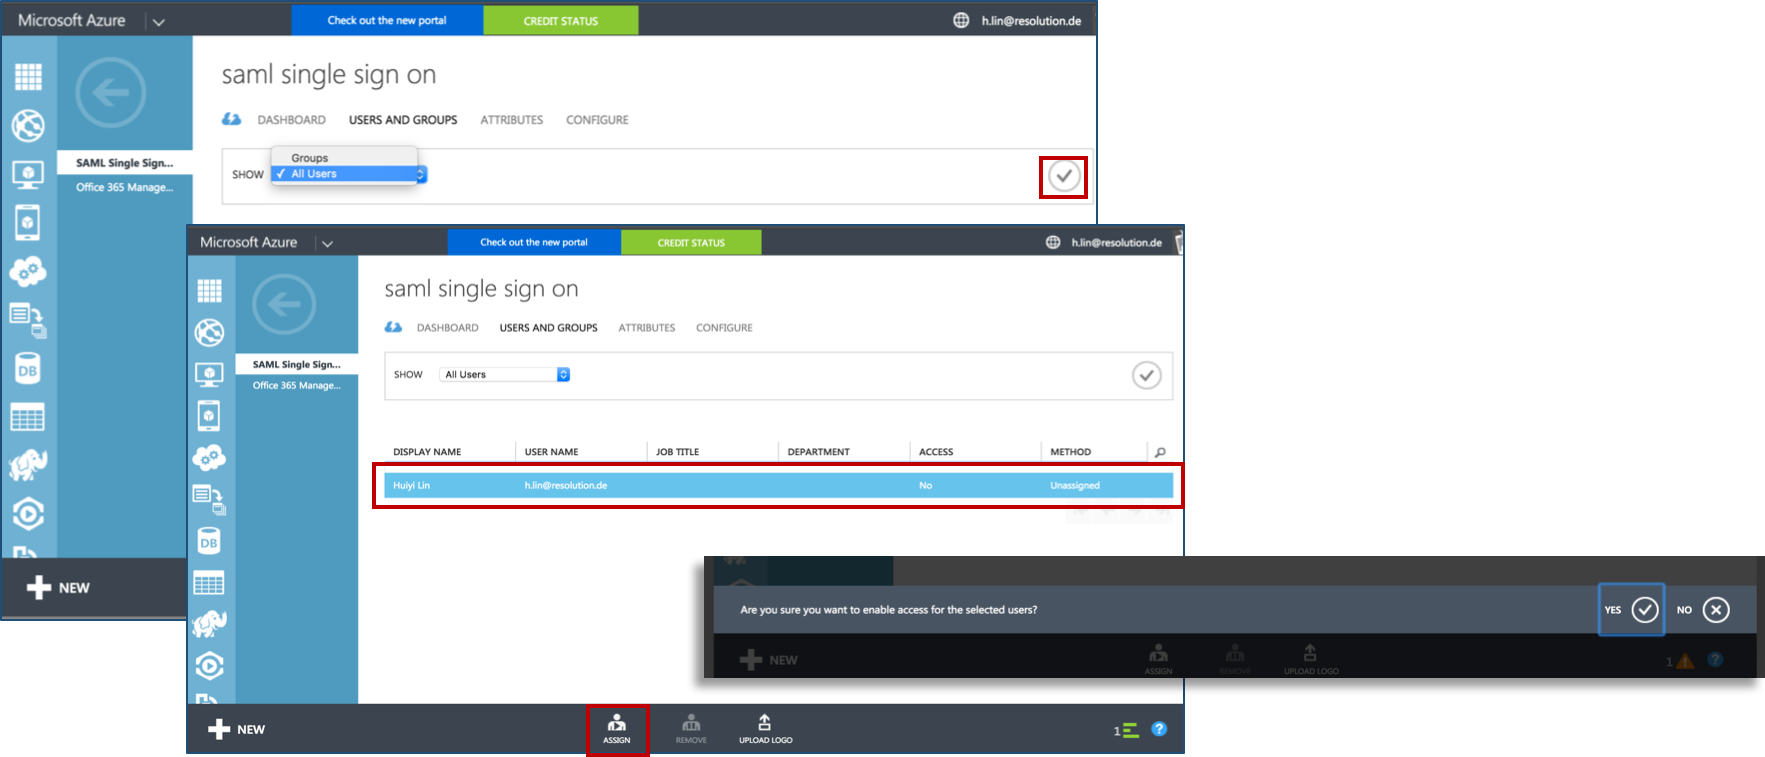
- Click on USERS AND GROUPS and select All Users in the SHOW drop down field. Then click on the tick on the right side to show all users.
- Select the user which you want to grant access for this application, and click on ASSIGN at the bottom.
- Then, click on YES at the bottom of the black pop-up window to confirm to enable access for selected users.
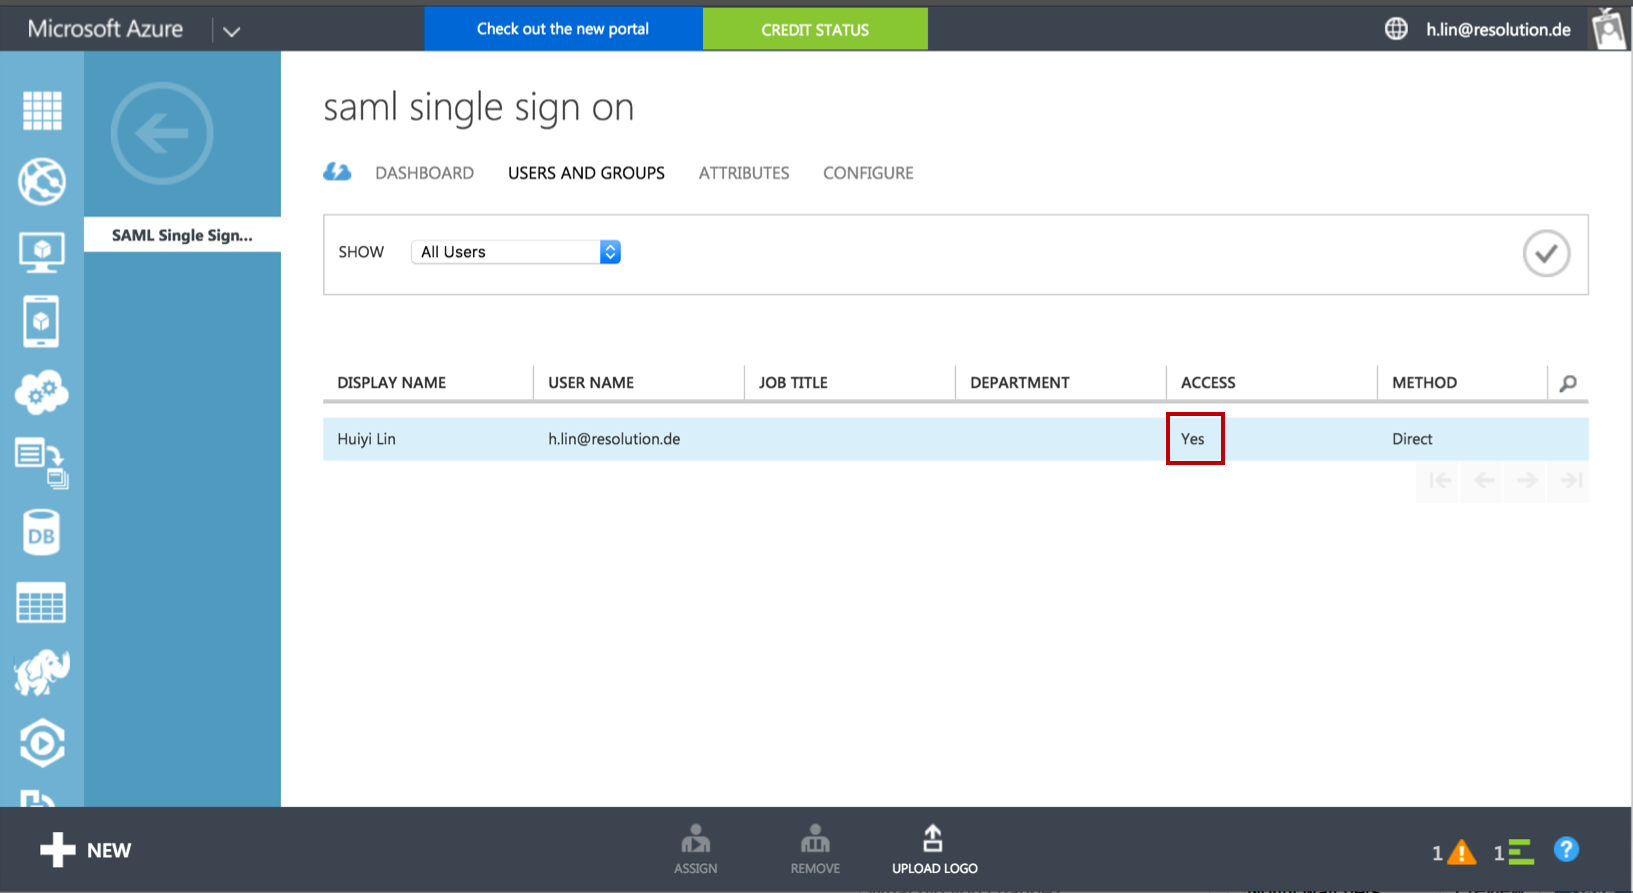
- Finally, review “Access” status to see if the user has been successfully granted access to application now.
Step 3: Configure the Plugin
- To continue Step 3, please go back to the plugin configuration page opened in Step1.
Substep A: Load Azure AD Metadata
The recommended way to setup the Azure AD on the SAML Single Sign On is to import the Azure AD Metadata.
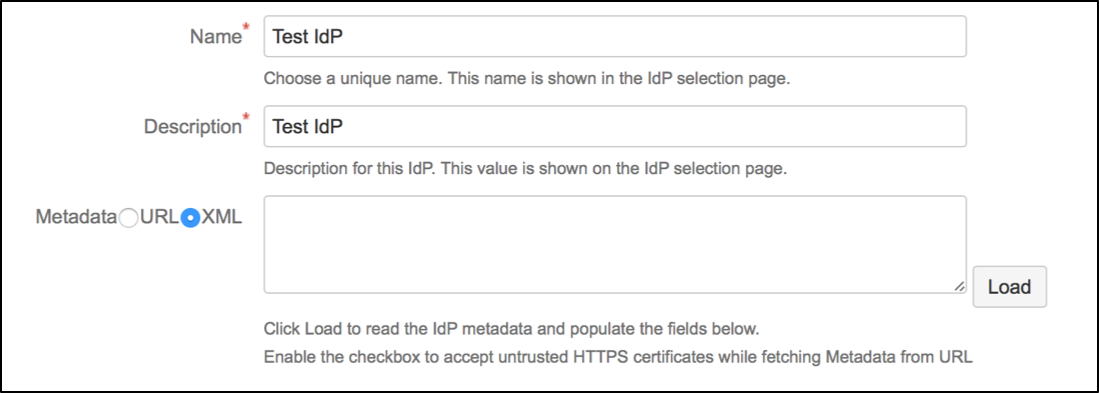
- Select load from XML and paste in the content from the FederationMetadata.xml (downloaded in Step2 Substep C) into the field below.
- Click on Load to load the Azure AD configurations into the plugin.
Substep B: Configure general Confluence groups in Advanced IdP Settings
If a user logs in using SAML, he will be added to the groups specified in the User Groups section. This applies to all users. The user is assigned to these groups in addition to the groups in the SAML-response's attribute. The standard group in Confluence is called "confluence-users".
- Click on Show Advanced IdP Settings, find User Groups in the drop down menu.

- Click Save settings to store the configuration

Step 4: Test
In a separate browser, open the URL https://<your-confluence>/plugins/servlet/samlsso.
You should be authenticated by your Azure AD and redirected to the Confluence Dashboard.
Step 5: Enable login redirection
After testing, you can enable the login page redirection to finally activate the plugin. After checking the Enable SSO Redirect checkbox and clicking Save settings, requests to the Confluence login page should be redirected to the Azure AD.

If Enable SSO Redirect is enabled, you can login to Confluence manually by browsing https://<your-confluence>/login.action?nosso. Use this URL if you need to login a local user unknown to the Azure AD or if there are any issues with Single Sign On.
You might also find following documentation helpful:
