
Working With OpenPGP Encrypted Tokens
Introduction
When other people create tokens for you they might ask you for your public OpenPGP key.
This will allow them to encrypt the plaintext token so that it can be transmitted to you more securely. You'll then receive a PGP message like the below which you can decrypt using your private key.
- -----BEGIN PGP MESSAGE-----
- hQIMA7scARKwit0KAQ//SMVdyeGCZqqf+U00sx++SWxtFiuRmfMyJkmunazwNpm
- jpPCjXruh88hLZ09p2Gc+h0hyhFCE+JJY7gx+CCWxMZ1KZlU8oY/Ef8Bvh1raeJ
- dOlqByYjmUo8WvaxXQ4/dCtNIKk0VkQgp+LNxAc3b0YZFSTkS6qQtMkmIKM6qBZ
- m+NVtmcWMdU3vG3ZH4Vo/qQ/PsFqTGDQKiZuHPEjW5LP6hzz0zprfv5NRDjxs6w
- uNRvIdFo98iWkrBsgNVWyYFlHTh5BzZFM4vhichZU4KZ9XsNTruWslr/Bss3FTQ
- LCu6y/t3KUh275ZT9D5fGy4BgCQkLpdwcs8h0SzX2KGZAxBg/LqsgWSarmW2TIz
- dRSnftAu0eyZnuS6yJBgZBMbzJtVq/oNULqfWpJOL9OKiiPFtAkqXrU9YRZlmNQ
- m6naxLMEZtfm86WcFTpHd5fy/GQj1DQF50YnkGQdPKd5LHN9BMOwxLT9vh2baYw
- XR51o5dzn9AVCOKDegHl0D6jes0E8gGw8jjJuiqDAZHqRNFplwOXjo69ULxtvj3
- 2C0LIiB8GoTSeorlrL2Tgu6SHkTm6sxnWRGhkIGJRX1xQPro8U5+7T8ATxdXta5
- 8/QzGD+Awped6hT7iJgXRQLrjJfp5BKNVCeClxsRPYwipzXryZ0PYPkkQpmJOUw
- 0bu2WgCtT3SXwH91se6VP+nW8v82e3HR2Hxrx8x9lS8RRljbbkH4RhgqBdSdmRu
- cyconMIx6Qq0HM3/9bSyabVYHVifGr1DLazUKi0F2wNjISXhe5yS5BzHX7qssZ0
- gI730yHYleFmm
- -----END PGP MESSAGE-----
OpenPGP Prerequisites
Download And Installation
There is a cross-platform frontend for OpenPGP which is recommended on the OpenPGP website.
It's called GPG Frontend and you can download it here: https://www.gpgfrontend.pub/#/.
It only runs on 64Bit operating systems and also requires GnuPGP to be installed on the system, otherwise, there will be an error message when you start GPG Frontend.
We found that on macOS the error message only went away when using the GnuPG for OS X Installer for GnuPG provided via https://gnupg.org/download/index.html.
Installing GnuPGP is different for each operating system, you can find more help for other OS and also the installation of the frontend itself here: https://www.gpgfrontend.pub/#/quick-start?id=install-amp-run.
Creating A Public Key Using GpgFrontend
macOS
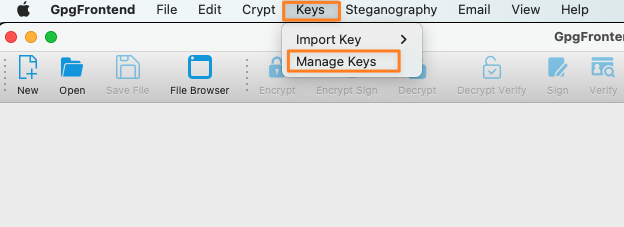
Start the app and open the Keys/ Manage Keys settings:
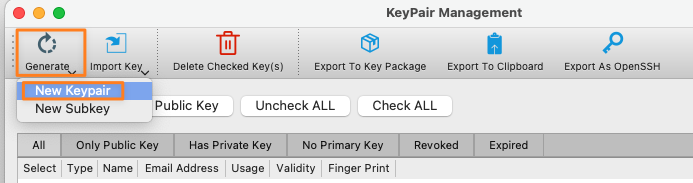
Click on Generate and New Keypair
Provide a Name and Email Address, click OK and protect the key pair with a password when prompted.
Make sure the Key usage supports Encryption.
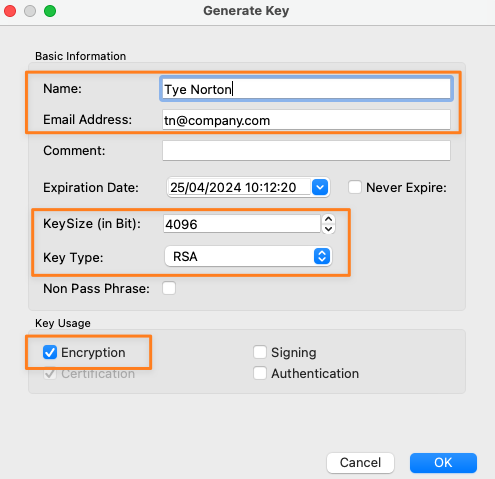
When creating key pairs with the GUI, there seems to be no way to create the key type ED25519 for encryption key usage.
Thus, we create a 4096 bit RSA key for this example. The GnuPG command-line tool normally creates the aforementioned key type with proper usage by default. Please read here how.
You'll then see the new key pair in your Key Toolbox

To provide the public key to the person that creates the token for you, you can either go back to Manage Keys and export it to the clipboard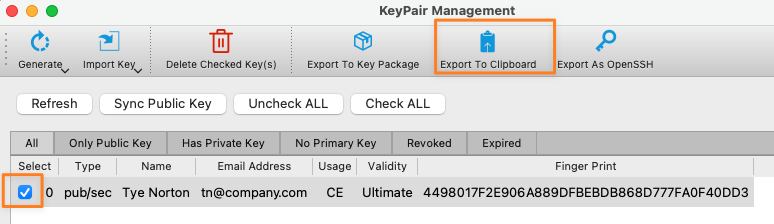
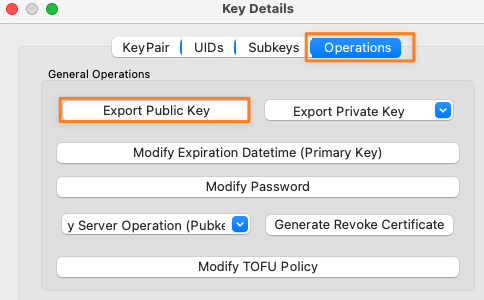
or you right-click on the pair in the Key ToolBox to show the key details
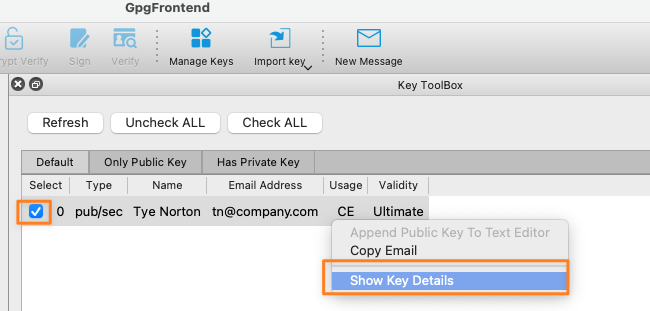
and export it to a file from there
Windows
The Windows version is nearly identical to the MacOS one. Please refer to the above instructions.
Decrypting the PGP Message Using GpgFrontend
Once you got back the encrypted token as a PGP message you can decrypt it with the same tool.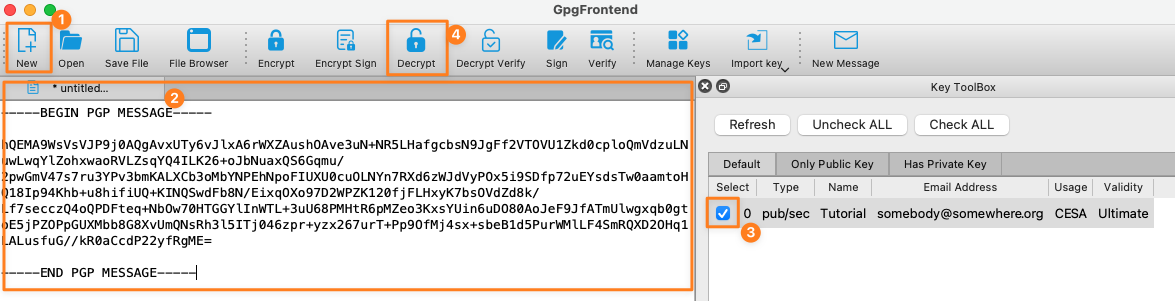
After entering the passphrase for your key pair/ private key the PGP message gets replaced with the token:

Creating A Public Key Using Commandline
The procedure is the same across all platforms and requires GnuGPG to be installed, as mentioned earlier.
On macOS and Linux you can use the gpg command from your terminal, on Windows from the command shell (cmd).
Create Key Pair
Create the pair with the below command and select the key type. The default selection should be the best choice in most cases.
The below example is from macOS with GnuPG 2.3.4 installed. I chose (9)
- gpg --full-generate-key
- Please select what kind of key you want:
- (1) RSA and RSA
- (2) DSA and Elgamal
- (3) DSA (sign only)
- (4) RSA (sign only)
- (9) ECC (sign and encrypt) *default*
- (10) ECC (sign only)
- (14) Existing key from card
Select the elliptic curve, the default is the best choice again.
- Please select which elliptic curve you want:
- (1) Curve 25519 *default*
- (4) NIST P-384
- (6) Brainpool P-256
Specify how long the key should be valid, i.e. 1y for one year and confirm
- 0 = key does not expire
- <n> = key expires in n days
- <n>w = key expires in n weeks
- <n>m = key expires in n months
- <n>y = key expires in n years
Provide a real name, passwords and optional comment and confirm.
- GnuPG needs to construct a user ID to identify your key.
- Real name: Tye Norton
- Email address: tn@company.com
- Comment: API Token Encryption
You'll be prompted to enter and confirm a passphrase for the private key portion afterwards.
This is the output after completing these steps:
- gpg: revocation certificate stored as '/Users/tyenorton/.gnupg/openpgp-revocs.d/C3E964E9329B807F9D495CB2392B0C457338C4AE.rev'
- public and secret key created and signed.
- pub ed25519 2022-04-20 [SC] [expires: 2023-04-20]
- C3E964E9329B807F9D495CB2392B0C457338C4AE
- uid Tye Norton (API Token Encryption) <tn@company.com>
- sub cv25519 2022-04-20 [E] [expires: 2023-04-20]
Export The Public Key
The person who encrypts the token for you requires the public key. Here is how to export that key using the command line.
Exporting The Only Public Key
If you only created one key pair, you can export the public key like this:
- gpg --armor --output myGpgPublicKey.pub --export
Exporting One From Many Public Keys
If you have other key pairs already and created a new one as described above, you can export that key by adding the public key identifier at the end:
- gpg --armor --output myGpgPublicKey.pub --export C3E964E9329B807F9D495CB2392B0C457338C4AE
If you don't know which public key is which, run the following to get a list. The identifier is displayed in the second line of the pub key
- gpg --list-keys
- gpg: checking the trustdb
- gpg: marginals needed: 3 completes needed: 1 trust model: pgp
- gpg: depth: 0 valid: 2 signed: 0 trust: 0-, 0q, 0n, 0m, 0f, 2u
- gpg: next trustdb check due at 2023-04-20
- /Users/tyenorton/.gnupg/pubring.kbx
- ------------------------------
- pub ed25519 2022-04-20 [SC] [expires: 2023-04-20]
- C3E964E9329B807F9D495CB2392B0C457338C4AE
- uid [ultimate] Tye Norton (API Token Encryption) <tn@company.com>
- sub cv25519 2022-04-20 [E] [expires: 2023-04-20]
- pub ed25519 2022-04-20 [SC]
- BB88BDC1F99DAA8C3936C1D12067B8FC7CB362B3
- uid [ultimate] Tye Norton (Other Purposes) <tn@company.com>
- sub cv25519 2022-04-20 [E]
Decrypting the PGP Message Using the Commandline
There are various ways, but not all of them will work on every type of command line.
What should always work is to paste the encrypted token/ PGP message to a text file first and decrypt the file.
You'll get prompted for the private key passphrase and eventually see the token on that last line:
- gpg -d token.txt
- gpg: encrypted with cv25519 key, ID F6B55BC01E713AD8, created 2022-04-20
- "Tye Norton (API Token Encryption) <tn@company.com>"
- gpg: Note: sender requested "for-your-eyes-only"
- CVPgoOkvV6pL4kbhaNEMYee3OHl7YBcbsK34Ed
Other methods require the PGP message to be copied to the clipboard first. Please read the additional comment for each method below:
- # macOS
- pbpaste | gpg -d
- # Linux 1
- echo '-----BEGIN PGP MESSAGE-----
- hF4D9rVbwB5xOtgSAQdAyMFGkdS3oUfGNMHGaZB6r85/XRSsfeUyOSGXEZdzcEAw/JuBcLUhMJoSWaH/lp0i28x5Cgqs6XNAej/890yIm39/12Mz7VCCRlMExmYtaM0I0mABLAJOen5sLvZTfUkQlxlvvYBdfZBjwoTX2X6x/lHhhjPo36NoSmibS/4/tbJrsihHr85NidtMM+ltBC6qhWdtouPWvor4ZlnY2Da6or+lomqkRpjDyKXQeiaZVfAvQ94=
- -----END PGP MESSAGE-----' | gpg -d
- # Linux 2
- echo '-----BEGIN PGP MESSAGE-----
- hF4D9rVbwB5xOtgSAQdAyMFGkdS3oUfGNMHGaZB6r85/XRSsfeUyOSGXEZdzcEAw/JuBcLUhMJoSWaH/lp0i28x5Cgqs6XNAej/890yIm39/12Mz7VCCRlMExmYtaM0I0mABLAJOen5sLvZTfUkQlxlvvYBdfZBjwoTX2X6x/lHhhjPo36NoSmibS/4/tbJrsihHr85NidtMM+ltBC6qhWdtouPWvor4ZlnY2Da6or+lomqkRpjDyKXQeiaZVfAvQ94=
- -----END PGP MESSAGE-----' > token.txt; gpg -d token.txt
On Windows, the easiest way to do this is using Power Shell because it has built-in functionality to read from the clipboard.
- Get-Clipboard | gpg -d
If you can't use Power Shell, paste the PGP message to a text file first and decrypt it afterwards
- gpg -d token.txt