Admin Guide
App Configuration
Administrators can adjust the app settings in the corresponding management section.
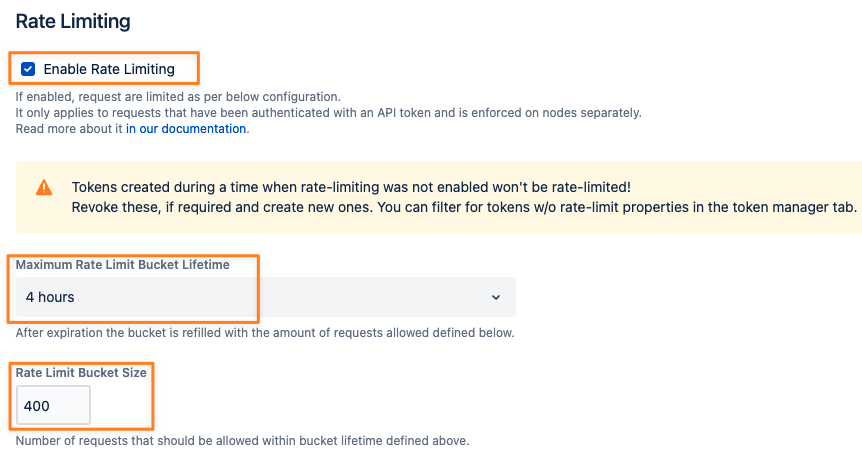
Example: enabled rate limiting
Please refer to this KB article, if you want to change the configuration by using our app's REST API.
Since version 2, every configuration change will cause an audit log record containing details of the changes to be created.
Jira
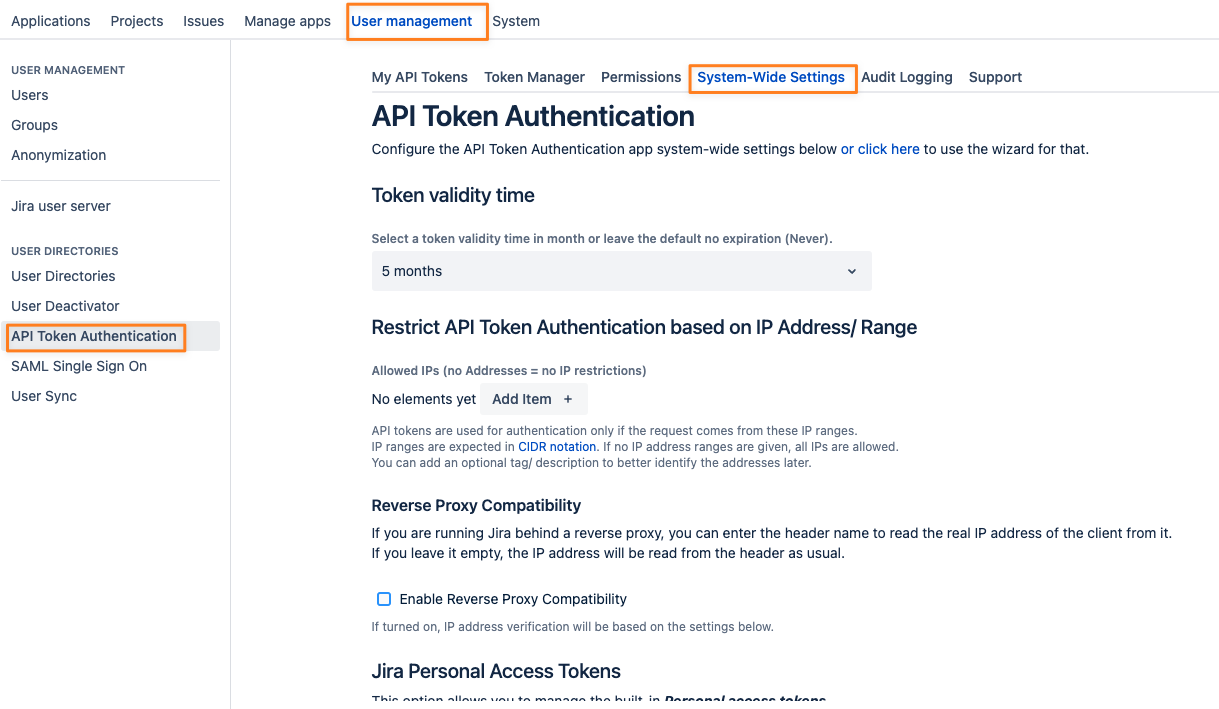
In Jira, navigate to the User management section and select API Token Authentication
The System-Wide Settings and the Permission tabs provide all settings and options to configure the app for all audiences.
Confluence
In Confluence, scroll down to the Users & Security section in the administration configuration panel and select API Token Authentication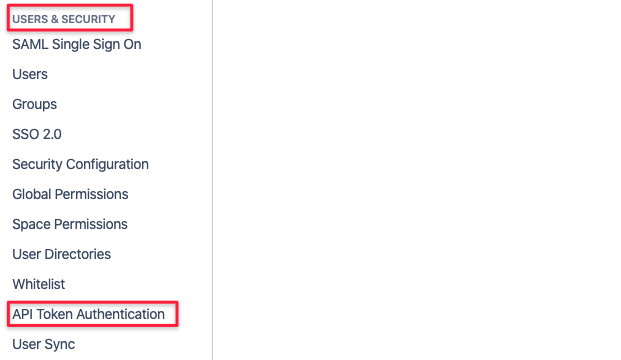
Bitbucket
Open the admin settings via the top right corner icon and click on one of the API Token Authentication links

Permissions, Token Scopes and PGP Encryption
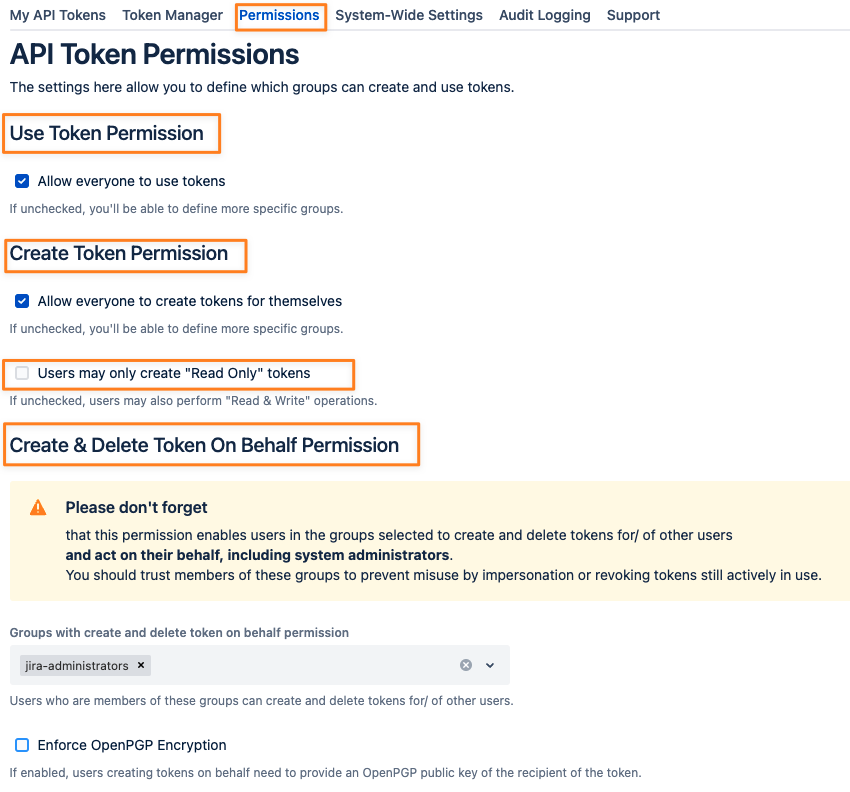
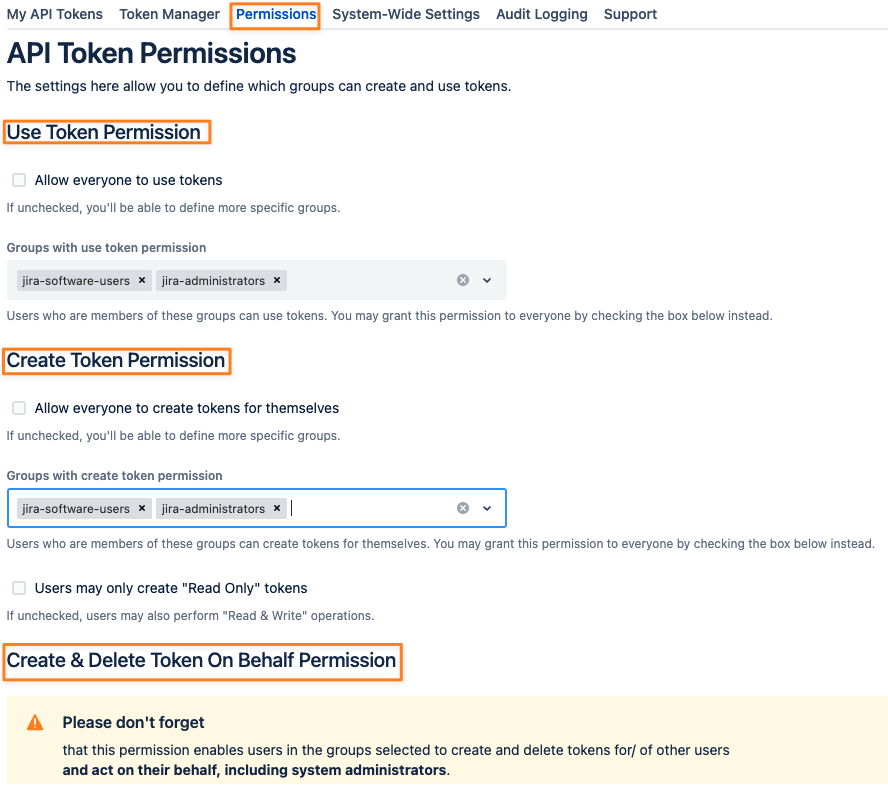
Administrators have control over the following permissions and can assign one or multiple groups to each:
Use Tokens
Create Tokens for yourself
Create & Delete Tokens for other users
These settings can be found in the permission tab:
Permissions
You can either assign permissions to everybody or groups of users. The Create & Delete Token On Behalf permission can only be assigned to individual groups.

Token Scopes
Users with the "Create & Delete Token On Behalf Permission" can assign scopes to the tokens they create for other users.
For regular users with the "Create Token Permission", administrators can limit these tokens to always be Read-Only tokens by checking the corresponding box in the "Create Token Permission" section: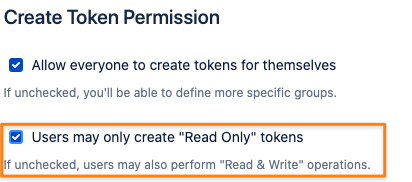
Read Only
Only the GET, HEAD and OPTIONS HTTP request types are allowed, using a token on endpoints requiring any other type will result in a 403 Forbidden error.
There are two exceptions/ endpoints not affected by that:
the Jira Session endpoint to which you can POST your username and token to retrieve a session cookie
the API Token Authentication endpoint to which a user can POST details to create a token if permitted to
Read & Write
All HTTP request types are allowed to be used.
Every type other than GET, HEAD and OPTIONS suggests that it is a write operation somehow, manipulating existing data in some way.
If your configuration wasn't migrated from an earlier version, in which you might have restricted creating- and using tokens to administrators only,
the default settings allow all users to create- and use their own tokens and administrators to do that for other users.
OpenPGP Encryption
Since version 2 you can also enforce OpenPGP encryption of tokens created on behalf:
Please read here how users who are creating tokens for others see that.
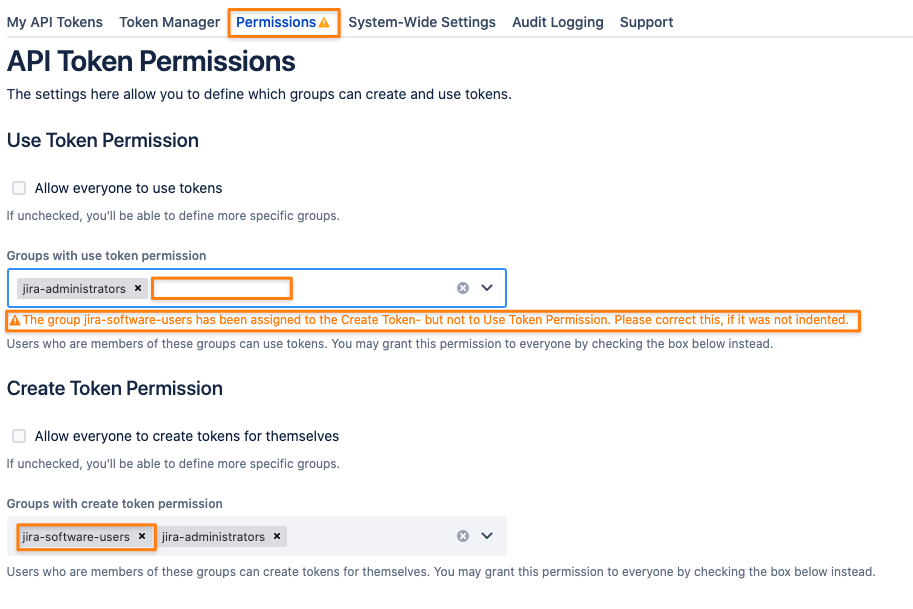
Warnings about Permission Settings
Depending on your changes, you might see some warnings and recommendations. These are of informational character only and won't prevent you from saving the settings.
How Users See Permission Restrictions
If you remove permission for a user's group again, the API Token Authentication link will be removed from the users' top-right user profile picker
(see (2.4.x) User Guide) and if they would browse the page manually, users will see an info box instead:

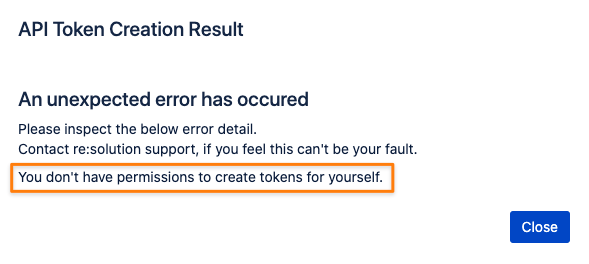
Trying to create a token from a page still open would result in a 403 Forbidden:
System-Wide Settings
The app contains a few System-Wide Settings settings, available for administrators only.
Settings here apply to all users accessing the REST API with Basic Authentication and any of the tokens they've created for their user in Jira or Confluence.
Please find more details about the options currently available below.
Token Validity Time
An administrator can define a maximum validity time of a token if required.
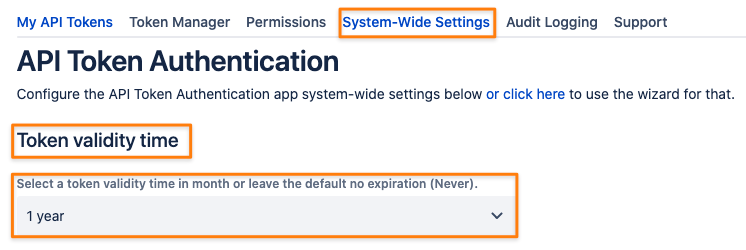
Options are:
Never
1 to 6 months
1 year
2 years
Users may override this according to the boundaries defined by you, the system administrator.
Examples:
System-Wide Setting is 6 months - users can select 6 months only, nothing else
System-Wide Setting is 1 year - users can select 1 year or 6 months, nothing else
System-Wide Setting is 2 years - users can select 2 years, 1 year or 6 months, nothing else
System-Wide Setting is Never - users can select any validity time from the select list
Since version 1.5.0 it is possible to pass a custom ISO 8601 date-time string to set a specific expiration date time within the boundaries allowed. Read more about it here
Maximum Active Tokens per User
Administrators can define the maximum number of active tokens a user can create. An active token is one that has not expired yet.
A value of zero is equal to an unlimited number of tokens a user may create.
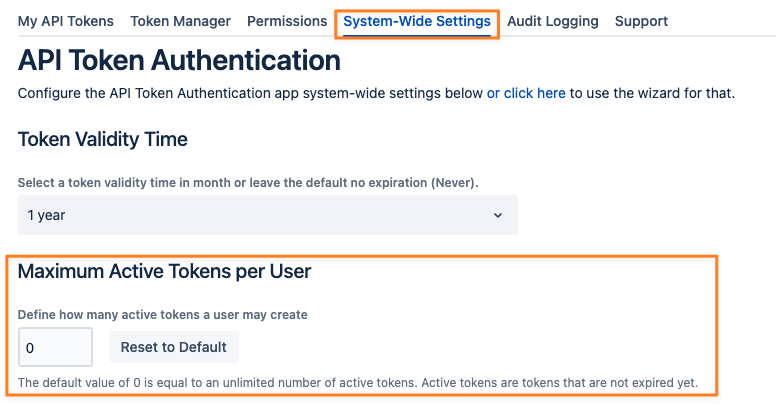
Exceeding the value and trying to create another token results in an error message:
IP Address Restrictions
Admins may restrict REST API requests by IP addresses or ranges.
Here is what happens, if the request comes from an IP address not allowed:
Authentication with API Token and Basic Authentication with User Password enabled (see chapter further below)
Error 401 (the request needs to be passed to the Atlassian Authenticator because it could potentially be a password and since the token won't be one, a 401 is returned by the Atlassian Authenticator)
Authentication with API Token and Basic Authentication with User Password disabled (see chapter further below)
Error 401 with a message about more details in the log file, to not leak any sensitive data

Just enter one or more addresses or address ranges with the + button or delete existing ones and save your settings.
Since version 2 you can also add tags to each of these. These might later help you to better identify restrictions.

 Requests from every IP address will be allowed if no addresses are provided.
IP Restrictions & Reverse Proxy
The above example will only work if you are not running Jira or Confluence behind a reverse proxy, as the client IP address is contained in a different header.
You can enable reverse proxy support by checking the corresponding box and adding one or more trusted reverse proxy IP addresses or ranges:


You might also need to adjust the header name to read the client IP from, usually X-Forwarded-For or X-Real-IP:
If you need to find out why you can't access the REST API after applying IP restrictions, please read our troubleshooting guide: Troubleshooting IP range restriction issues
Disable Personal Access Tokens
This feature is only visible in Jira starting with version 8.14 and in Confluence starting with version 7.9 since these versions come with the Personal Access Token app. It is always visible in Bitbucket.
If you are running our app, you should disable it. For obvious reasons, it doesn't make sense to run both in parallel, mainly because the app from Atlassian does not offer any token scope or other permission-based settings.
Users could then create tokens with the Atlassian app and perform write operations, which they were not allowed to do as per our app's config.
You can do that with the button in the Jira/ Confluence/ Bitbucket Personal Access Tokens section

You can do this in the app management section (https://your-jira-bitbucket-or-confluence-url/plugins/servlet/upm/manage/system) as well.
If you've uninstalled our app and want to re-enable it, you can only do that from there, unless you didn't enable it already before uninstalling ours.

Disable Authentication with Session Cookies
Enabling this option will render any session invalid after using it for one request. While this can be considered more secure, it comes with the downside of not being able to use sessions for subsequent requests, such as using it to download attachments as described here.
You also won't be able to use sessions retrieved during authentication on the Jira session endpoint anymore. With that option, we provide the same as Atlassian is doing already in the Cloud.

Disable Basic Auth with Passwords
You may also want to disable password authentication for REST endpoints completely. Should the token provided not match any user's tokens, a 401 status code will be returned. With Basic Auth and user passwords enabled Jira, Confluence or Bitbucket will try to authenticate the user with a password.
You can also prevent path traversal in REST URLs, to avoid users getting a session with a password and Basic Auth on a non-REST URL. This option is only available if Basic Authentication with User Password is checked.

Confluence Only - Allow Basic Authentication With Passwords on the Confluence Remote API (XML-RPC & SOAP)
The Confluence Remote API can't be used with API Tokens but is sometimes required since not every method has been implemented in REST. Confluence admins can make an exception so that even though Basic Authentication with passwords is disabled in general, it would still work on the Remote API.

Disable Bearer Authentication with other Authenticators

Enabling this option will only allow bearer authentication with tokens created with this app. With this option enabled, you also don't need to disable Atlassian's Personal Access Token app anymore to achieve the same. This was described here on this page earlier.
However, there could be other authenticator apps that we don't know of. If you are using audit logging in Jira and Confluence and expecting that only bearer authentication failures with tokens from this app are recorded, enabling this option is your only chance.
Rate Limiting
Our rate limiting only applies to requests that have been authenticated with API tokens. It works independently of the Atlassian built-in rate-limiting system and is intended to meet the needs of some more specific requirements and use cases.
Please be aware that rate limits are applied per node, not per cluster. So if users have used all their requests on one node, they could send requests again if they started a new session on a different node. Switching between cluster nodes isn’t something users can do, but it can still happen.
You might need to take that into consideration when selecting the bucket lifetime and amount of calls allowed.
We know that many customers route REST requests to a single data center node, a setup in which you'd always have an exact rate limit.
Global Rate Limit Settings
An administrator can enable rate-limiting in the system-wide settings tab.
The Maximum Rate Limit Bucket Lifetime defines how long requests with an API token are limited to the number of requests defined in the Rate Limit Bucket Size field below.
The values defined here are the global maximum. Trying to apply less strict rate-limiting properties to new tokens (i.e. via REST) will always default to the values defined here.
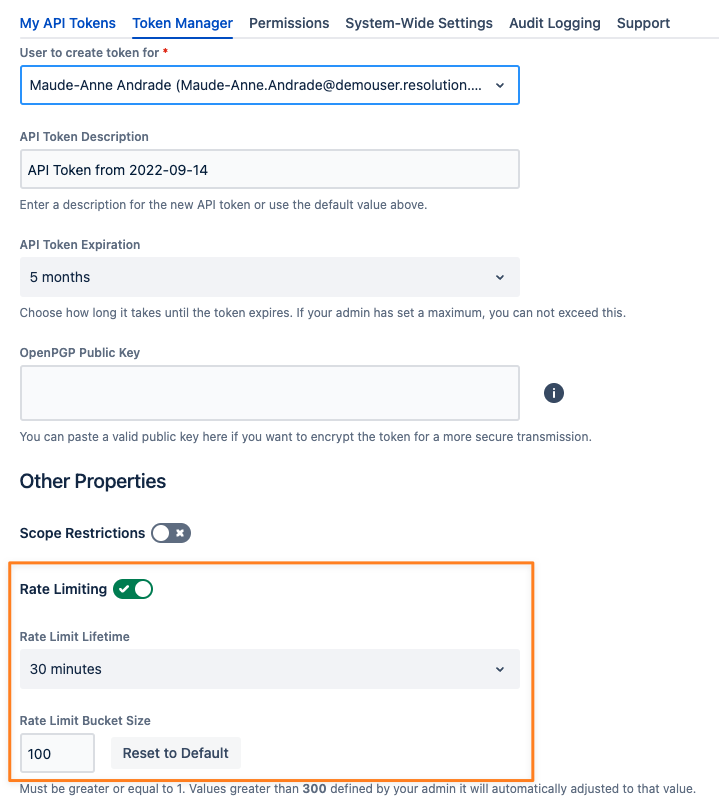
Creating Tokens For Other Users
Users with the Create Token On Behalf Permission can apply different rate limits to individual tokens as long as they don't exceed the values globally defined.
Example: While the global maximum is 300 requests within 1 hour you can create a token with 100 requests within 30 minutes:
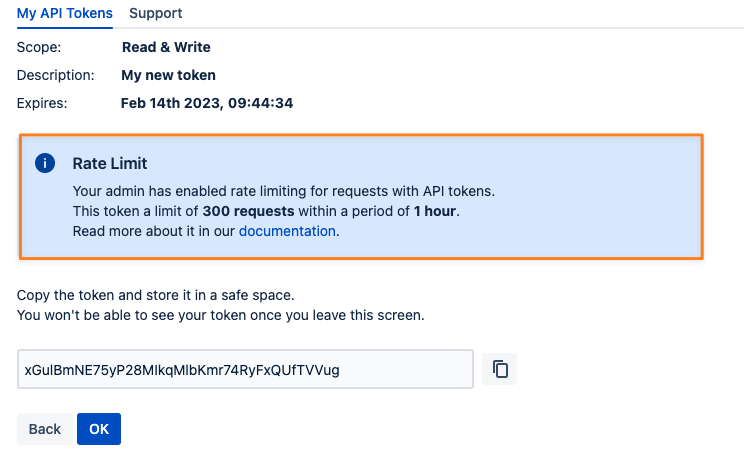
Rate Limit Default For Regular Users
Users without the Create Token On Behalf Permission can see an info box on the screen with the new token:
Retrieving Rate Limit Details
Below is an example of how users can access the current rate limit status when executing requests.
at some point, users make their first request with a token
from that moment on they are allowed to make 5 requests for the next 5 minutes
details are contained in the response headers:

if the user exceeds that amount they will receive error 429 (Too many requests) and some more information as JSON
- {
- "remainingMillisecondsUntilRateLimitReset": 283893,
- "requestBucketSize": 5,
- "currentRequestBucketSize": 0,
- "rateLimitMessage": "You've exceeded the rate limit for your token"
- }
the field remainingMillisecondsUntilRateLimitReset provides the amount of time in milliseconds until the request bucket is filled again and more requests can be executed
Logging
Please read here how rate-limited requests are being logged.
Cluster Node Configuration
Since version 2.2.0 system administrators can optionally select one or more nodes of a data center cluster that should be the only one(s) that allow authentication with our API tokens. All other nodes would ignore the request and delegate it to the default authentication handler.
Please keep in mind that node references might become invalid after restarts. The node might also just not be available anymore in certain situations. The configuration will show an error in these cases, indicated in the system-wide settings tab and the configuration section:

Don't forget to update the configuration accordingly then.
Pitfalls
When testing with passwords and API tokens, be aware that authentication failures can lead to too many failed logins recorded.
Read more about it in our knowledge base.
