
AD FS with Just In-time Provisioning
Goal
Configure SAML Single Sign-On for Atlassian Data Center and Server applications to work with AD FS where users are created and updated via just in-time provisioning.
The guide is applicable for app versions starting 3.1.0. If you need any further support, please feel free to contact us here.
Prerequisites
Confluence Server, Confluence Data Center, Jira Server, Jira Data Center, Bitbucket Server, Bitbucket Data Center, as well as Bamboo Server. Fisheye/ Crucible does not support just in-time provisioning
ADFS 2.0/2.1/3.0/2016
Your Atlassian Data Center or Server application must be accessible via HTTPS. (read more about it in the Atlassian documentation, i.e. for Jira or Confluence)
This is necessary because ADFS accepts only HTTPS-URLs for SAML endpoints.
Video Guide
The video below is the basic installation guide for setting up our SAML SSO app with ADFS, without the just in-time provisioning part. (watch on YouTube).
Step-by-Step Setup Guide
Install the SAML SSO app for Atlassian Data Center
In your Atlassian product, open the in-product marketplace as described in the Atlassian documentation.
Search for "resolution saml" and click "Install" for SAML Single Sign On (SSO) by resolution Reichert Network Solutions GmbH.
After the installation is complete, click on Manage, then choose Configure.
Now, you are on the Add-on / app configuration page and the first step of the setup wizard will appear.

Configure SAML SSO app for Atlassian Data Center
Add new Identity Provider (IdP)
Click on Add new IdP to start the wizard.
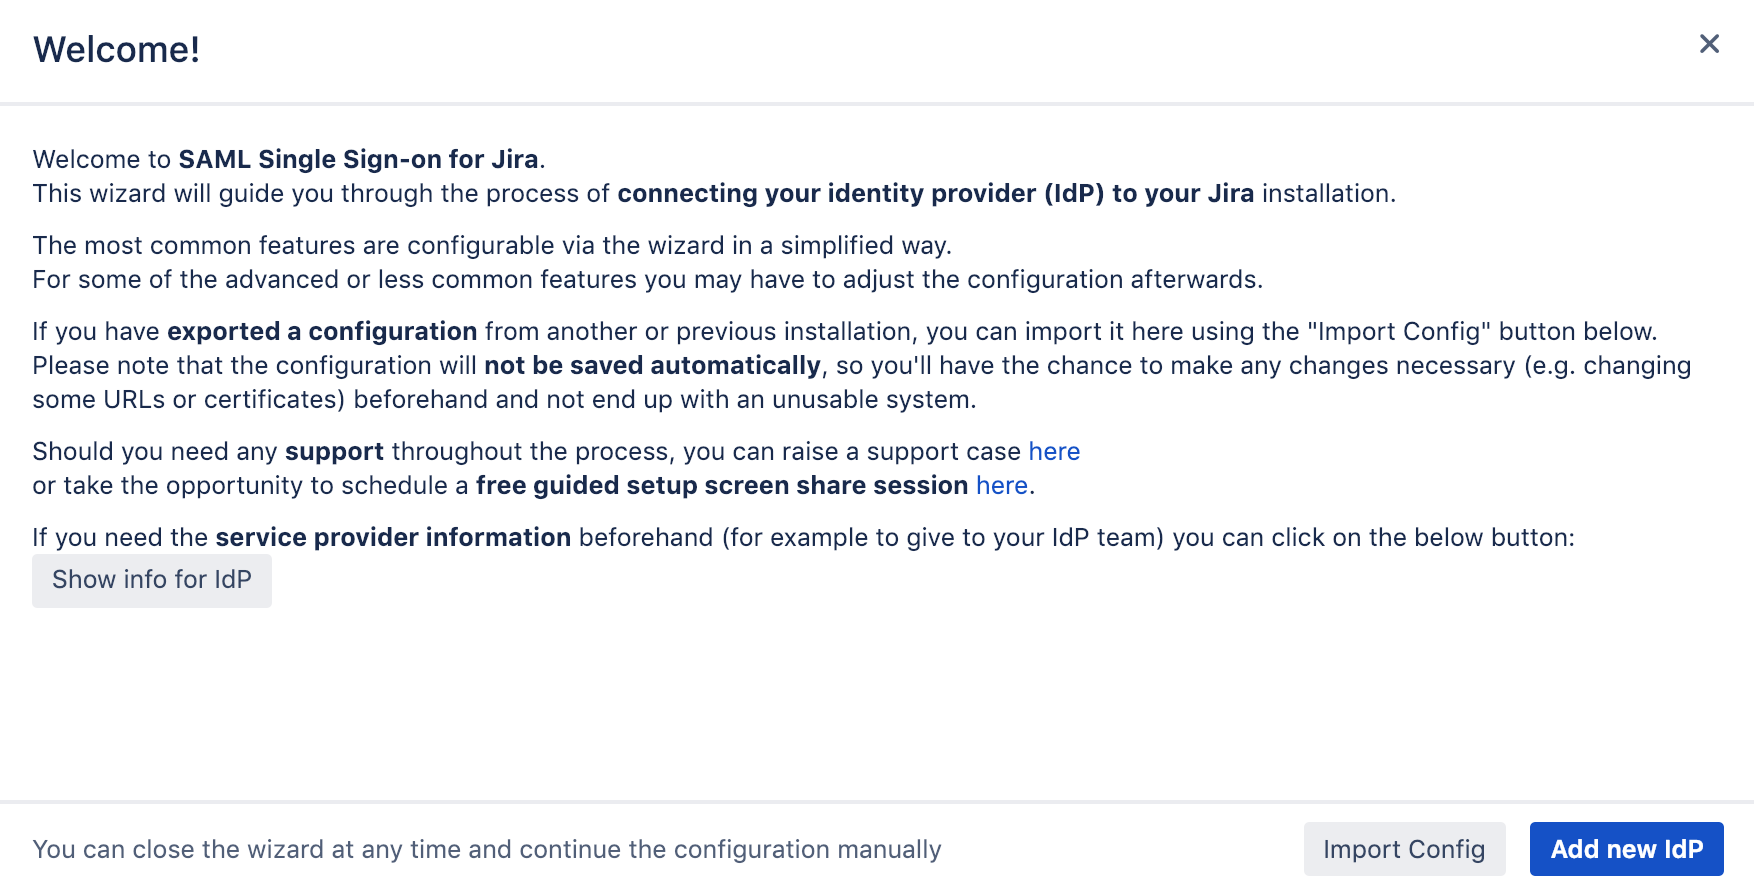
Adding a new IdP can also be done outside the wizard in the app configuration section Identity Providers

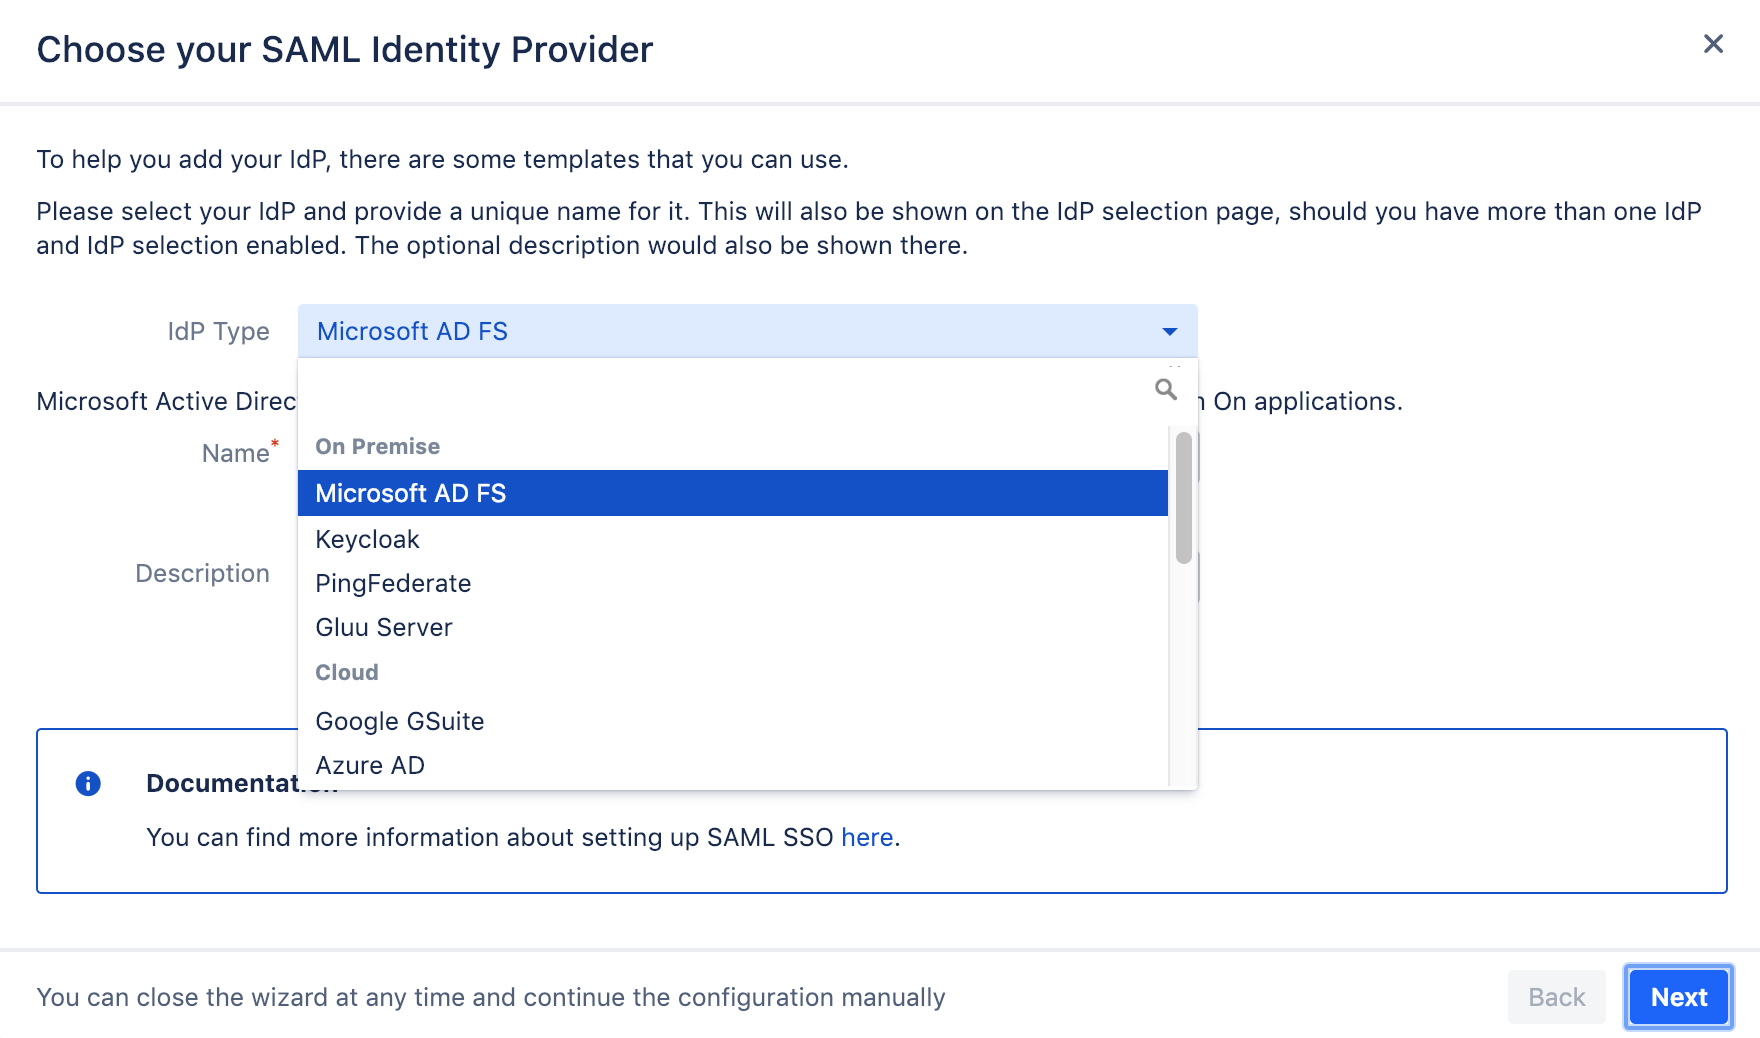
Select Microsoft AD FS as IdP Type.
You may also change the name and add a description. The name needs to be unique.
Click on Next.
Retrieve SAML Metadata for ADFS
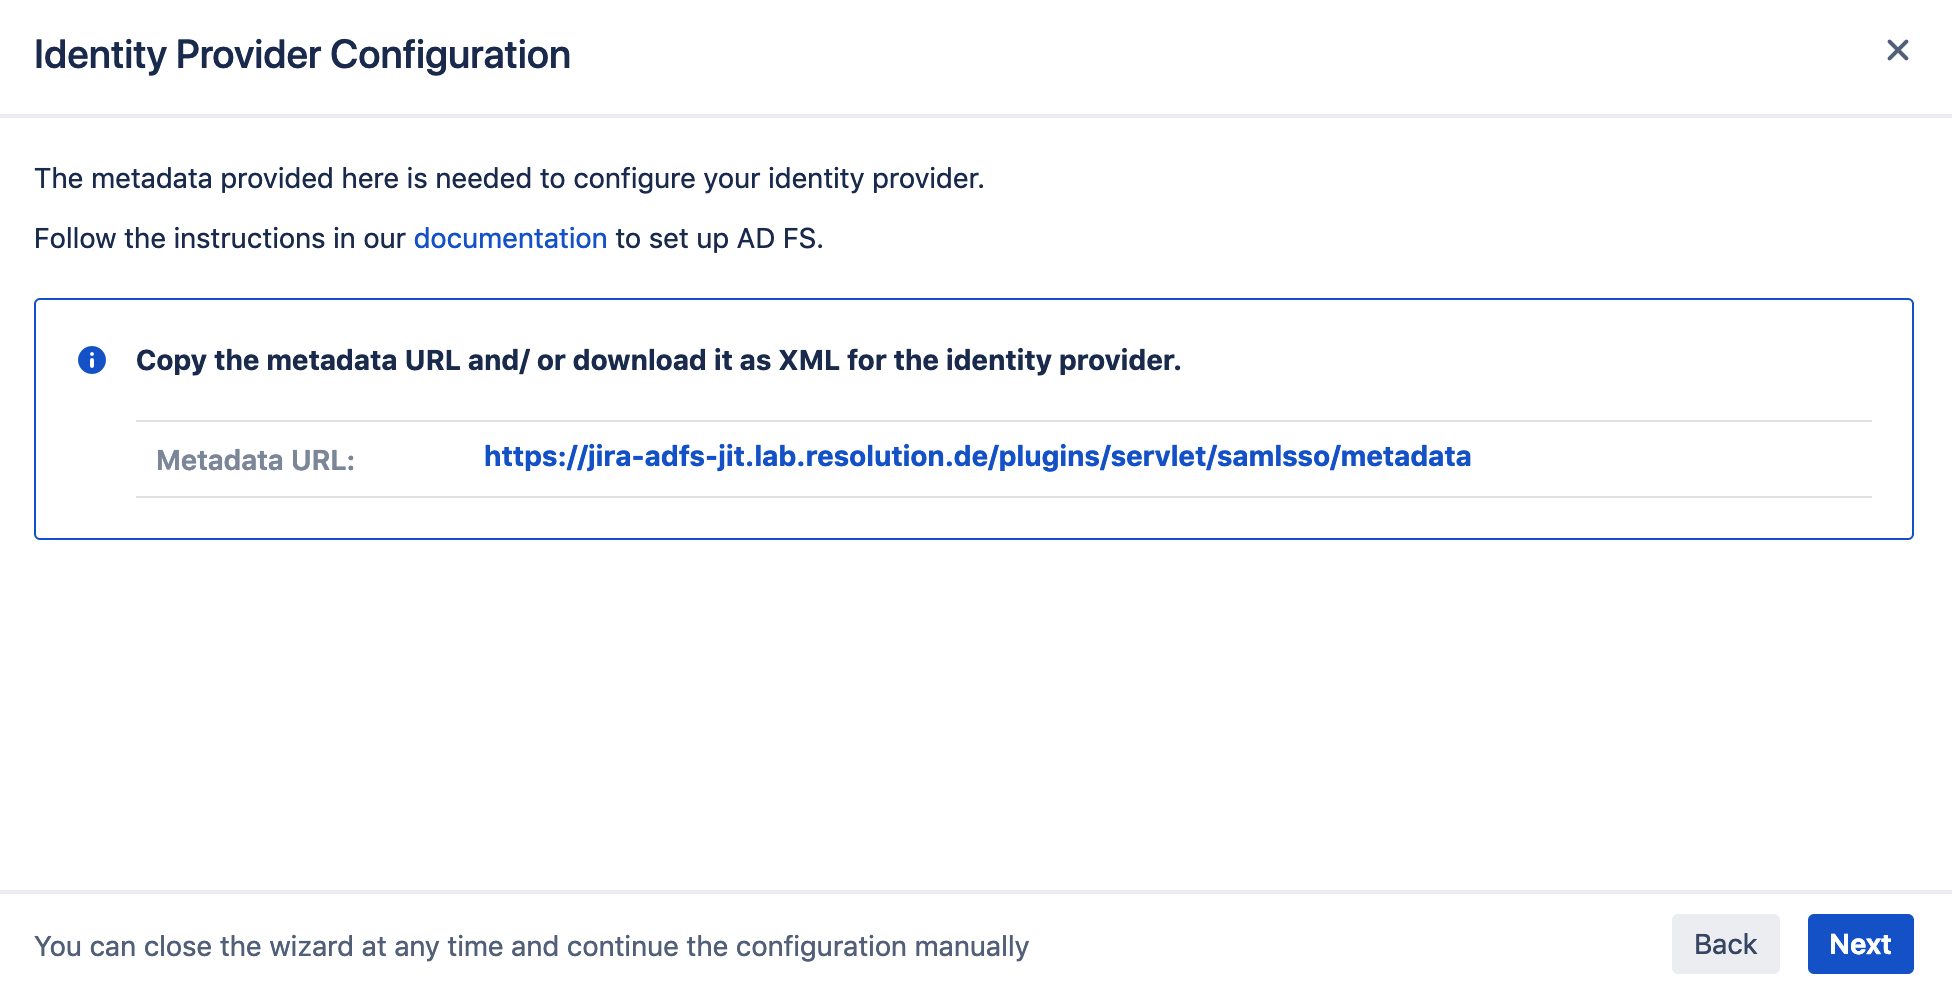
The next step enables you to retrieve the information ADFS needs to work with our SAML SSO app.
There are two ways to retrieve the metadata:
SAML Metadata via URL
If the server with ADFS has internet connection to your Atlassian instance, copy the SAML Metadata-URL shown on the screen.
If the server with ADFS has no internet connection, proceed with this chapter
SAML Metadata via XML file
Instead of copying the Metadata URL, right click on the link instead and select save the link as, which will provide a download/ file metadata.xml.
Click on Next already but you can now pause the SAML SSO setup for now and proceed with the next chapter configure the ADFS side:
Configure ADFS
Here are the steps that need to be done on ADFS: AD FS Configuration.
Please follow them now or forward them to your AD FS admin to work through.
Import SAML IdP Metadata
Now that the ADFS configuration is complete, you can go ahead and resume configuration on the SAML SSO side.
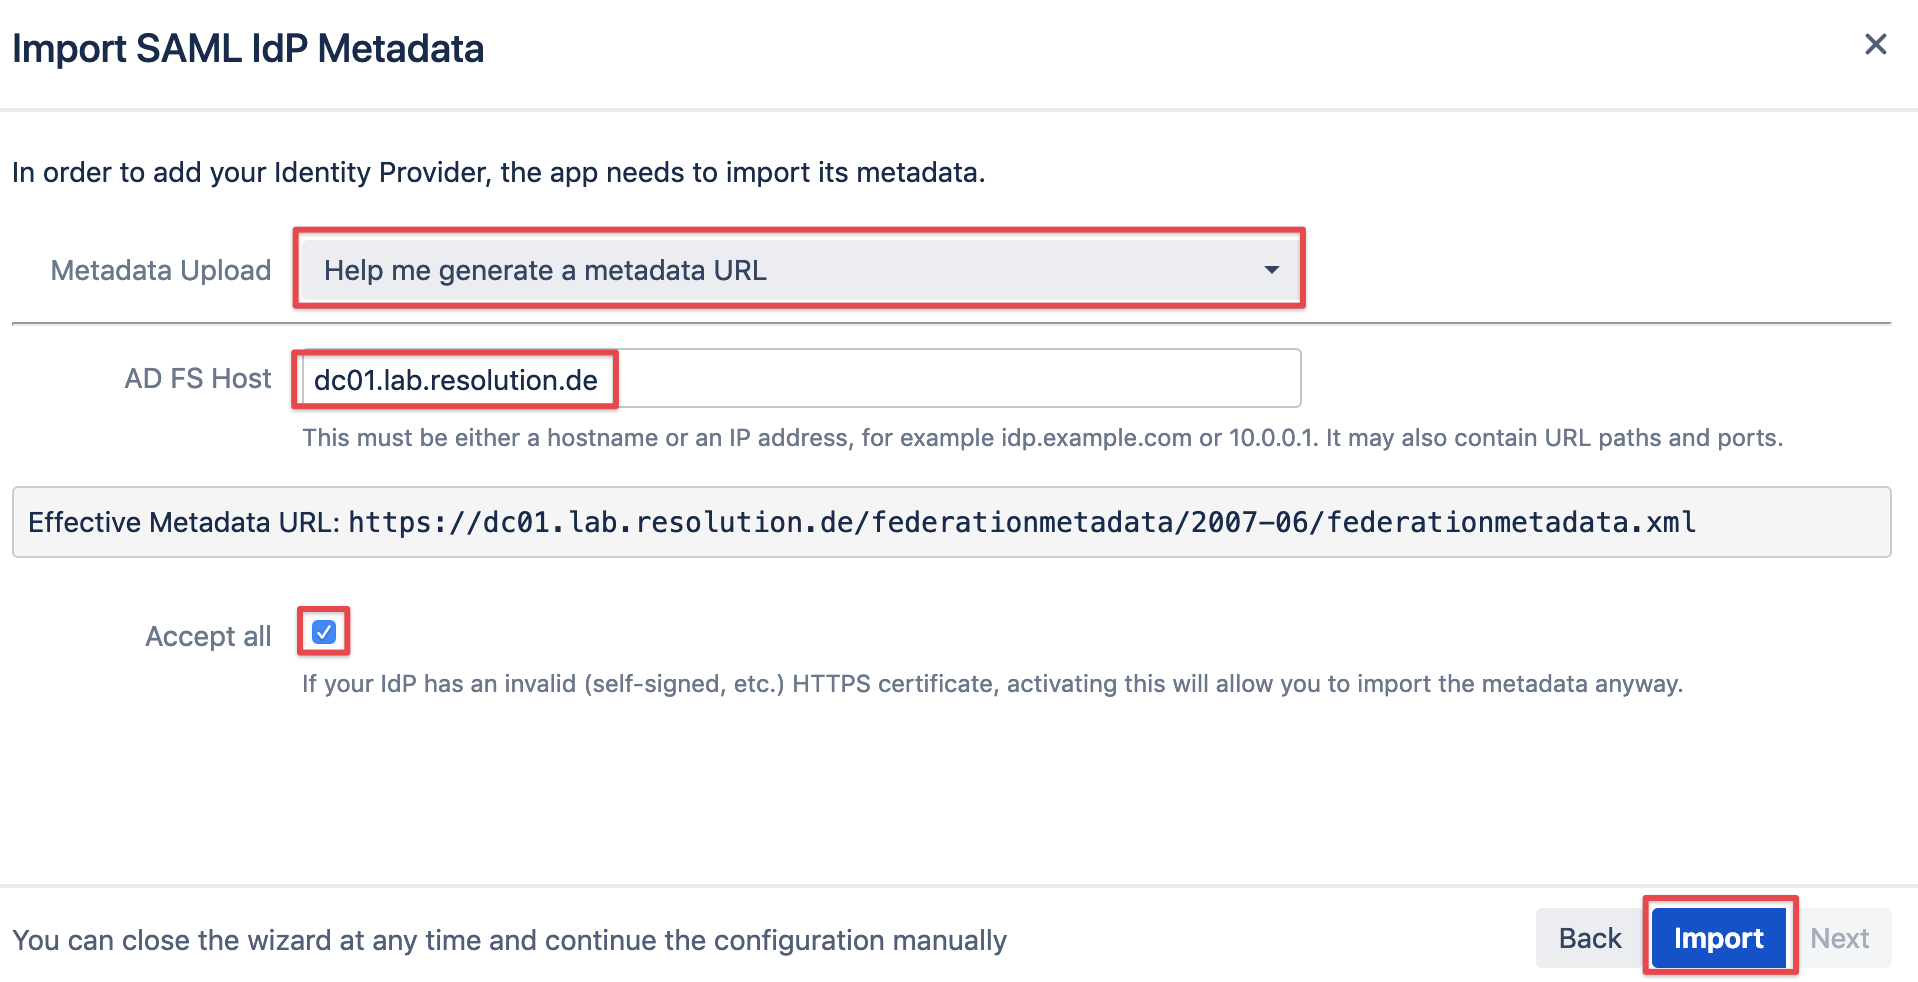
We now need to import the metadata from ADFS.
You can choose from the following options in the Metadata Upload dropdown:
Help me generate a metadata URL
I have a metadata URL
I have a metadata XML file
I want to past my metadata XML
I don't have any metadata and want to enter the data manually
Option 1 is the easiest to use, provided that your Atlassian instance has connection to your ADFS server.
It will create the URL based on the host name of your ADFS server. With Option 2 you could paste this URL manually.
Import via metadata URL
Provided the Atlassian instance does have access to ADFS, simply select the first option and click Import.
You should only need to tick the Accept all checkbox, if you are working in a test environment with self signed certificates.
Import via metadata XML file
With no access to ADFS, you can also export the metadata on ADFS and then load it with option 3 or paste its content with option 4.
Exporting can be done with a simple powershell script on ADFS. Just create a script file with extension ps1 and paste the following content:
- # Export MetaData XML to current users desktop
- $mUrl = (Get-ADFSEndpoint | where Protocol -eq "Federation Metadata").FullUrl.ToString()
- $httpHelper = new-object System.Net.WebClient
- $metadataAsString = $httpHelper.DownloadString($mUrl)
- $httpHelper.DownloadFile($mUrl , "C:\Users\$($env:username)\Desktop\metadata.xml")
Once the import of the metadata is complete, you can go ahead and configure the settings described in the following chapters.
Configure remaining SAML SSO app settings
The following steps describe what needs to be
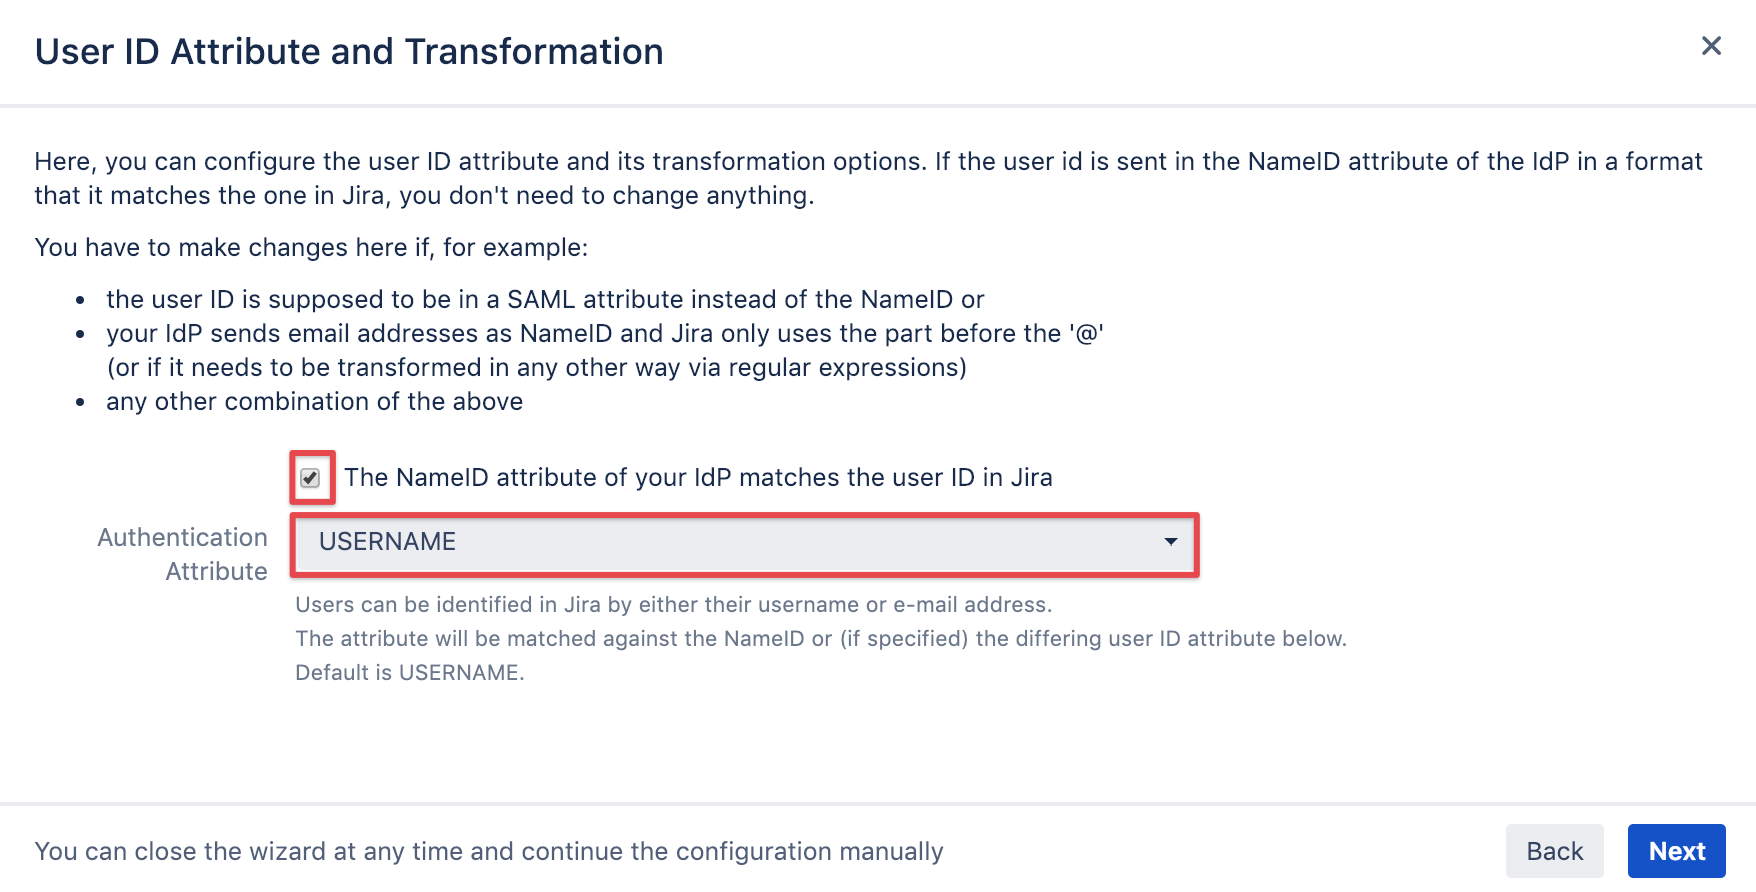
User ID attribute and transformation
It's recommended to leave this option checked unless did setup different claim issuance policies as described in Configure ADFS/ Claim rules.
Click on Next.
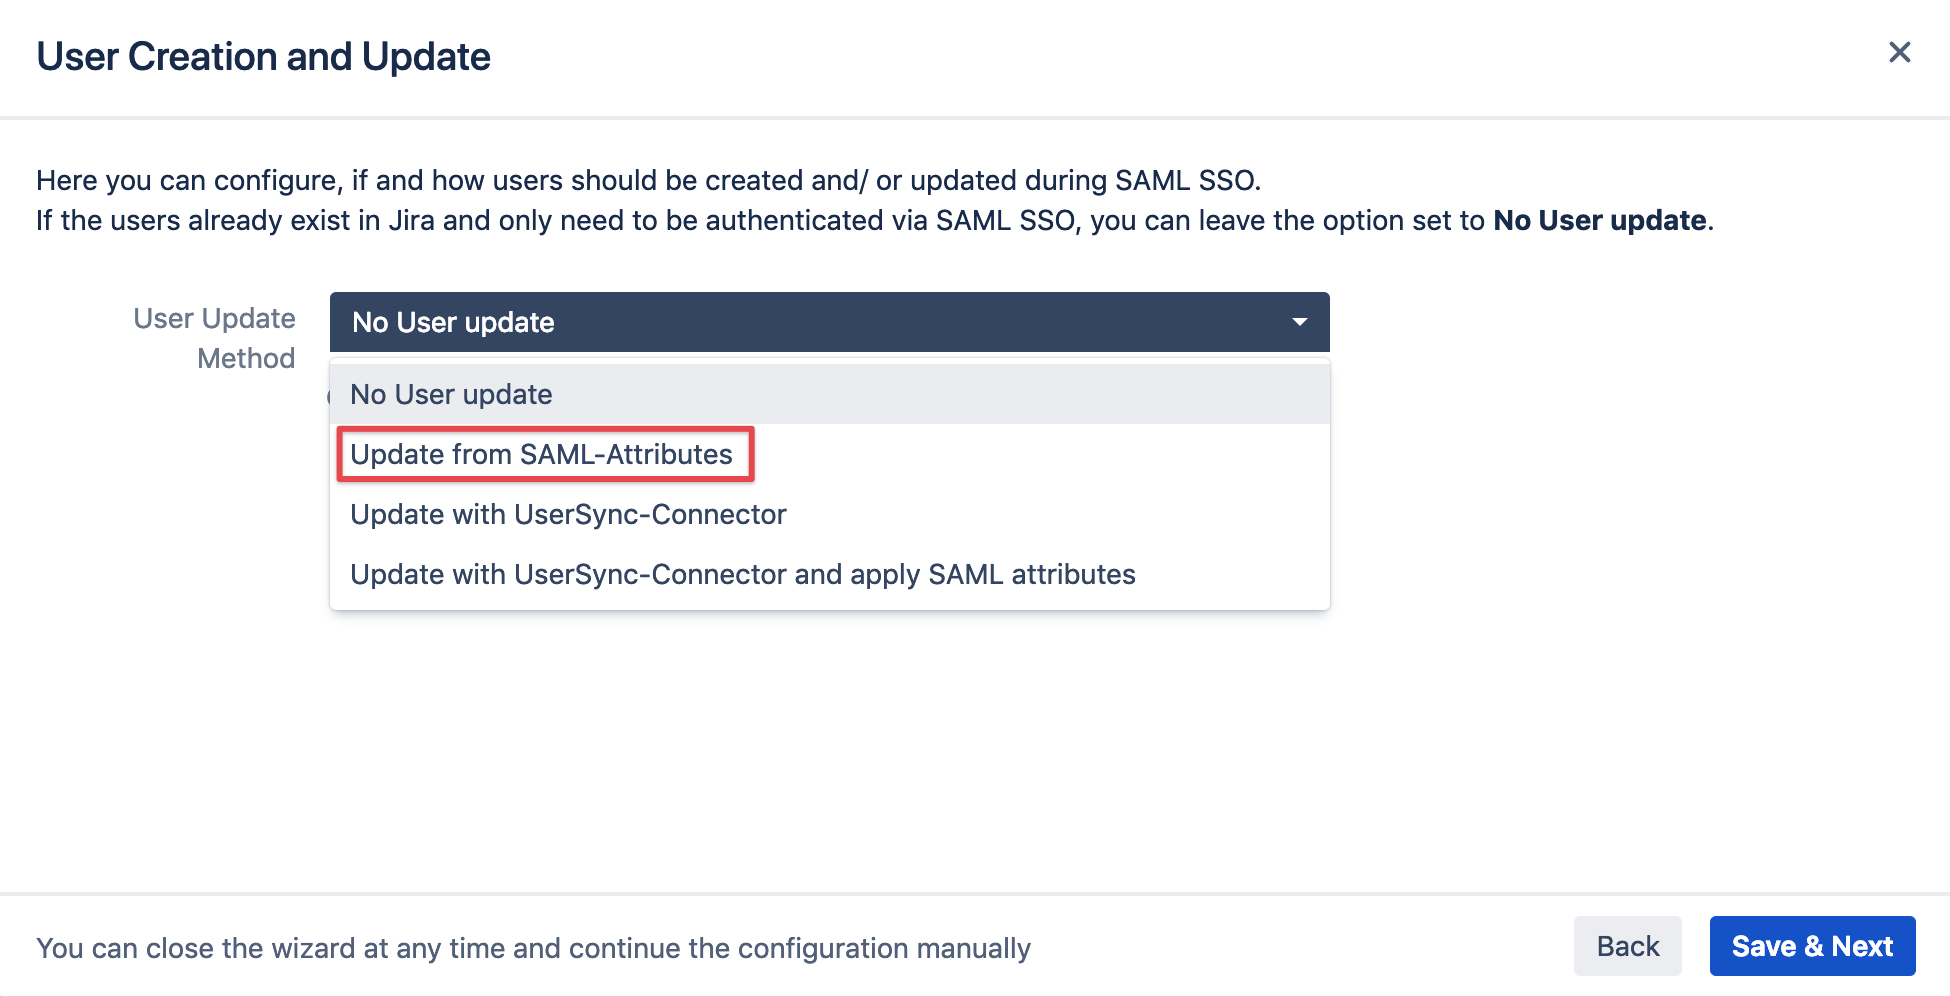
User creation and update (Just in-time provisioning)
Enabling Just In-Time Provisioning
Selecting Update from SAML-Attributes will enable just in-time provisioning.
Please note that you can refine and change the settings later as well.
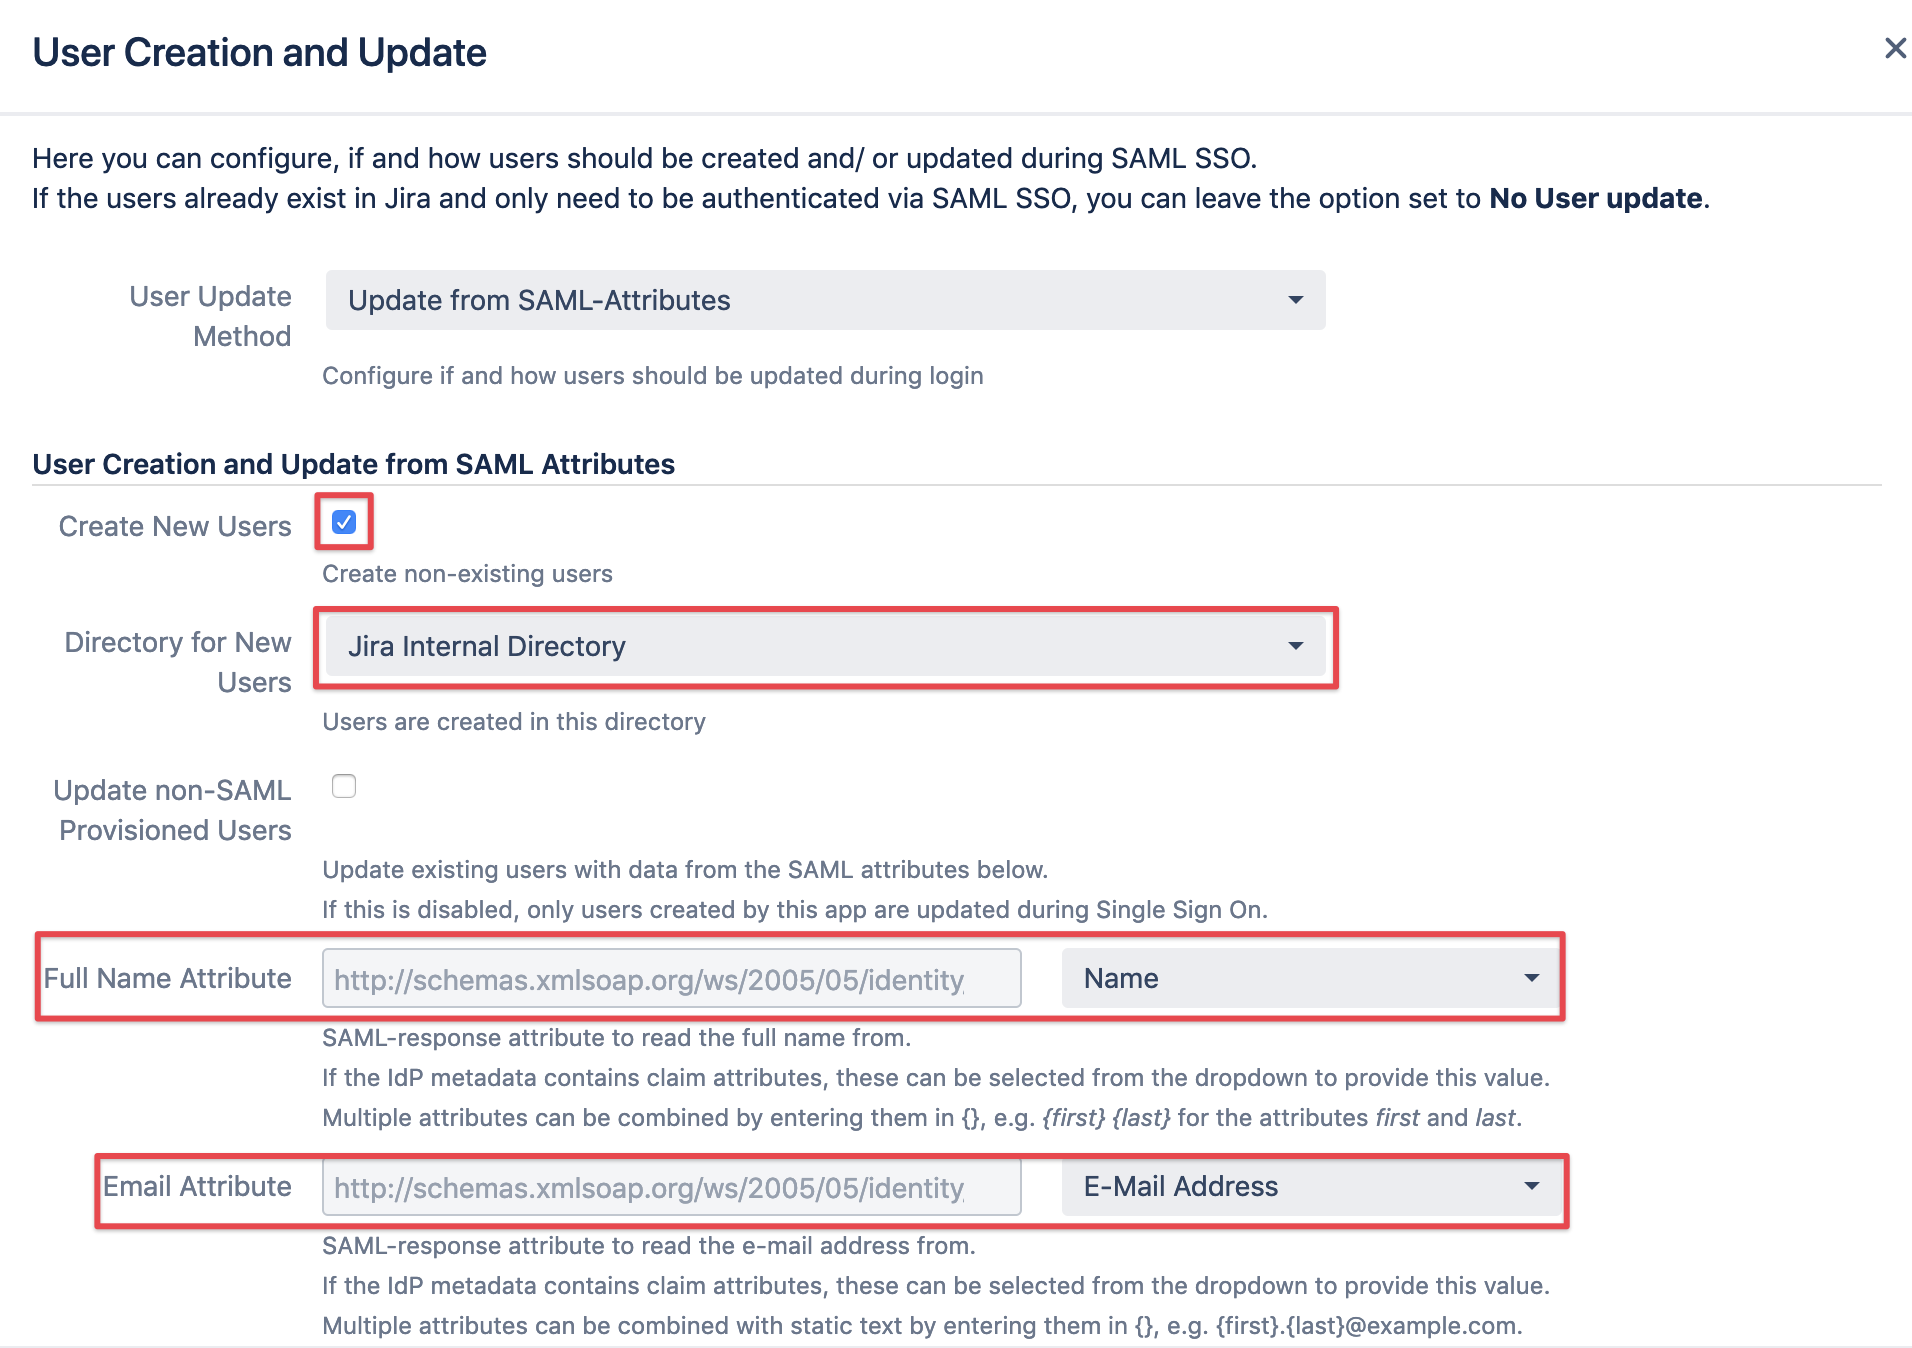
Configure how to create and update Users
select Create New Users and
select the Directory for New Users should be created in
this is typically the default internal directory, but could be any other you might want to use,
as long you are sure that the users/ usernames in that directory does not contain any of the users already
you are planning to create with just in-time provisioning
decide whether you also want to update users who were not created the SAML SSO app
in order to create users, a Full Name and Email Attribute has to be assigned, using the metadata from the IdP imported earlier
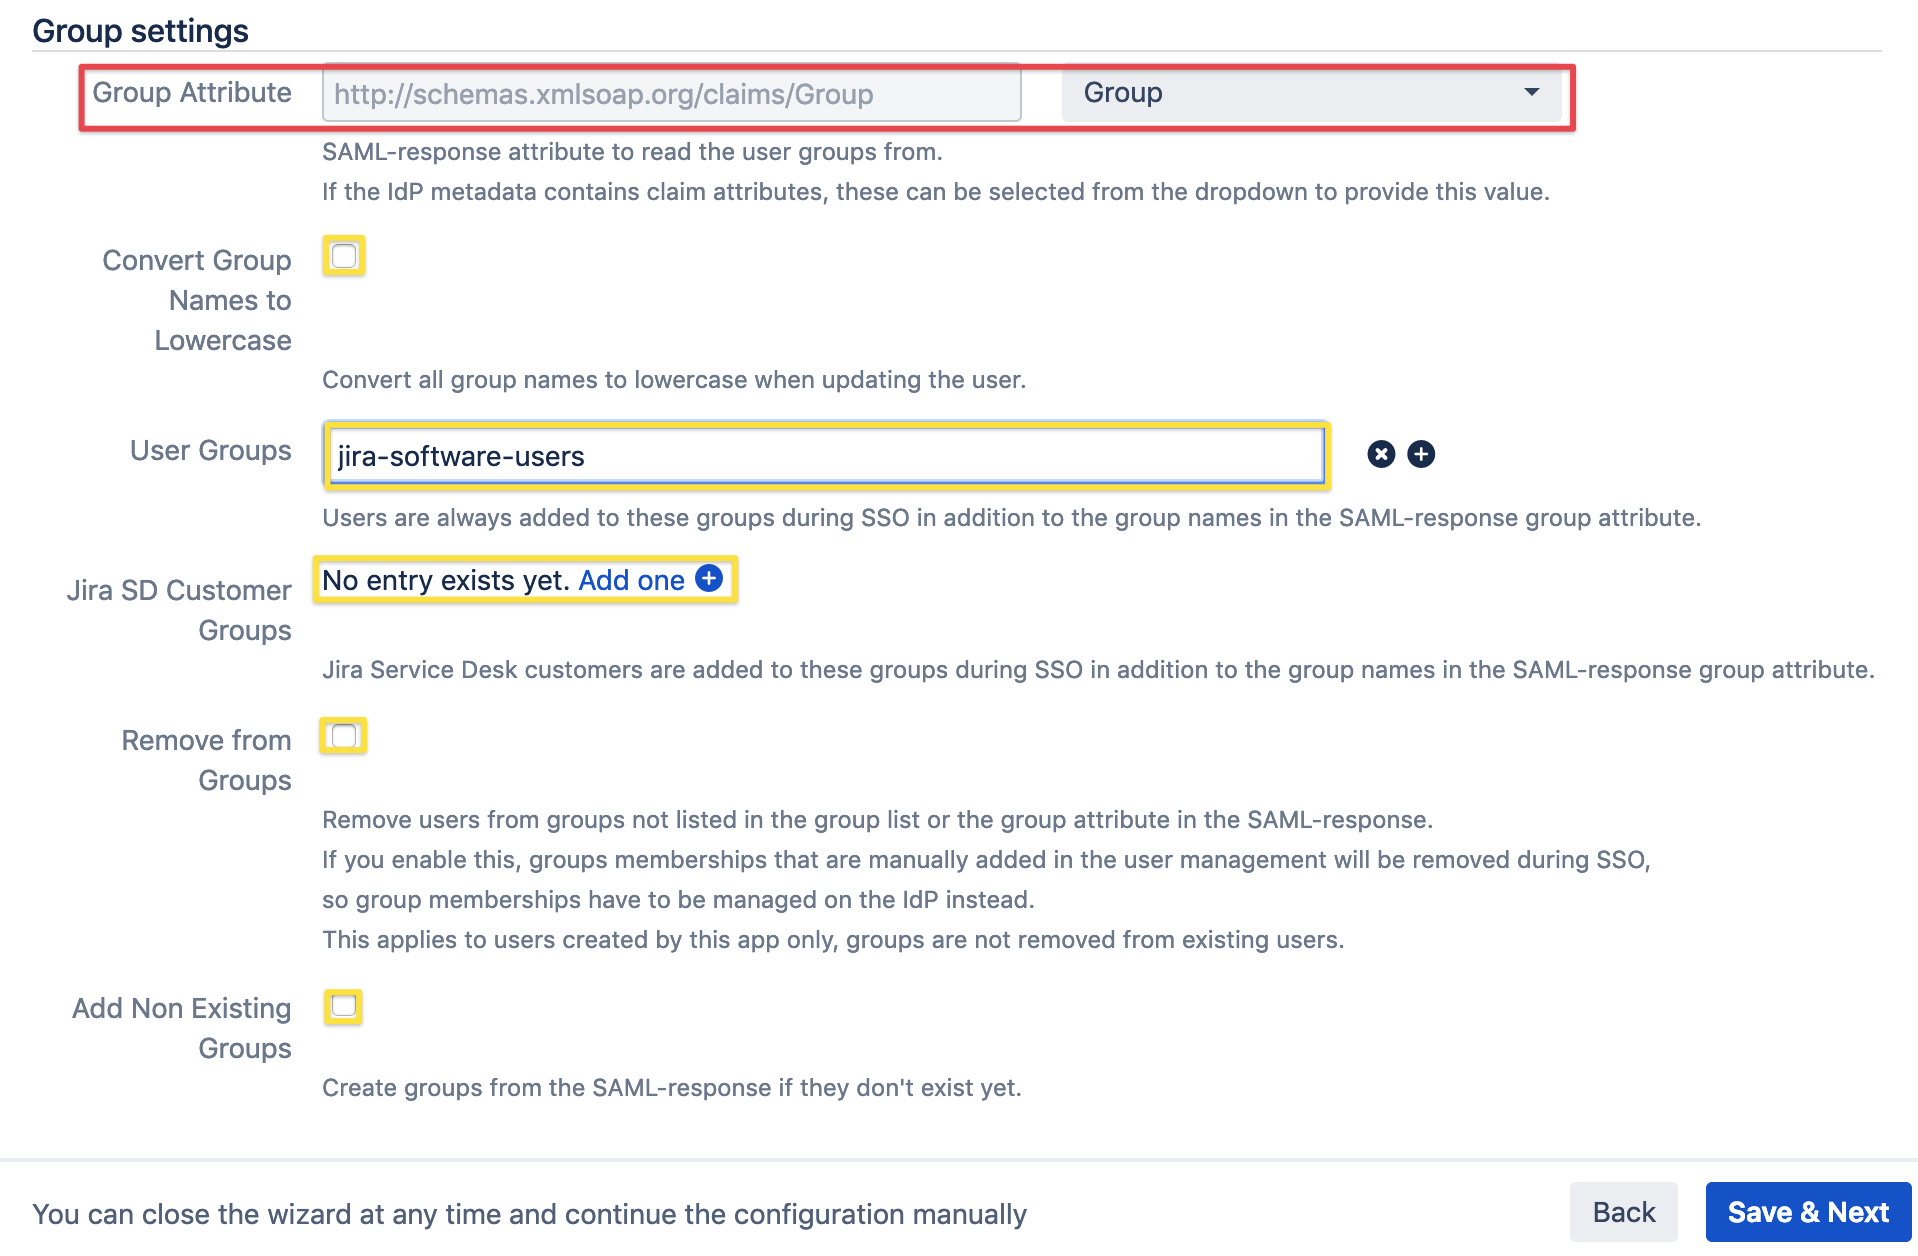
Taking care of Groups
If you want to retrieve groups from ADFS, you need to edit the claim rules for the relying party trust.
You can do that after completing the wizard. Please refer to Configure AD FS to send Groups for Just In-Time Provisioning in this tutorial.
select the attribute to read the groups from, typically Group in AD FS
you may want to have more control over group handling, e.g.: (options annotated in yellow)
convert the group names to lowercase
add existing, local groups from your Atlassian instance automatically to users logging in
add existing, local groups from your Atlassian instance automatically to Jira Service Desk customers,
should you have Jira Service Desk installed as wellremove users from groups which are not
in the User Groups list you might have provided earlier
in the SAML group attribute
this will cause groups which have been manually added to users only created by the SAML SSO app
to be removed again, meaning that groups need to be maintained on the IdP, the AD FS side
tick Add Non Existing Groups if you want to create these in your Atlassian application, should they not exist yet
Click Save & Next to proceed.
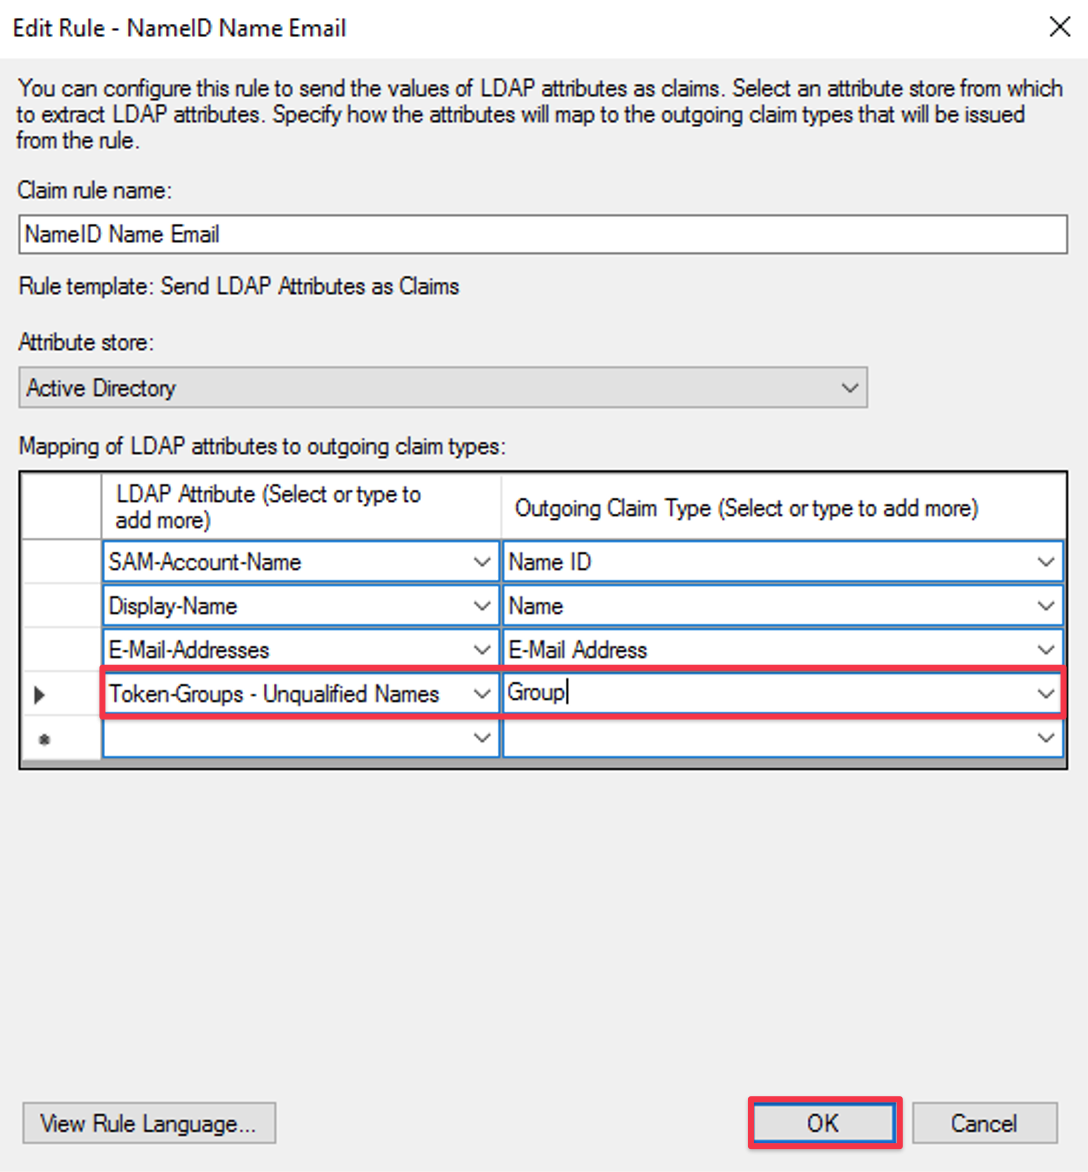
Configure AD FS to send attributes for Just In-Time Provisioning
This part of the tutorial describes how to add one more attributes to the claim rule for your relying party trust on AD FS,
which you've added earlier during the basic AD FS configuration.
You may add the additional mappings to the existing rule.
The following two mappings are mandatory for creating users (see screenshot below):
Display-Name → Name
E-Mail-Adresses → E-Mail Address
If you also want to send group memberships as SAML attributes, please also add:
Token-Groups - Unqualified Names → Groups
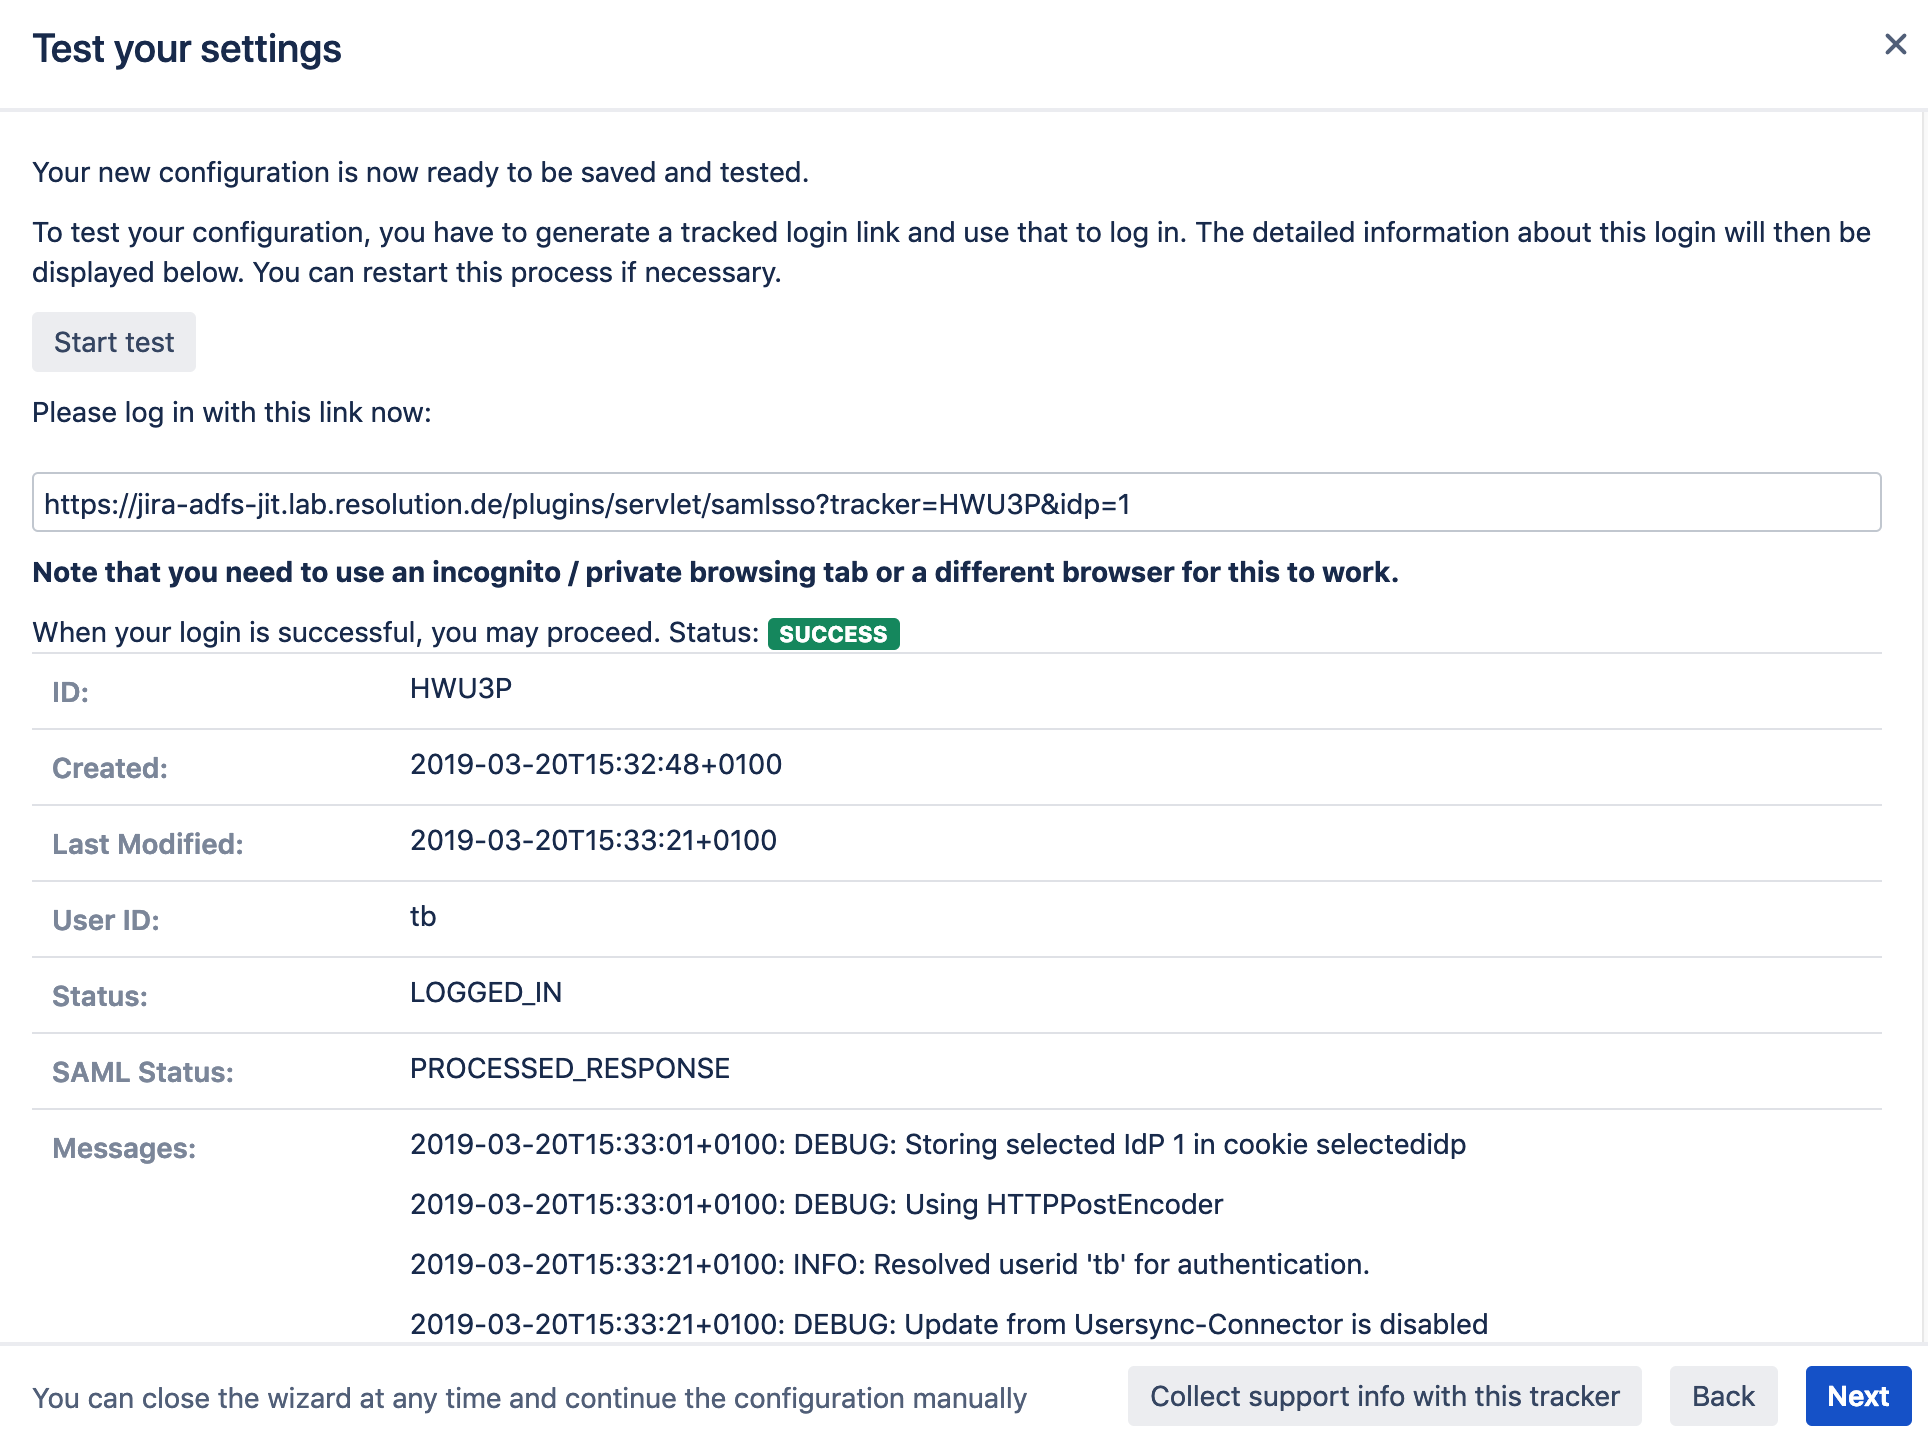
Test configuration of SAML SSO app for Atlassian Data Center
The last step when adding the ADFS IdP is a test which can be executed by clicking on the corresponding Start test button.
Copy the link displayed and paste it into a new incognito/ private browsing window, and execute a login with your Identity Provider.
Choose a user whom you want to be created, so you might want to select one with certain groups etc.
The status of the authentication process is permanently updated in the window.
Verify your Test Results and Complete the Setup
If the test has succeeded, you should verify that you can find/ see the user in your user management console:
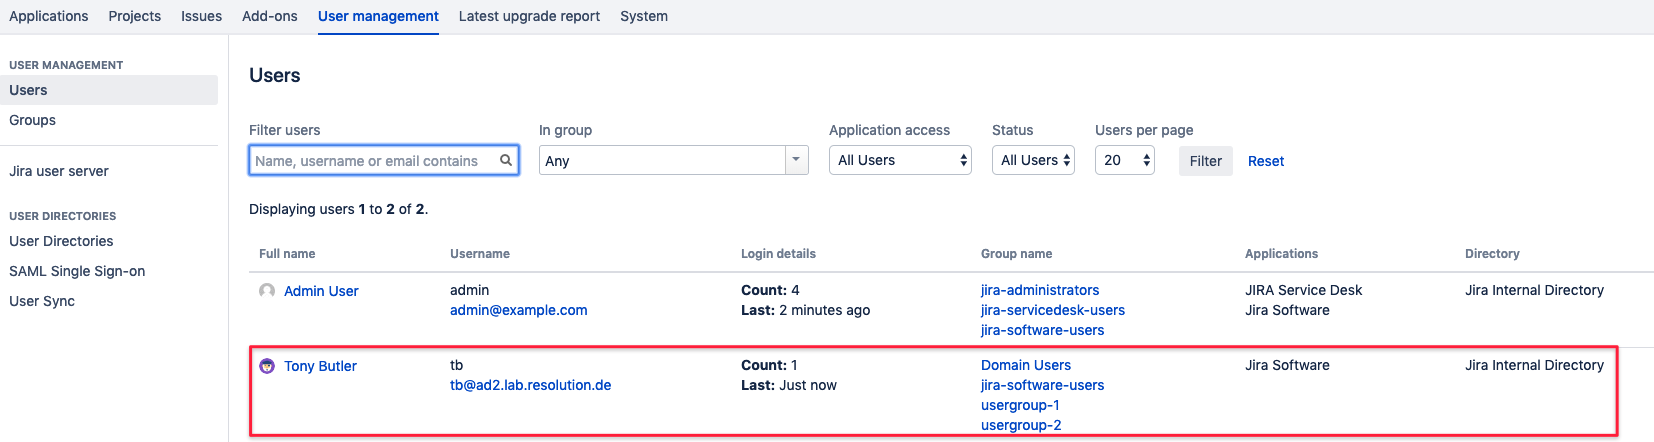
Check the group memberships and adjust the configuration in the Group Settings section of the User creation and Update settings, if needed.
You can do that later, once you've completed the basic setup with the wizard.
Logging the user out and in again will reflect the changes.
You might want to create a test user in your IdP for that, so that you can safely delete it again from your internal directory, before testing your changes.
This way you can repeat the tests for just in-time provisioning, as if the user would be a new one.
If there is any error at this point you need help with, please refer to the troubleshooting guide, which will also help us, should you open a support ticket with us.
Of course the test window above will display a lot of information about the errors already, but requires some deeper knowledge of the SAML protocol.
Enable login redirection
The last step of of the wizard takes care of the redirect options.
Selecting Enable SSO Redirect will ensure that users are getting redirected to be logged in via SAML,
instead via the login form as before the SSO setup.
The Override Logged Out URL Method can be left at the default option.
It will redirect users after log out to a default page where they can login again via username and password or SSO again.
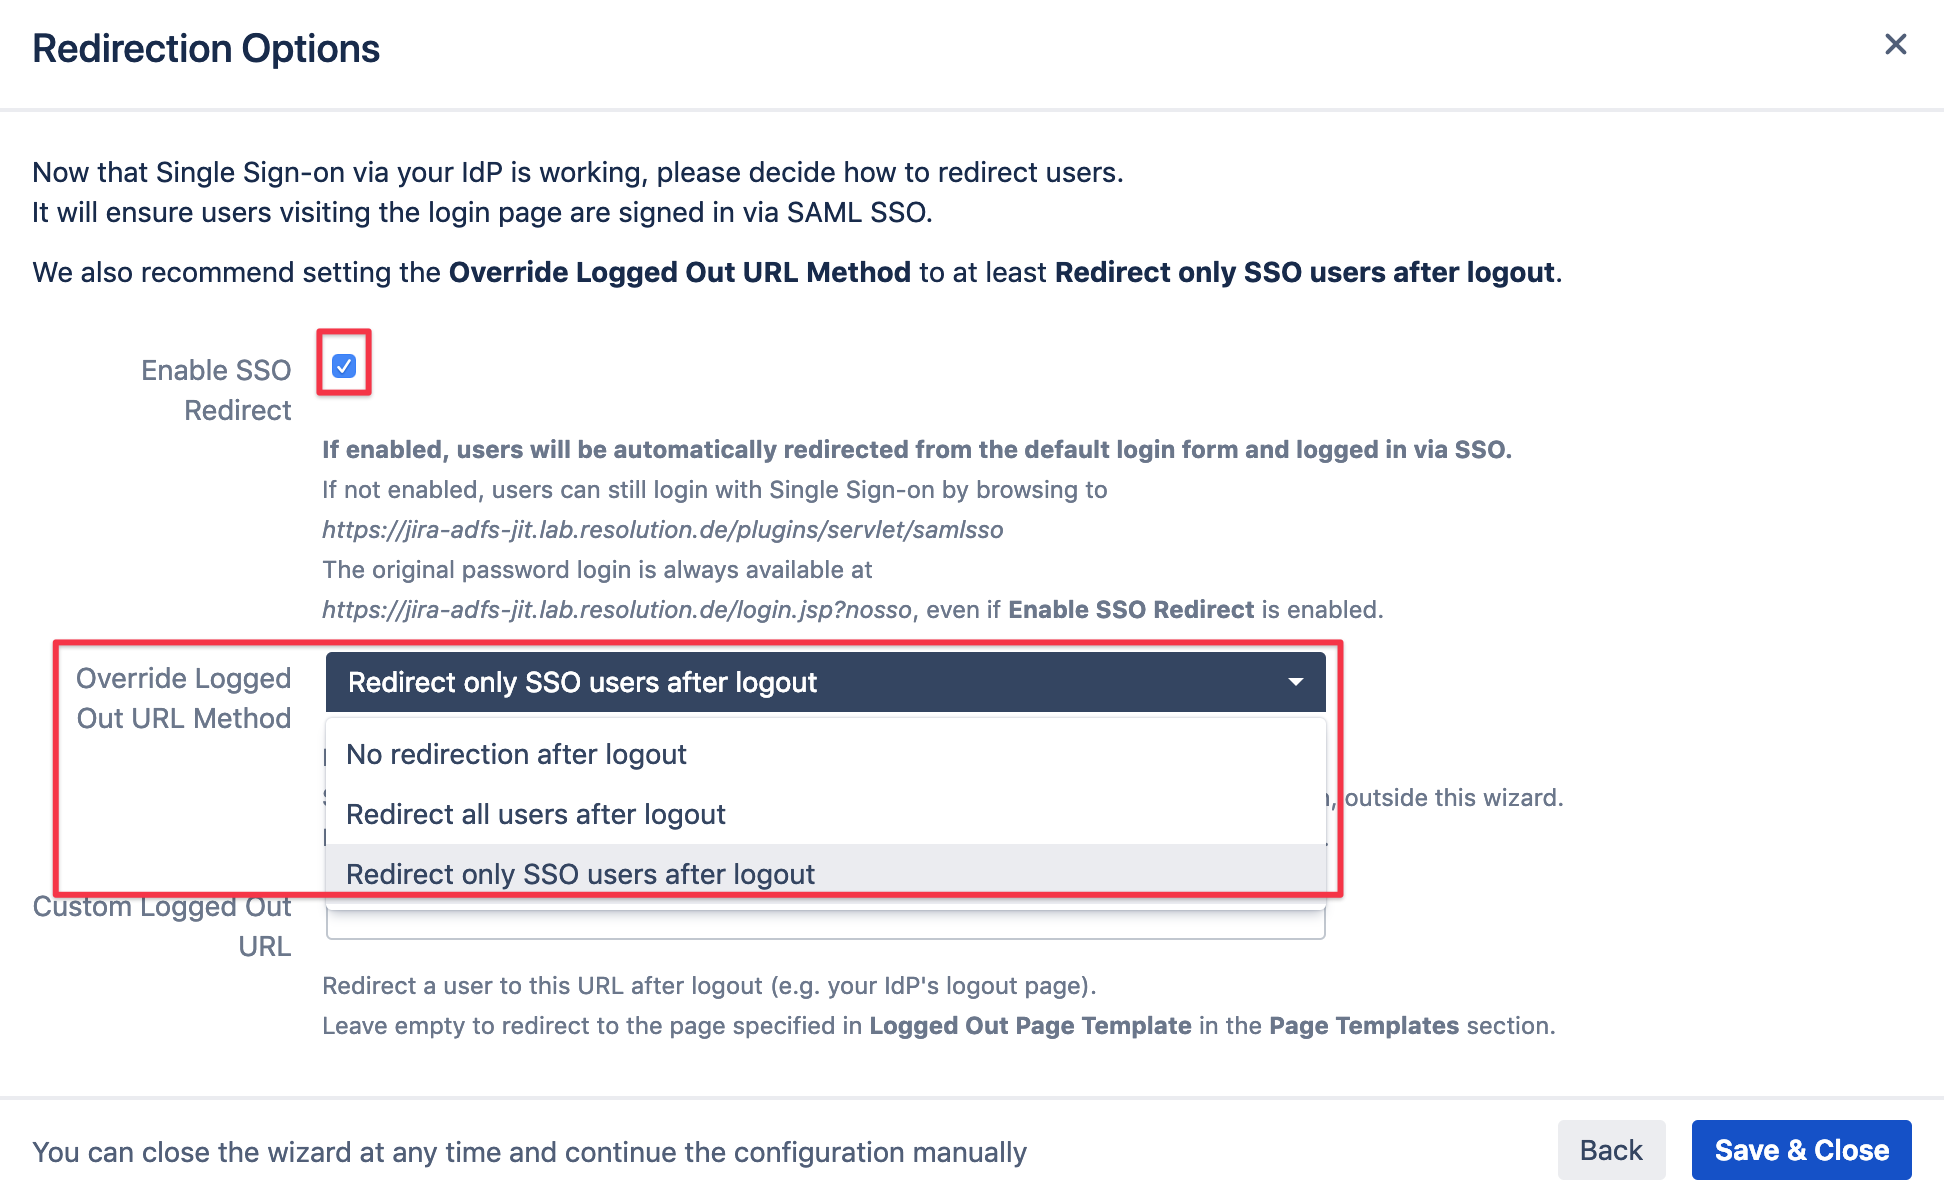
Save & Close to complete the setup and close the wizard.
You are now ready to use AD FS with SAML SSO and just in-time provisioning in your Atlassian application.
If Enable SSO Redirect is enabled, you can login to your Atlassian application manually by browsing to the URL that fits your Atlassian application as listed below.
Use this URL, if you need to login a local user unknown to the ADFS or if there are any issues with Single Sign On.
Jira: https://<baseurl>/login.jsp?nosso
Confluence: https://<baseurl>/login.action?nosso
Bitbucket: https://<baseurl>/login?nosso
Bamboo 5: https://<baseurl>/userlogin!default.action?nosso
Bamboo 6: https://<baseurl>/userlogin!doDefault.action?nosso