
Migrate LDAP Users to Microsoft Entra ID (formerly Azure AD) and rename them using User Sync
Tutorial of this guide for Azure Active Directory
This tutorial describes what to do, when LDAP-based authentication should be replaced with Microsoft Entra ID (formerly Azure Active Directory), renaming the usernames as well (optional).
Existing users should keep their tickets, pages, and any other references in the Atlassian application after migrating to the new IDP.
Prerequisites
Jira, Confluence, Bitbucket, or Bamboo Data Center
SAML SSO for Atlassian Data Center / Server, which always comes with User Sync
Azure Active Directory
Azure AD is assumed to be your new IDP, containing all the users and groups which used to exist in LDAP
Important: the following will only work if users in Microsoft Entra ID (formerly Azure AD) have been/ are synchronized from the existing LDAP to Microsoft Entra ID (formerly Azure AD) using Azure AD Connect
Caveats
While renaming users changes all references in Jira issues (Assignee, Reporter etc.) or owners of pages in Confluence, existing mentions of users in ticket comments won't be updated automatically. The same goes for username references in filters
Atlassian is not supporting this so far and won't anytime soon, if at all (see https://jira.atlassian.com/browse/JRASERVER-70685).
If historic mentions are important to you, you'd need to search and replace them via database statements, which can become quite an effort. We believe that this is only an issue if the old username differs a lot from the new name because you'd still recognize the person behind it if it isn't.
Example: [~john.doe] is the broken mention of user john.doe, who was renamed to john.doe@company.com
Once you update [~john.doe] to [~john.doe@company.com], it will be restored again.
High Level Migration Summary
The migration will be performed in the following order:
Install SAML SSO for Atlassian Server / Data Center (which always comes with the User Sync app)
Register app for User Sync in Azure AD
Setup User Sync connector for your Azure AD
Let User Sync copy users from LDAP to the new directory
Verify the results
Disable the old LDAP directory
Change usernames to Azure AD format
Configure SAML SSO to use Azure AD as the identity provider
Step-by-Step Migration Guide
Install SAML SSO for Atlassian Server or Data Center
In your Atlassian product, open the in-product marketplace as described in the Atlassian documentation.
Search for "resolution saml" and click "Install" for SAML Single Sign On (SSO) by resolution Reichert Network Solutions GmbH.
After the installation is complete, click on Manage, then choose Configure.
Now, you are on the Add-on / app configuration page and the first step of the setup wizard will appear.

Register app for User Sync in Azure AD
Below is a text-based step-by-step guide for registering an app in Azure AD.
This is required to connect User Sync with Azure AD, as described in the next chapter.
Quickstart guide
Go to portal.azure.com, click "Microsoft Entra ID" in the left panel and then choose "App registrations".
Click on "New registration"
Enter a "Name" for the app.
Click on "Register".
On this page you can see the "Application ID" and the "Directory (tenant) ID". You will need both to setup the Azure AD connector in User Sync.
Click on "API permissions" in the left panel.
Delete the default created permission since it's not needed.
Click on "Add a permission" and choose "Microsoft Graph".
Click on "Application Permissions".
Search for the "Directory" entry, expand it and tick "Directory.Read.All".
Click on "Add permissions" to add the permissions.
Click on "Grant admin consent for ...".
Next, click on "Certificate & secrets".
Add a new Client secret by click on "New client secret".
Enter a description for the secret and also set an expiry date. Click on Add to confirm.
Copy the secret now ("VALUE"). You are not able to see it again after leaving that page. Please paste it to a text editor for the tutorial.
Now it is time to configure User & Group Sync in your Atlassian Server or Data Center product. Please keep the Azure website open, because we will need it later on.
Now, go back to your Atlassian Server or Data Center product, and go to the User & Group Sync Configuration.
Click Create Connector and choose Azure.
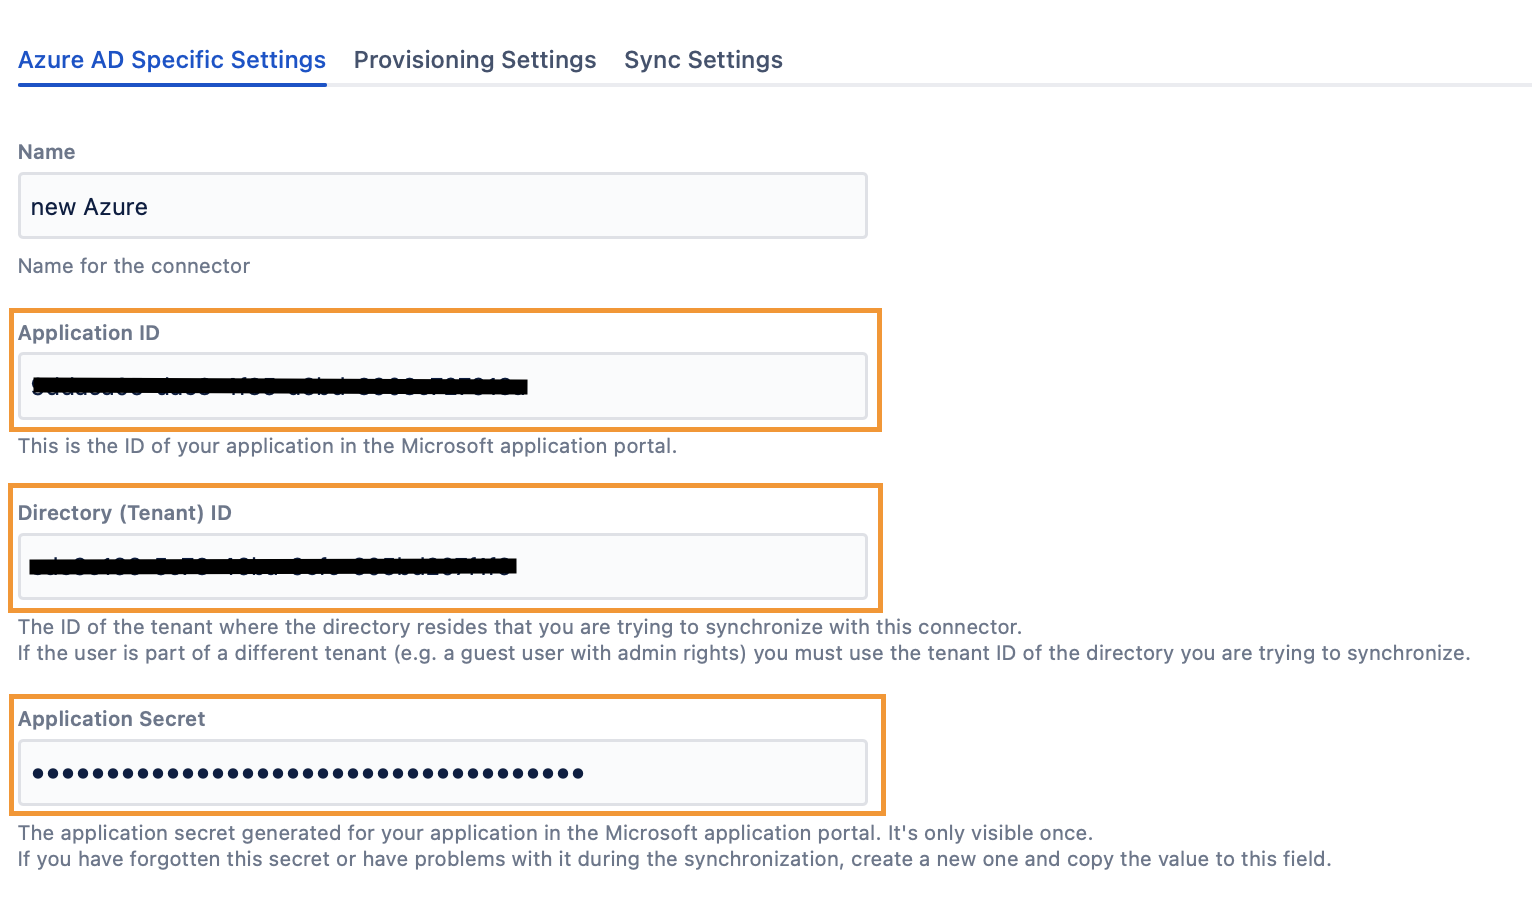
First, paste the client secret (which you copied before) into the Application Secret.
Next, go back to the Azure website and click Properties in the app you have created for User & Group Sync. Copy the Application ID and Directory (Tenant) ID and paste them into the User & Group Sync configuration in your Atlassian product.
In the User & Group Sync configuration under the Sync Settings tab, activate Scheduled Synchronization. You can edit the Cron expression to set a synchronisation interval.
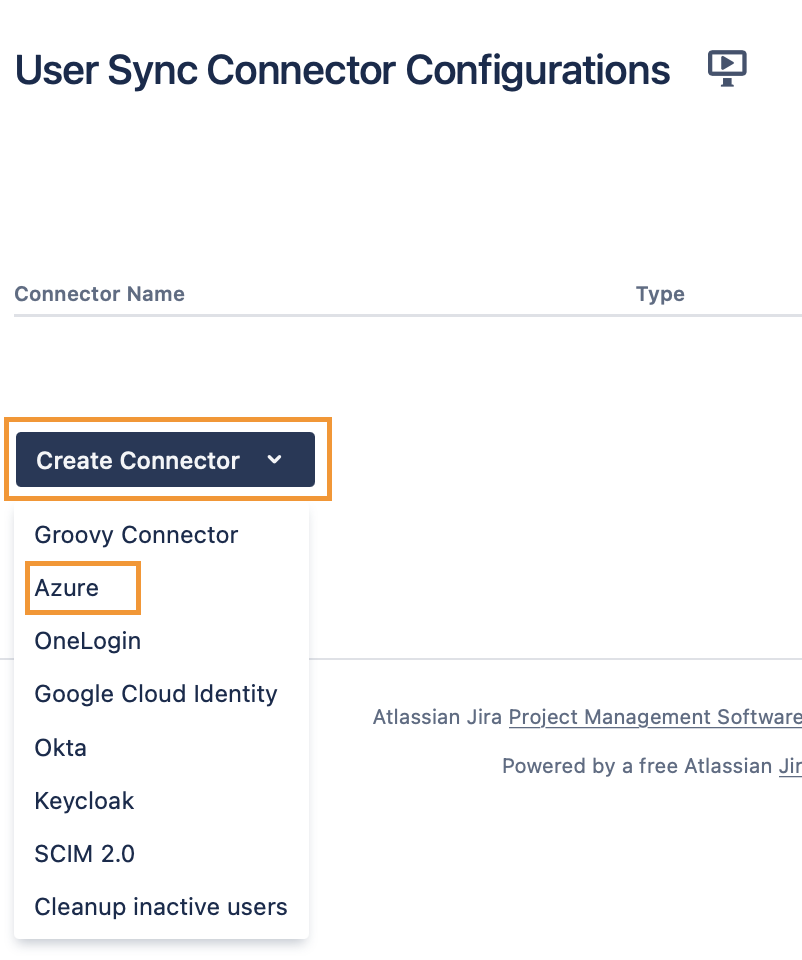
Setup User Sync connector for your Azure AD
Now that you've got the application ID, directory (tenant) ID and the application secret, you can head over to the administration console of Jira or Confluence
and click on User Sync in the left-hand navigation area. This will take you to the User Sync Configuration page.
Click on "Create Connector" and choose "Azure".
Grab the Application ID, Directory (tenant) ID and the Application Secret from the previous chapter.
You can find it again on the overview page of the Azure AD app. If you forgot to copy the application secret, you need to create a new one.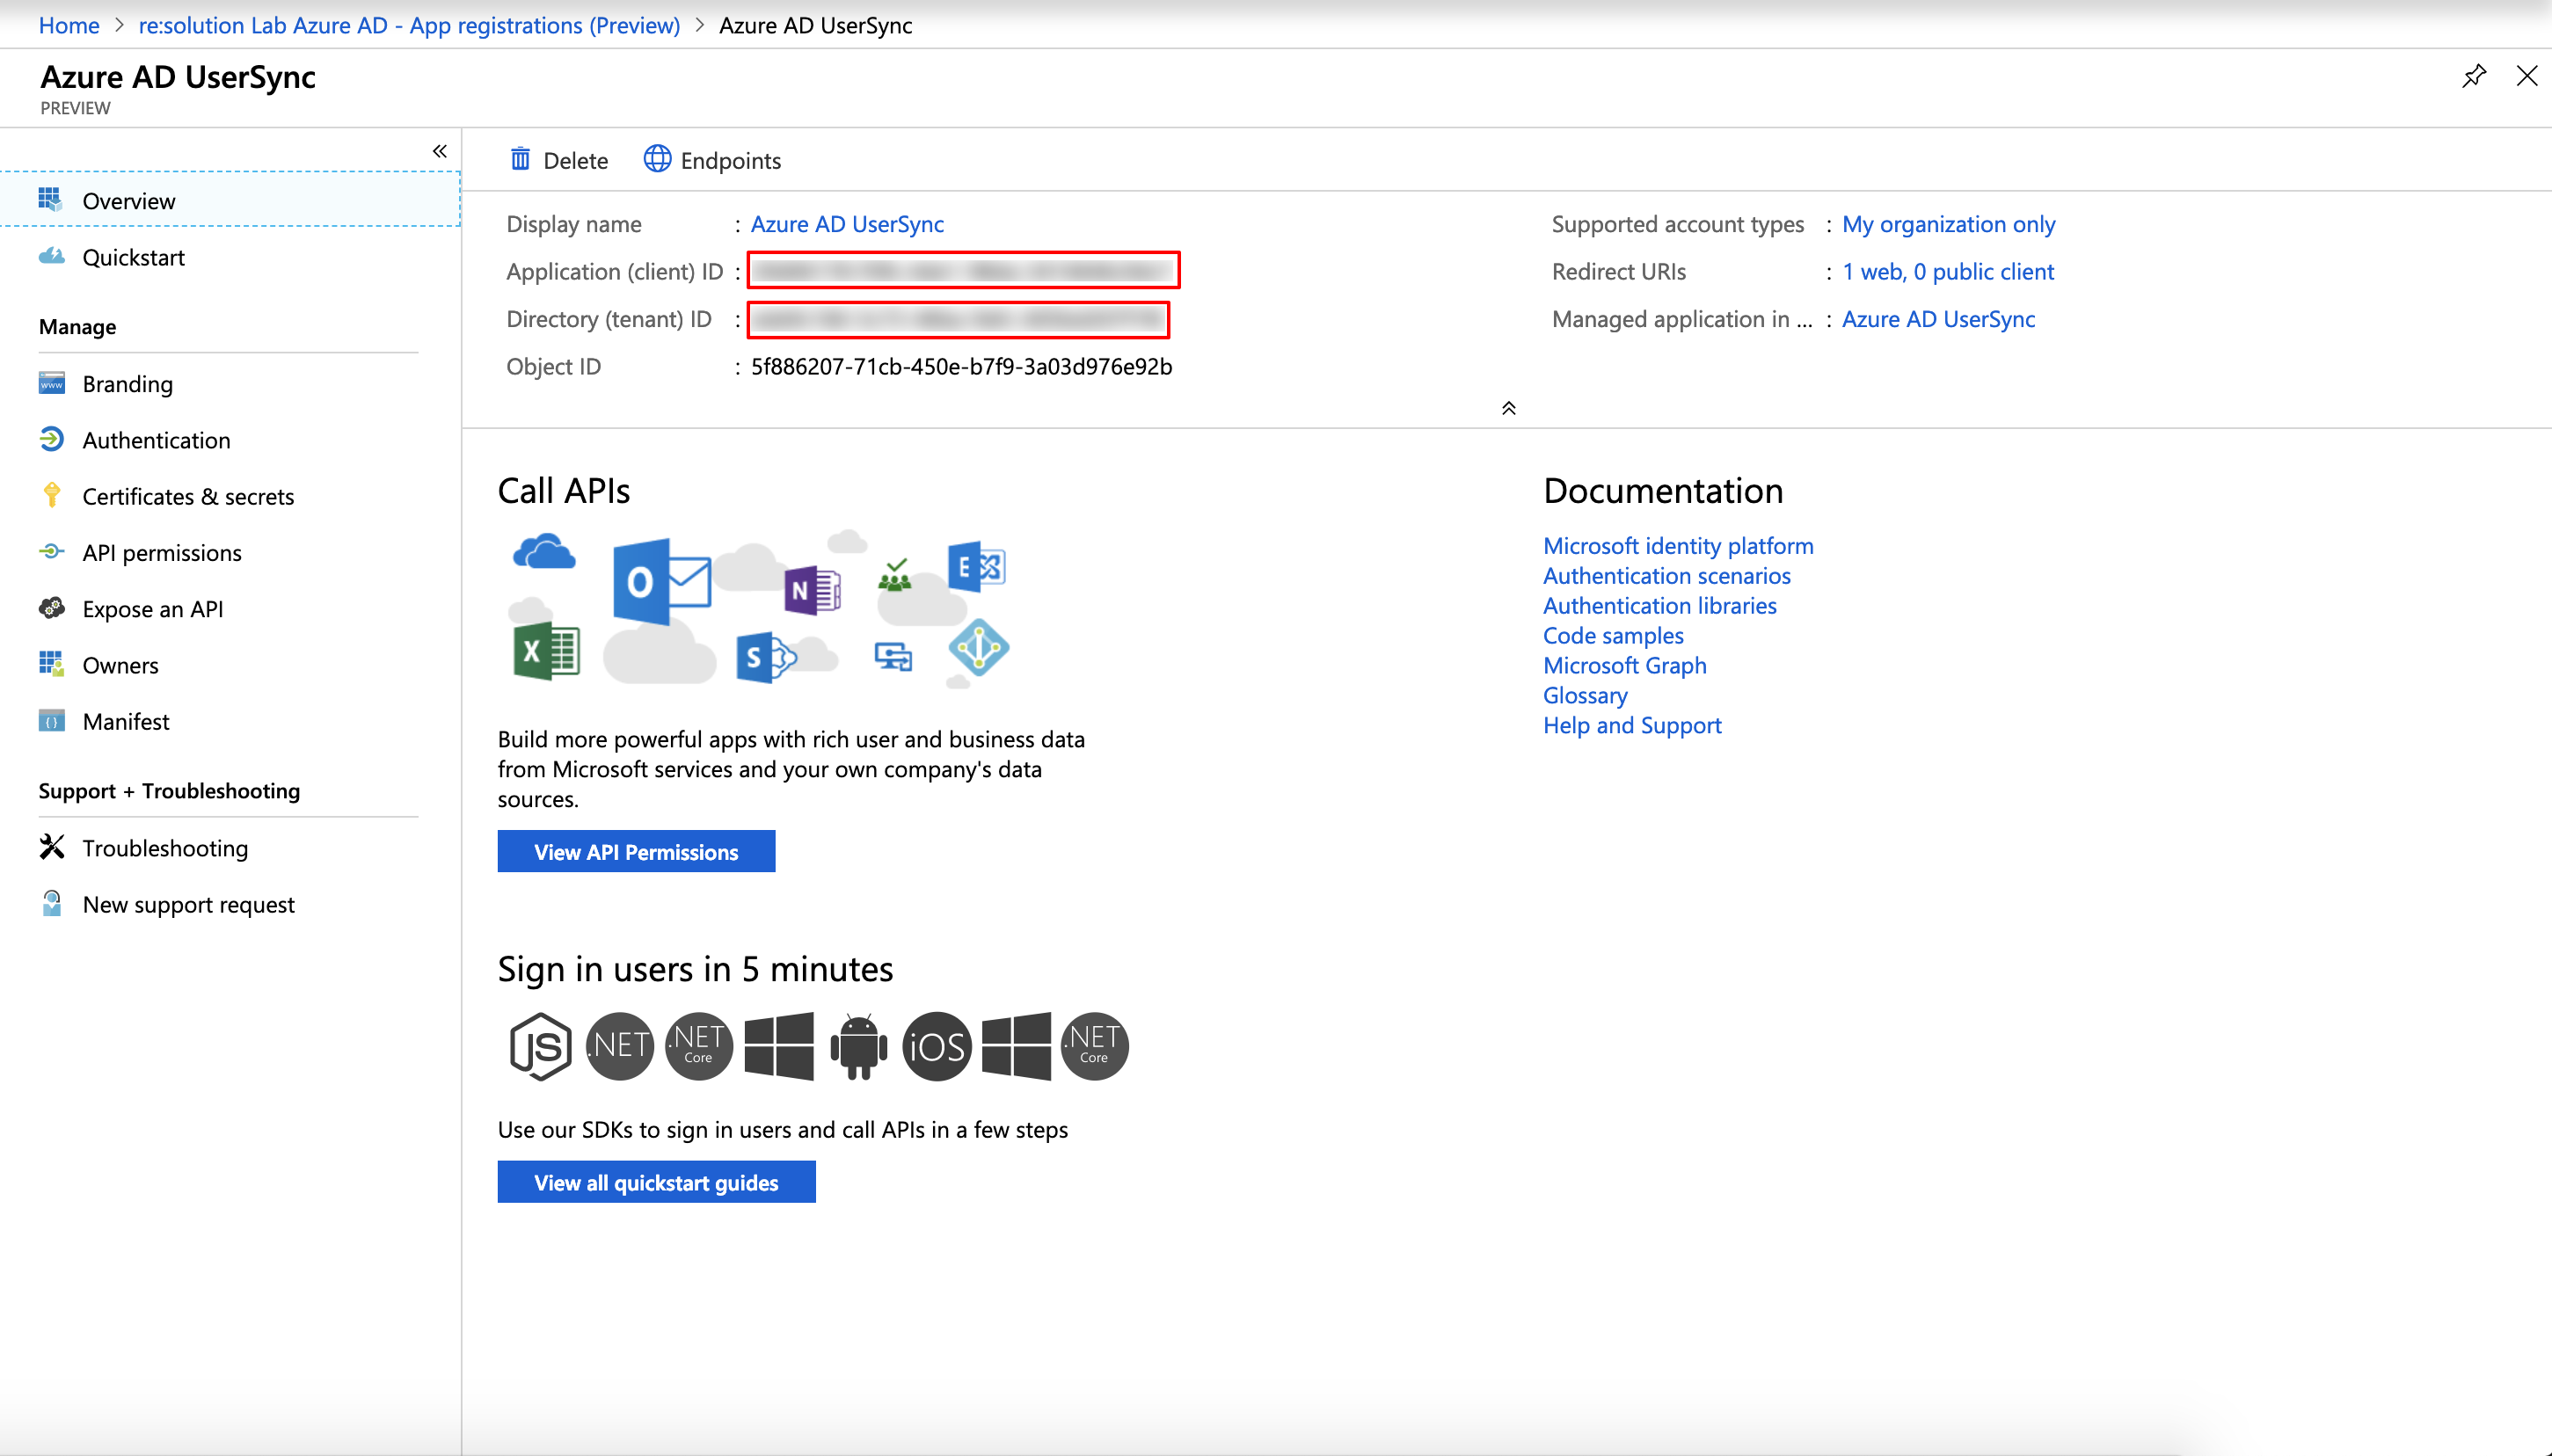
Copy and paste the Application ID, Directory (tenant) ID and Application Secret into the the corresponding fields on the Azure AD connector page.
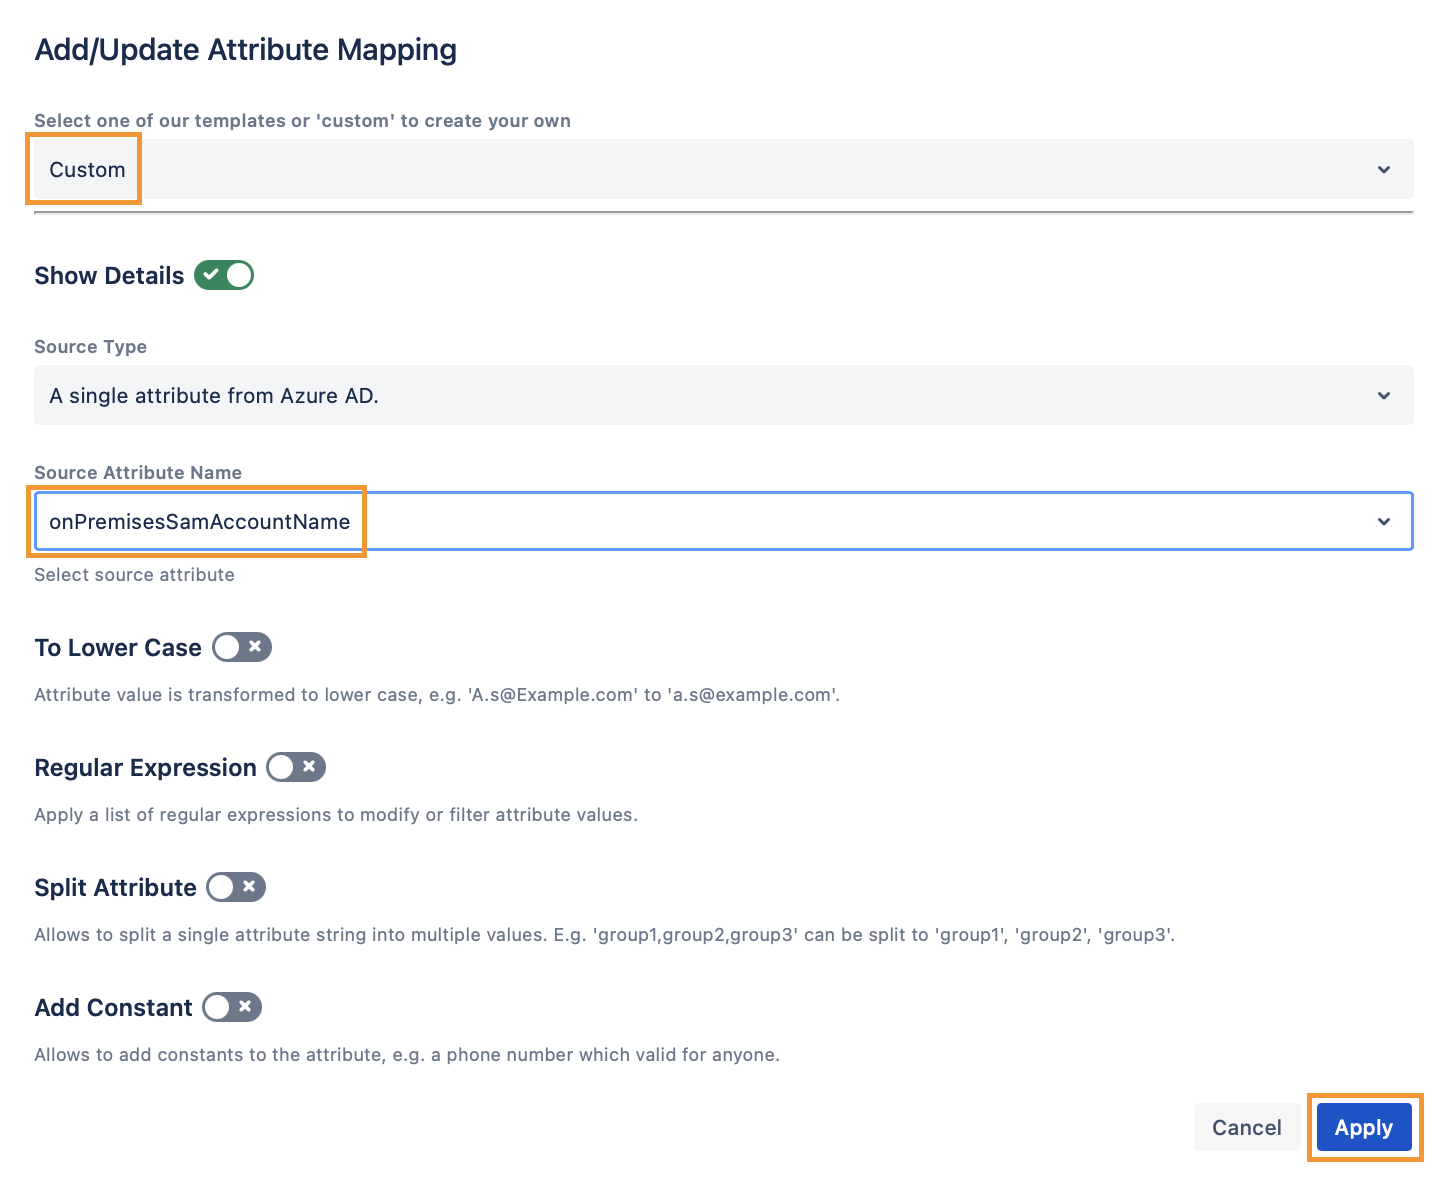
In the connector settings, go to the Provisioning Settings tab, and make sure that the Copy Behaviour is set to Copy these users.

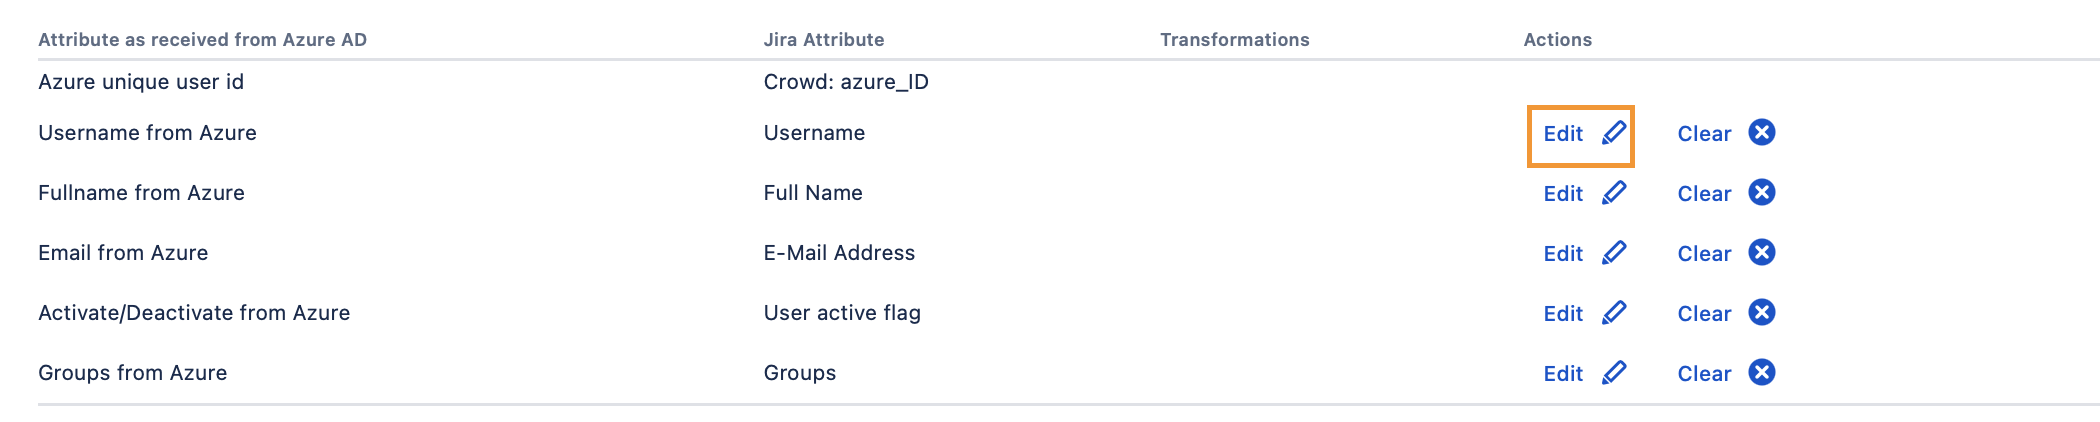
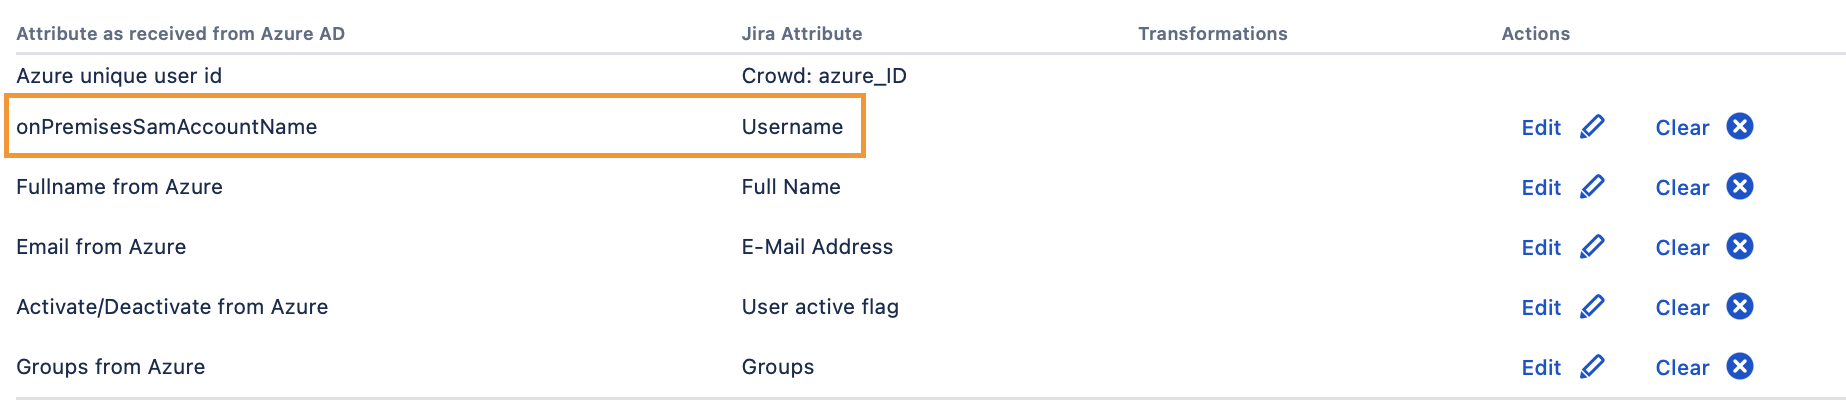
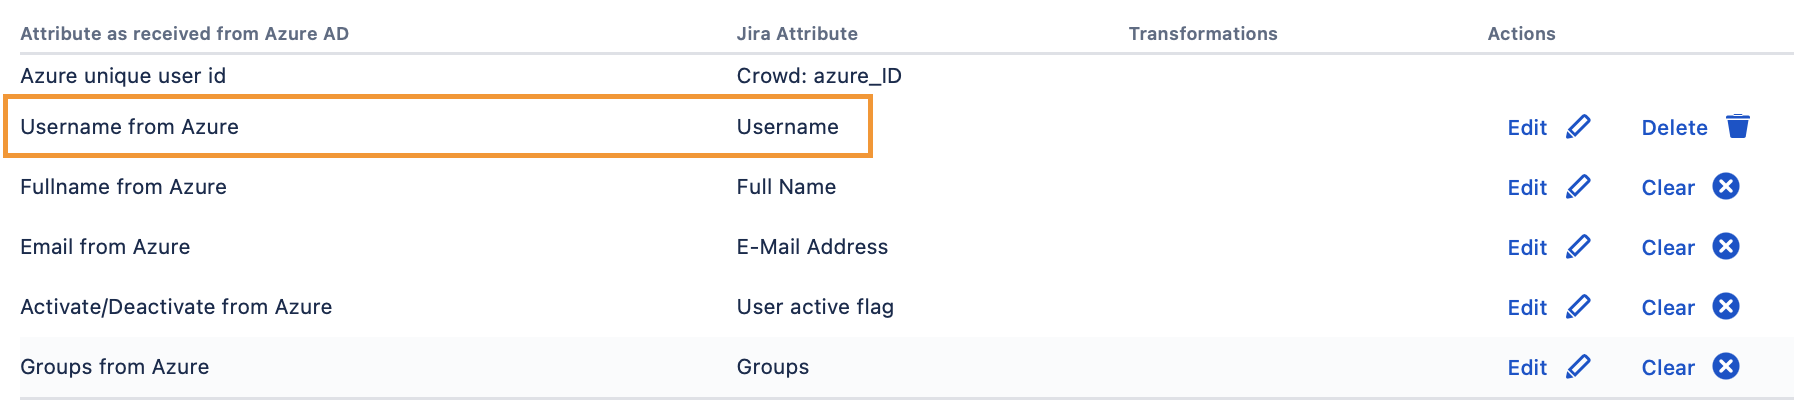
Then scroll to the Attribute Mappings section and select onPremisesSamAccountName as the connector attribute value for the Username attribute.
This ensures that the old LDAP usernames will be preserved so that users keep their issues, filters, pages etc.
Further down, you'll find a section called Never Remove Users From These Groups in which you should consider adding the below wildcard expression:
.*
So the settings should look like this afterwards:
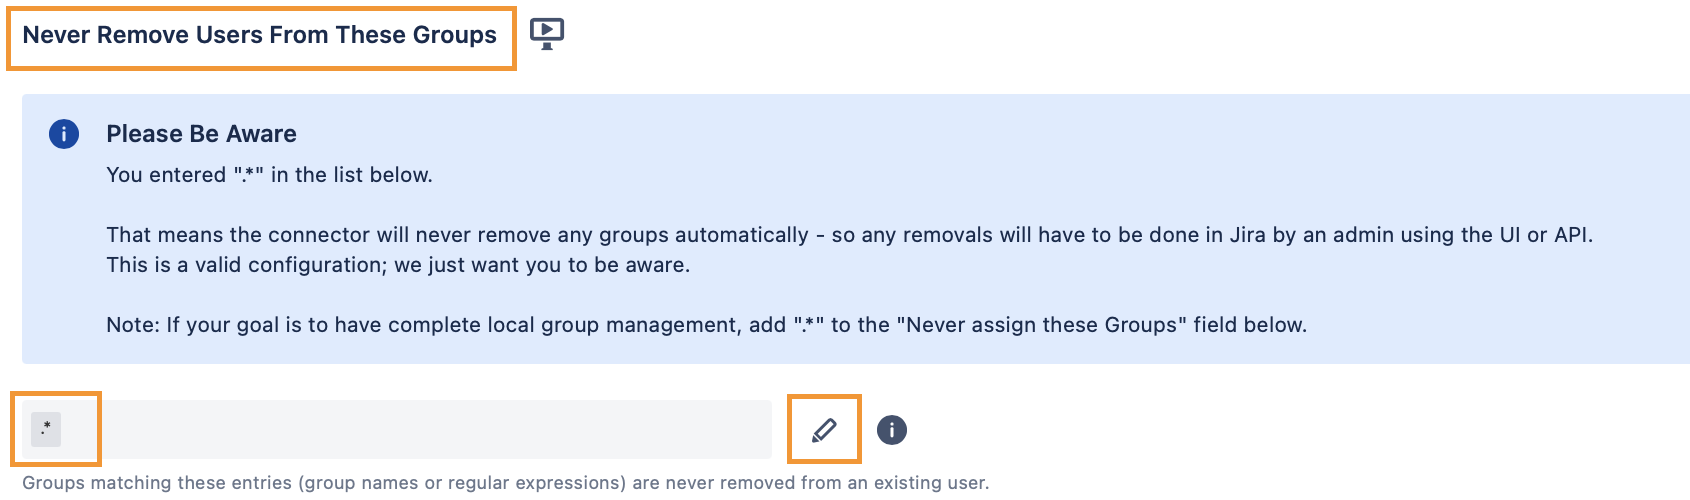
This is the safest way to ensure, that all groups who used to be assigned to the users in the old directory are also available in the new directory.
This is only required if you are unsure about all existing groups also being available in Azure with the same name or you can't make the transition that quickly.
You can remove that wildcard later and only groups assigned to the users in Azure would be assigned to the user in Jira/ Confluence/ Bitbucket.
You could also be more specific about what groups you want/ need to keep, by adding each by name in a single entry.
Group memberships can be important for applying restrictions to projects and spaces. Keeping all existing groups for the migration is always the safest option.
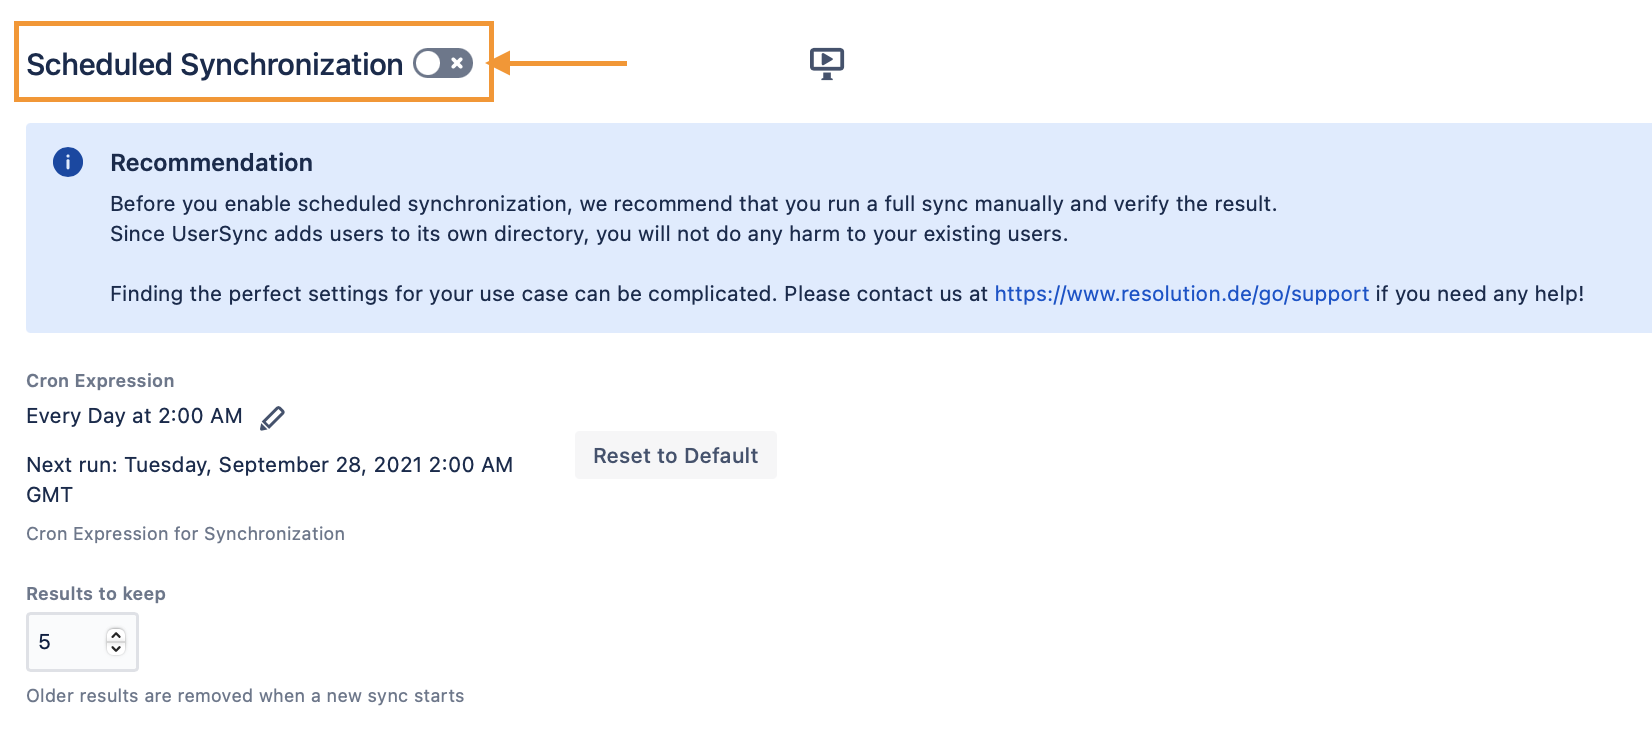
Before you save your settings, make sure scheduled synchronization (in the Sync Settings tab) is not enabled!
Now it's time to Save your settings to start the initial sync. Continue with the next chapter below.
Let User Sync copy users from LDAP to the new directory
Click on the Sync button in the actions column. User Sync will look up the users from Azure AD in your existing directories, find them in the LDAP user directory
and copy the users to the directory which has been created by the connector.

The sync might take some time, depending on the amount of users. During and after that time, you'll see a status window, informing you about the progress:
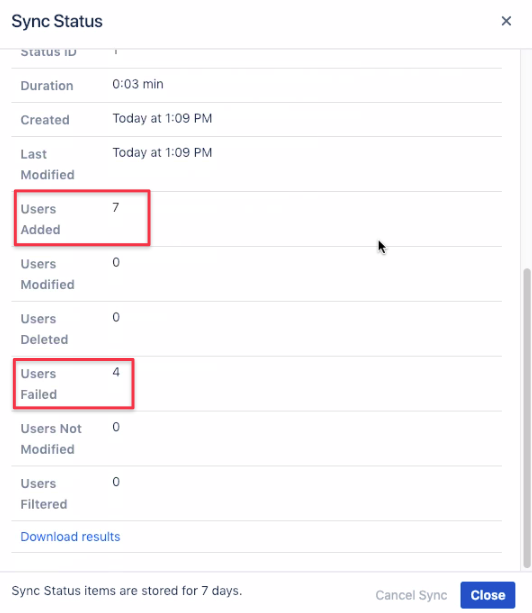
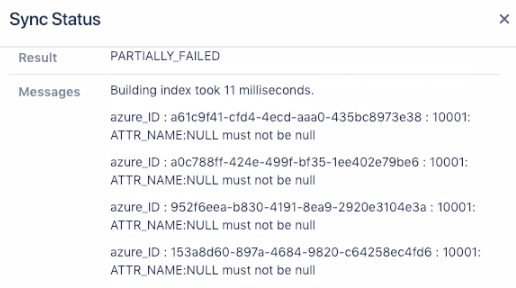
Partial failures don't necessarily mean something is wrong, usually, these are Azure AD internal users with missing attributes which couldn't be processed.
You can check details by looking at the file provided via Download results or looking at the top of the status window:
Change Directory Order and Verify the results
Now that the sync operation has been completed, we have the same user in two directories:
the LDAP directory and the Azure AD directory from User Sync.
Authentication will always happen with the user found in the first directory in the User Directories section.
Hence you need to move the Azure AD directory above the Active Directory server/ LDAP directory.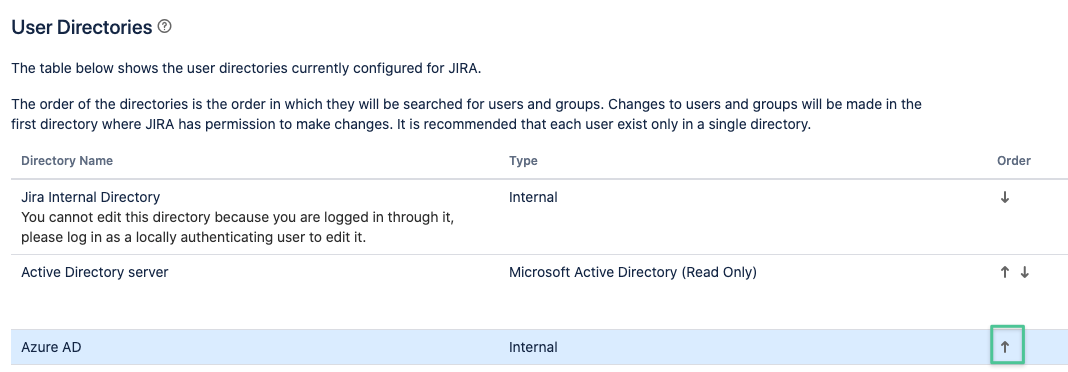
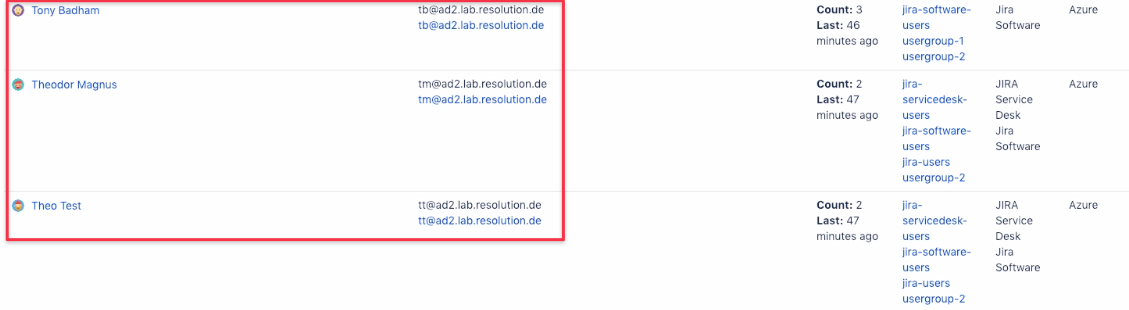
You should then verify the result of your migration sync, all users who have been migrated should appear under the new Azure AD directory
from the User Sync connector in the Users management console:
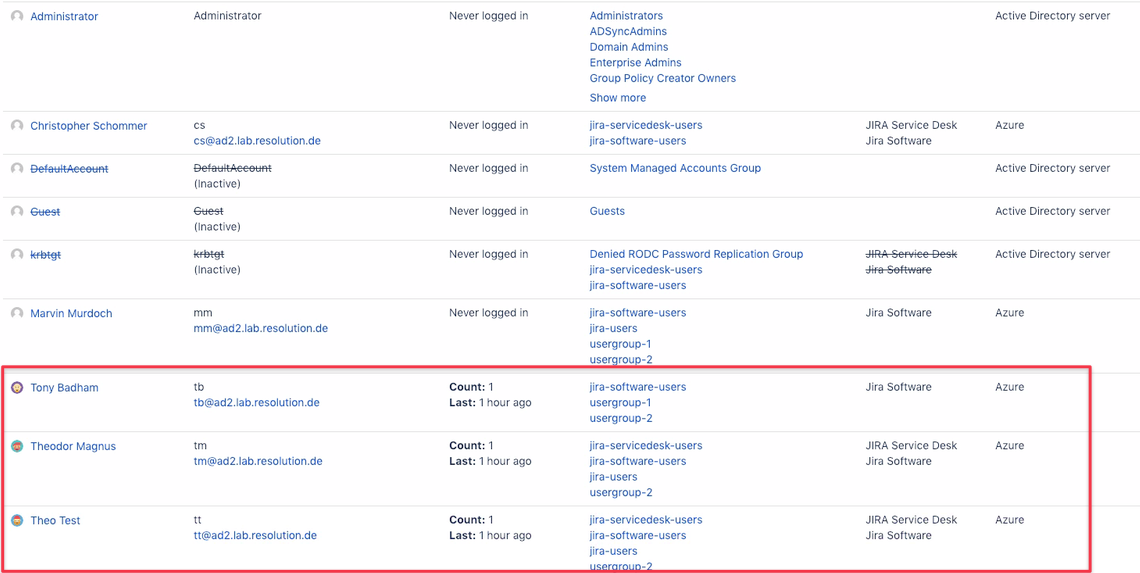
You should still see details like the profile icon picture, login details, group memberships and application access.
Disable the old LDAP directory
Now that users have been copied, you can disable the LDAP directory (don't delete it yet).
From this point on, no user will be able to log in anymore and this won't work before you've completed the configuration of the SAML SSO app for the Atlassian Server / Data Center in the next chapter.
Change usernames to Azure AD format
If you do want to rename your usernames so that match the Azure AD "User Principal" name, please do as instructed below.
If you don't want to, start reading Keep LDAP/ Active Directory Username below this section.
Go back to the User Sync configuration of your Azure connector (click on Edit).
Navigate to the Attribute Mappings section and select userPrincipalName
as connector attribute value for the Username attribute.
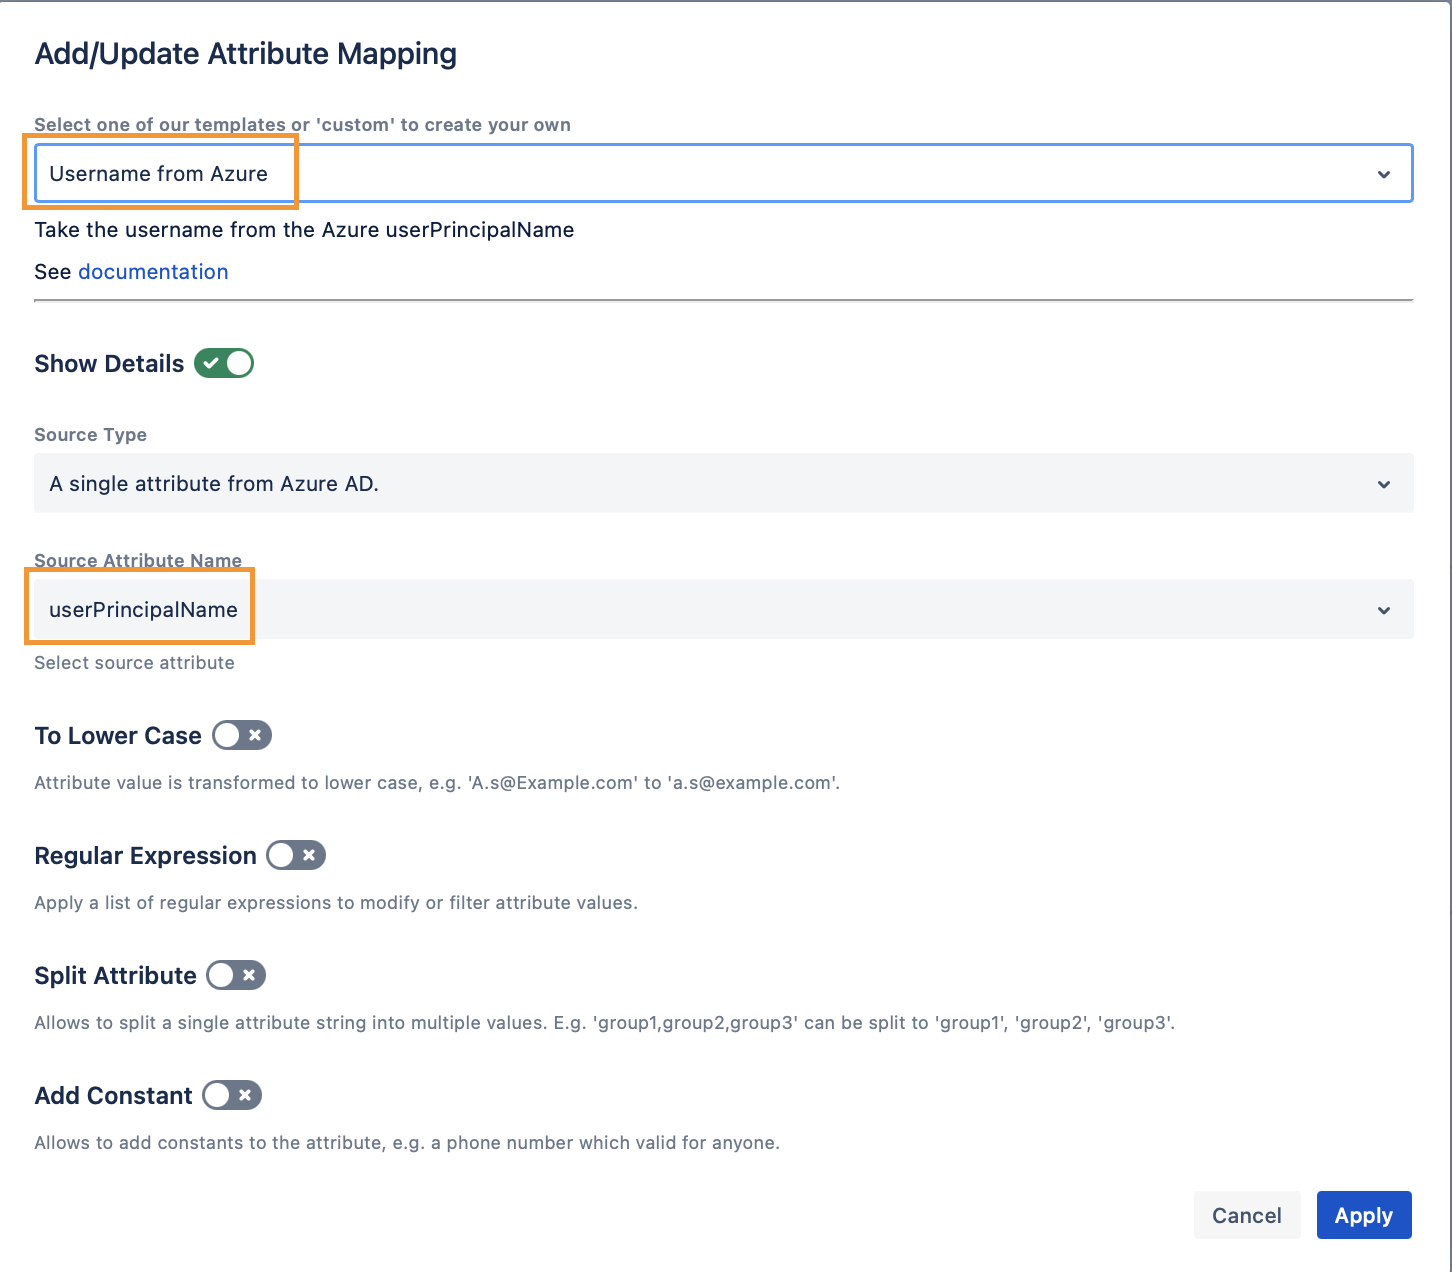
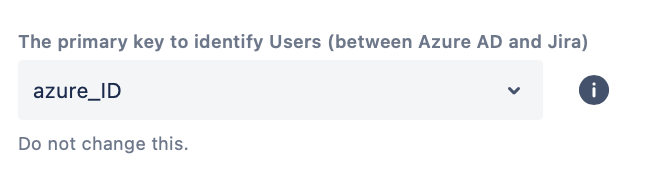
Don't change the Primary Key, keep it set to azure_ID.
Save you settings and initiate another sync again.
Once complete, you'll notice that the usernames have been changed to match the Azure AD format:
Post Username Renaming Tasks
If usernames change in Jira, Confluence and on other platforms, it's always recommended to start a re-index and clear caches of the application.
Please find below a quick summary of these tasks, depending on the Atlassian product:
Jira Server or Data Center
Perform a background index (or one blocking Jira, causing a temporary downtime)
https://confluence.atlassian.com/adminjiraserver/search-indexing-938847710.html
Confluence Server or Data Center
Perform a content index
https://confluence.atlassian.com/doc/content-index-administration-148844.html
Flush Caches, you can do that at the end of the cache admin page https://your-confluence/admin/cache/showStatistics.action
with the Flush All button. Read more about Cache management in Confluence here:
https://confluence.atlassian.com/doc/cache-statistics-150472.html
Bitbucket Server or Data Center
We are not aware of any indexing which could be done
Bamboo Server
https://confluence.atlassian.com/bamboo/reindexing-data-289277251.html
Schedule synchronization with Azure AD
You might want to schedule the synchronization of your Azure directory with User Sync.
You'll find the settings for that again in the Sync Settings tab.
Enable the Scheduled Synchronization and adjust the cron expression as desired.

Now it's time to finally configure SAML SSO so that users can Single Sign-on via Azure AD.
Please follow the steps in the linked guide in the next chapter.
Keep LDAP/ Active Directory Username
This step is an optional alternative to the previous chapter.
If you don't want to rename users to the new Azure AD username format as described above, because of different requirements,
you'll just need to make sure, that SSO is configured in a way so that usernames sent by Azure AD are matched against the old LDAP username format.
That can be accomplished by changing the NameId claim rule in the Azure AD SSO Enterprise app to onPremisesSamAccountName.
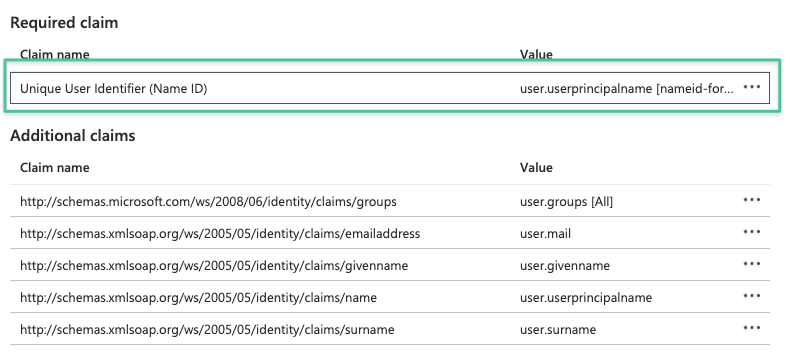
If this is the SSO Enterprise app, edit User Attributes & Claims
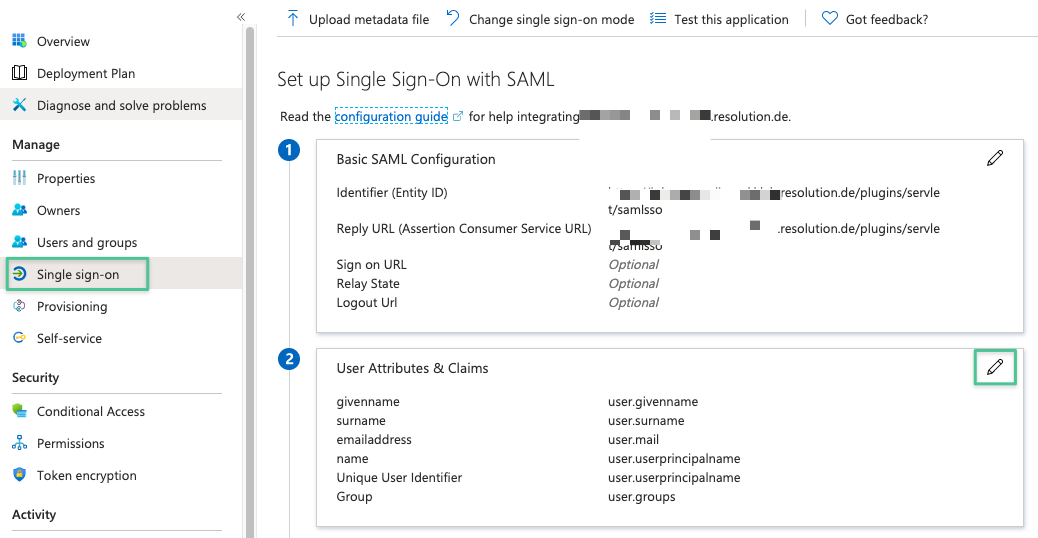
and click on Unique User Identifier:
and change its value to onpremisessamaccountname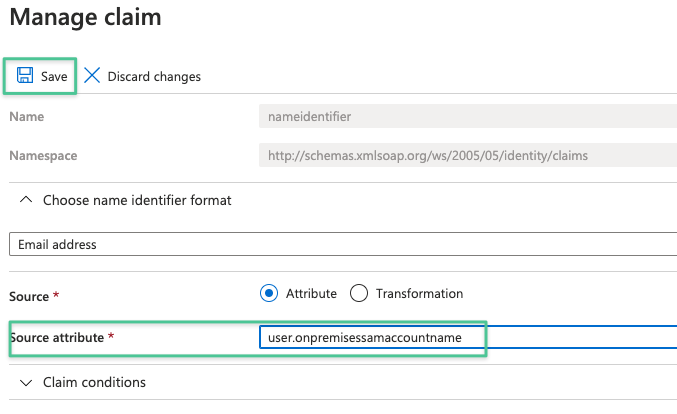
Configure the SAML SSO app
Please follow this detailed guide to complete the setup of SAML SSO itself.
You can skip its Configure Azure AD for User Sync part as you did that already as part of this guide.
Remember: if you didn't rename the users to the Azure AD format, make sure you change the claims accordingly.