Okta with Just-In-Time Provisioning
Goal
Configure SAML Single Sign-On to work with Okta and just in-time provisioning.
Prerequisites
Okta Directory
Your Atlassian application must be accessible via HTTPS. (read more about it in the Atlassian documentation, i.e. for Jira or Confluence)
Video Guide
The video below is an installation guide for setting up our SAML SSO app with Okta (watch on YouTube).
Step-by-Step Setup Guide
Find below a detailed guide on how to complete the setup of the SAML Single Sign On app with Okta and just in-time provisioning,
meaning that users from Okta are automatically created and updated in your Atlassian application, when signing in via Okta and SAML SSO.
Install the SAML SSO app
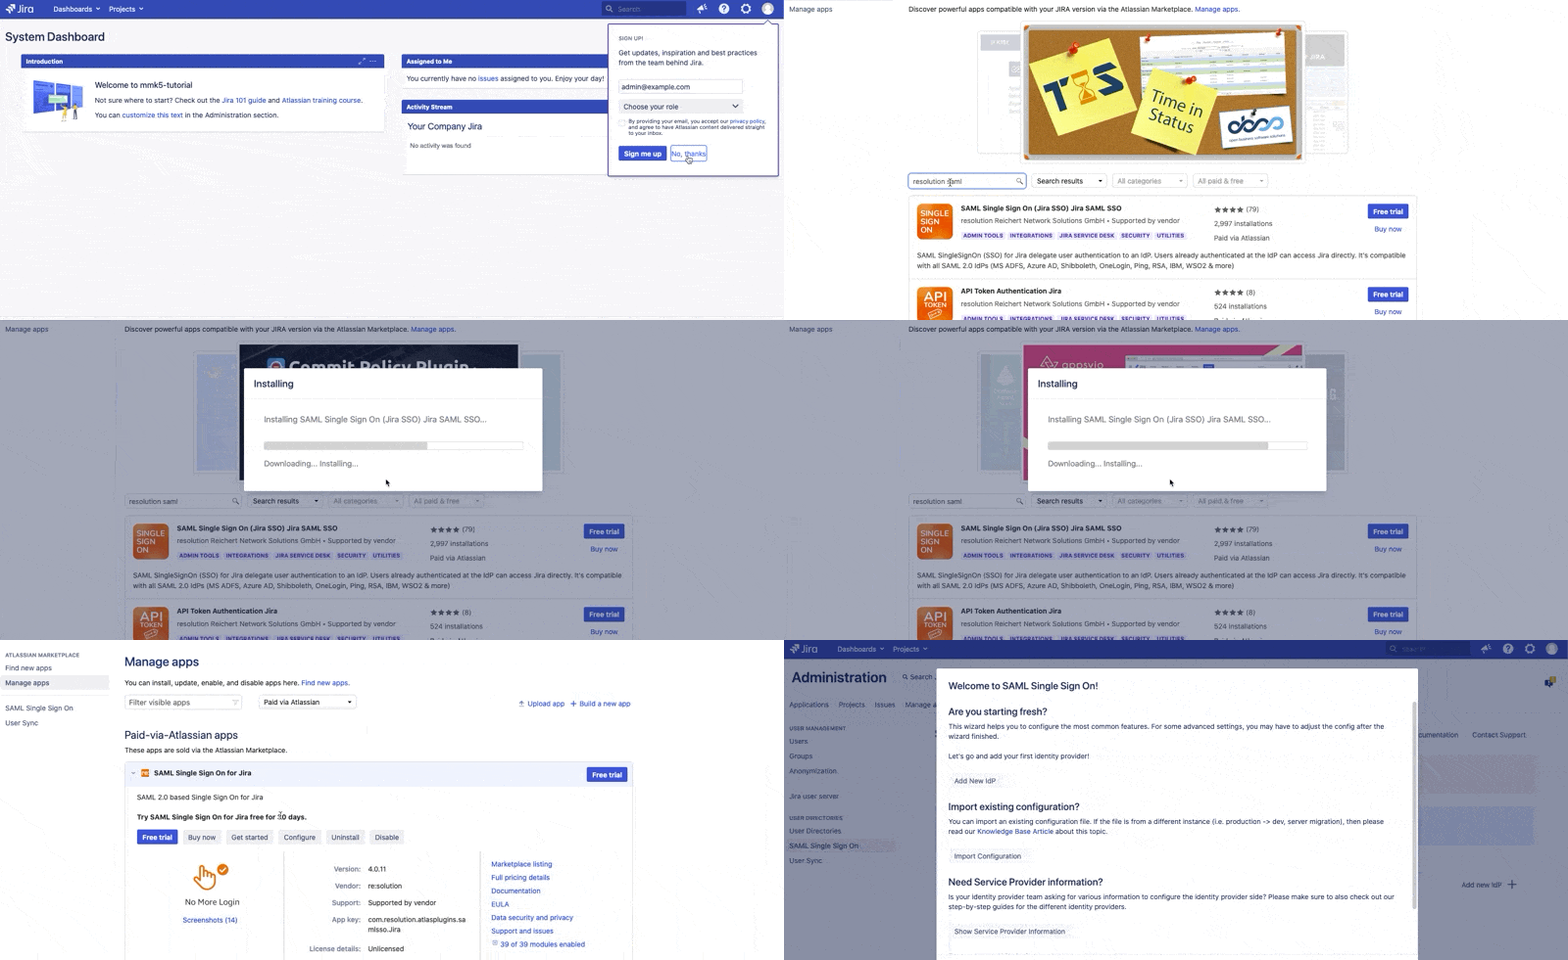
In your Atlassian product, open the in-product marketplace as described in the Atlassian documentation.
Search for "resolution saml" and click "Install" for SAML Single Sign On (SSO) by resolution Reichert Network Solutions GmbH.
After the installation is complete, click on Manage, then choose Configure.
Now, you are on the Add-on / app configuration page and the first step of the setup wizard will appear.
Configure SAML SSO app
Should you not have clicked on Configure immediately after the installation of the SAML SSO app:
To start the wizard and to configure Okta as your new identity provider, navigate to the administration console for
Jira or Confluence.
Confluence: search for USERS & SECURITY under which you'll find SAML Single Sign On
Jira: navigate to the User management tab in which you'll find SAML Single Sign On
Click on it and the wizard start page will show.
Add new Identity Provider (IdP)
Click on Add new IdP to start the wizard.
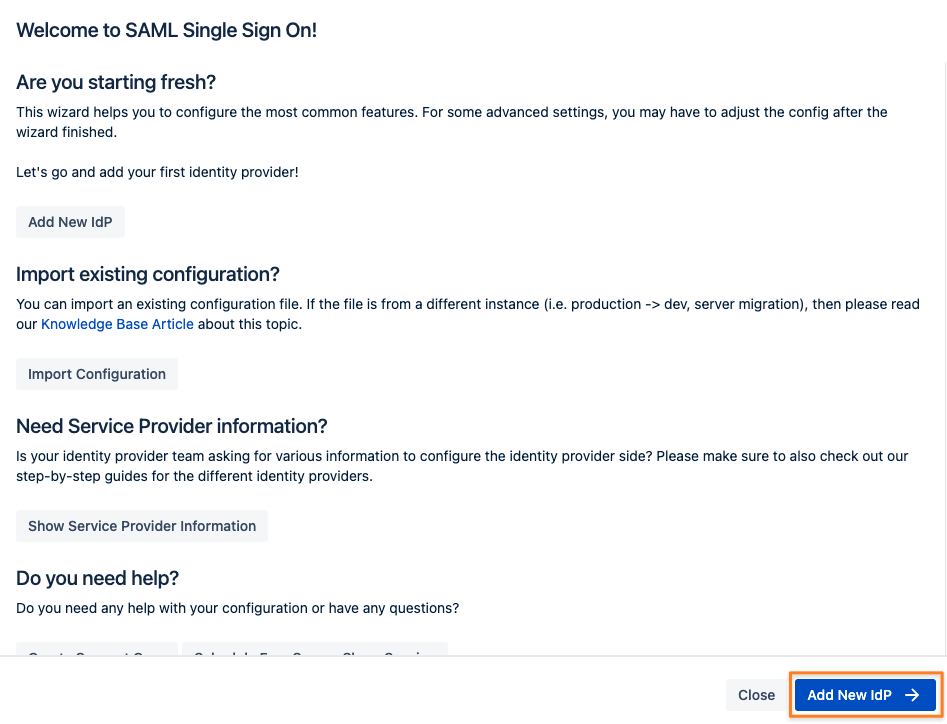
Adding a new IdP can also be done without the wizard in the app configuration section Identity Providers/ Add new IdP

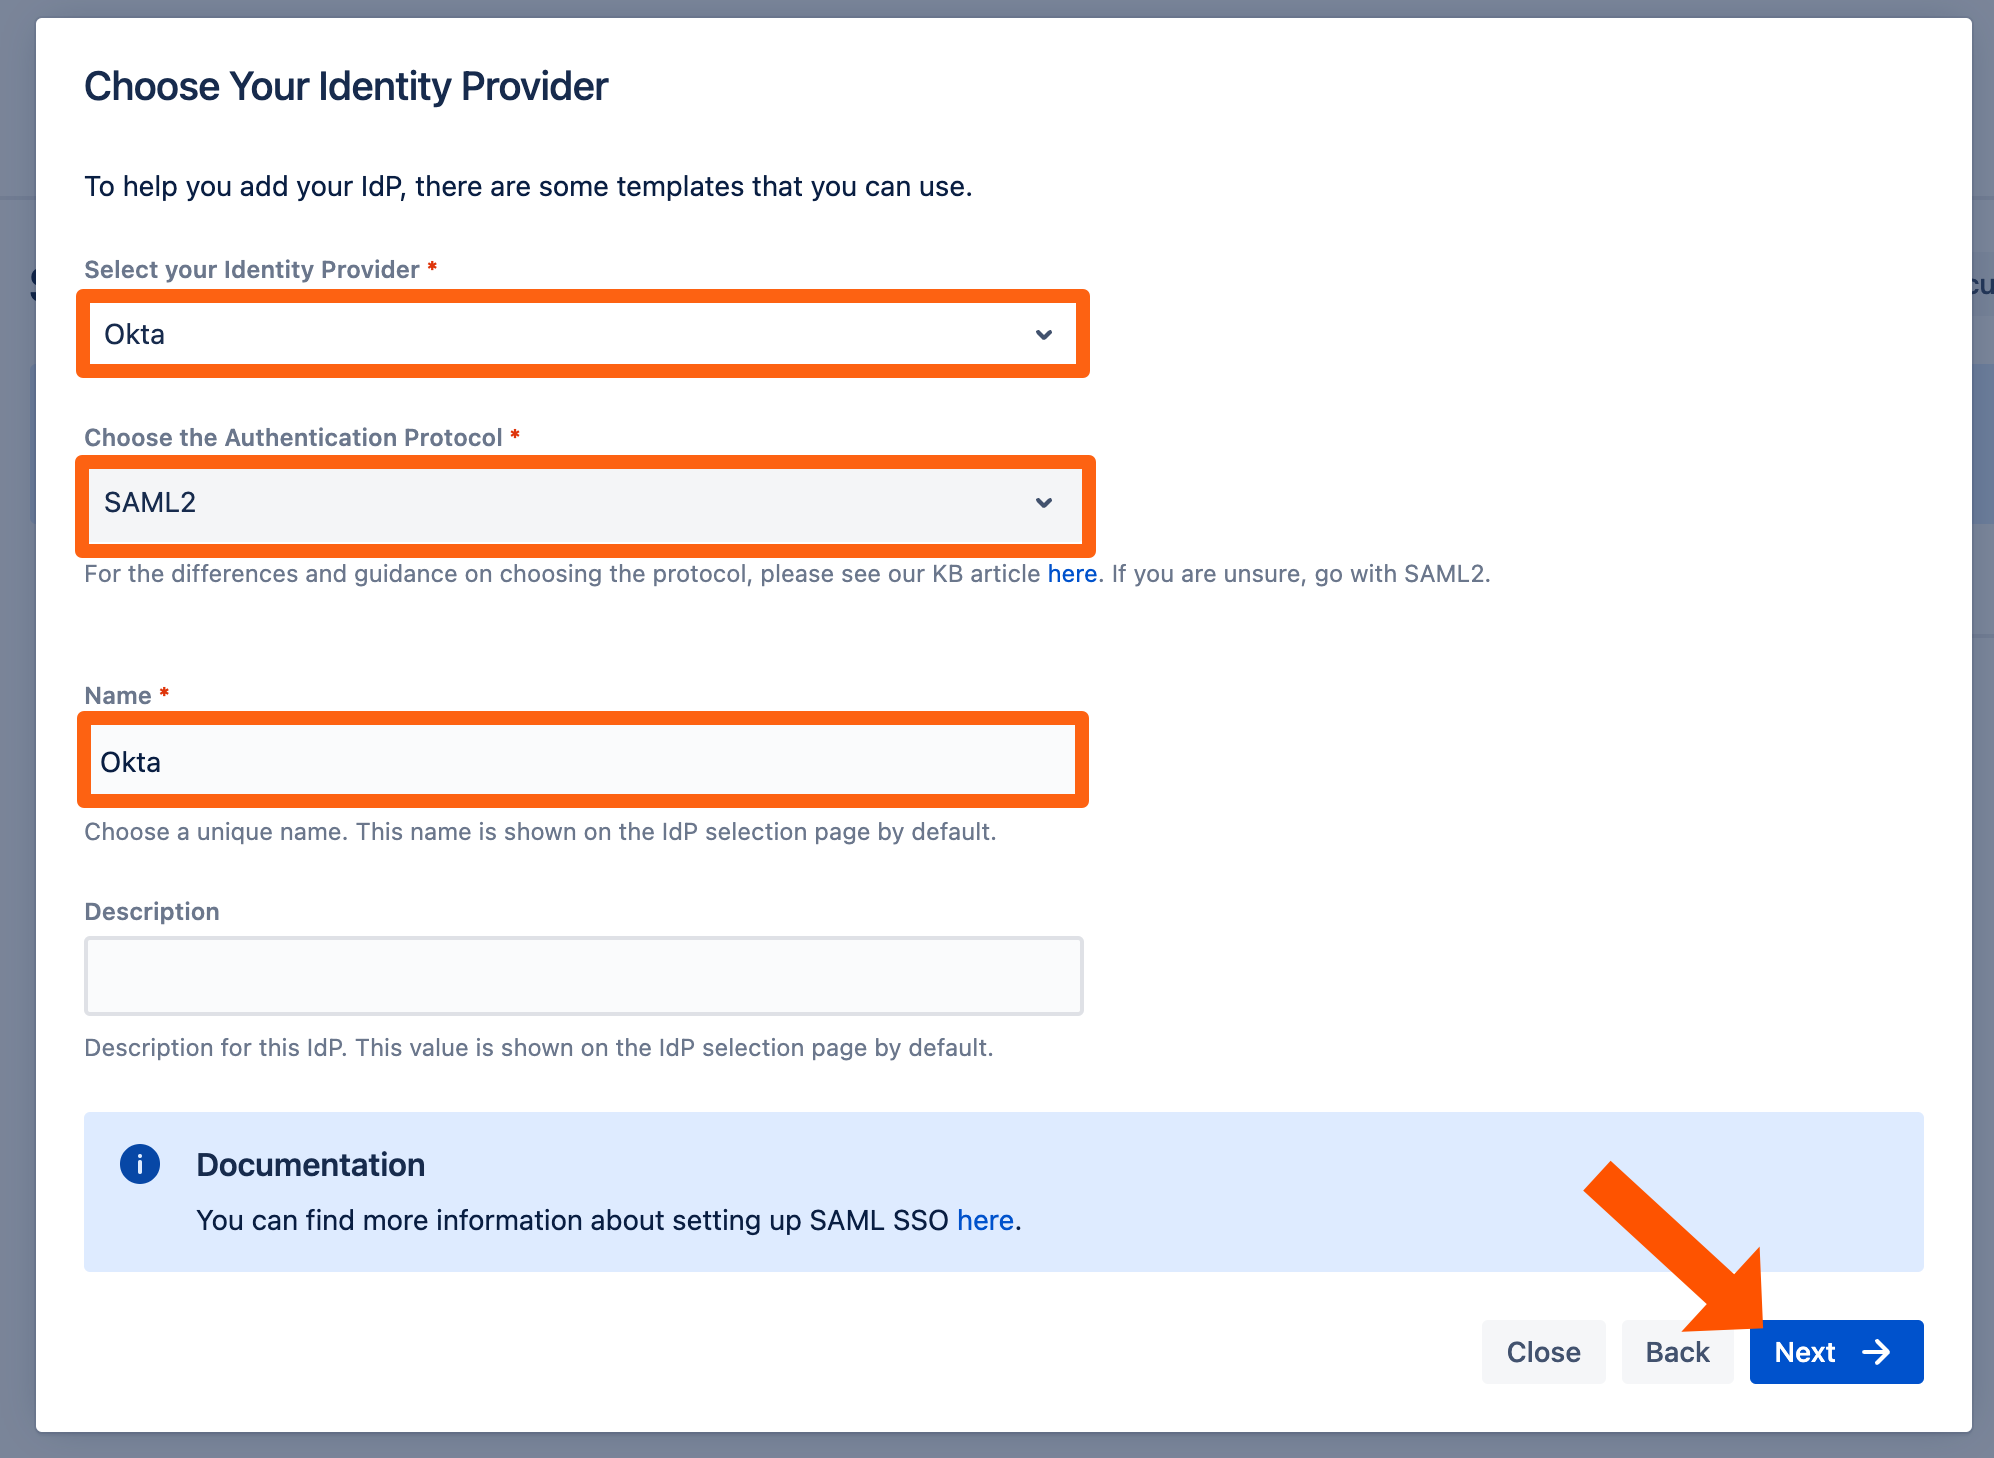
Select Okta as IdP Type.
You may also change the name and add a description. The name needs to be unique.
Keep the Authentication Protocol set to SAML2.
Click on Next.
Retrieve SAML Metadata for Okta
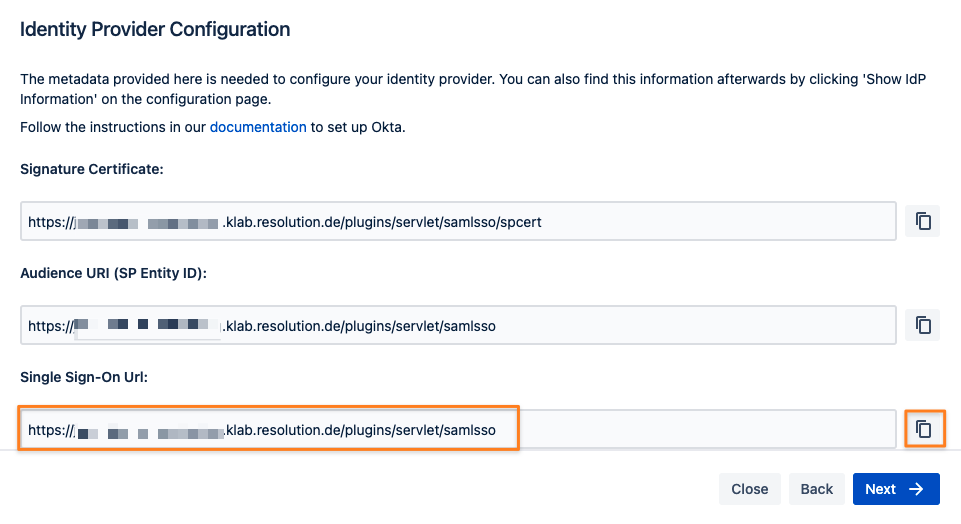
Copy the Single sign-on URL from the screen, you'll need it in your Okta configuration web console.
Click on Next and leave that next screen as it is for now since we'll continue the setup in Okta.
Configure Okta
Create Application
Now it's time to head over to Okta. Make sure you're logged in as Admin.
You need to switch to Developer Console/ Classic UI first, should you still see the black navigation bar:

Once In classic mode, expand the Application menu on the left and click on Applications, and then the Create App Integration button:
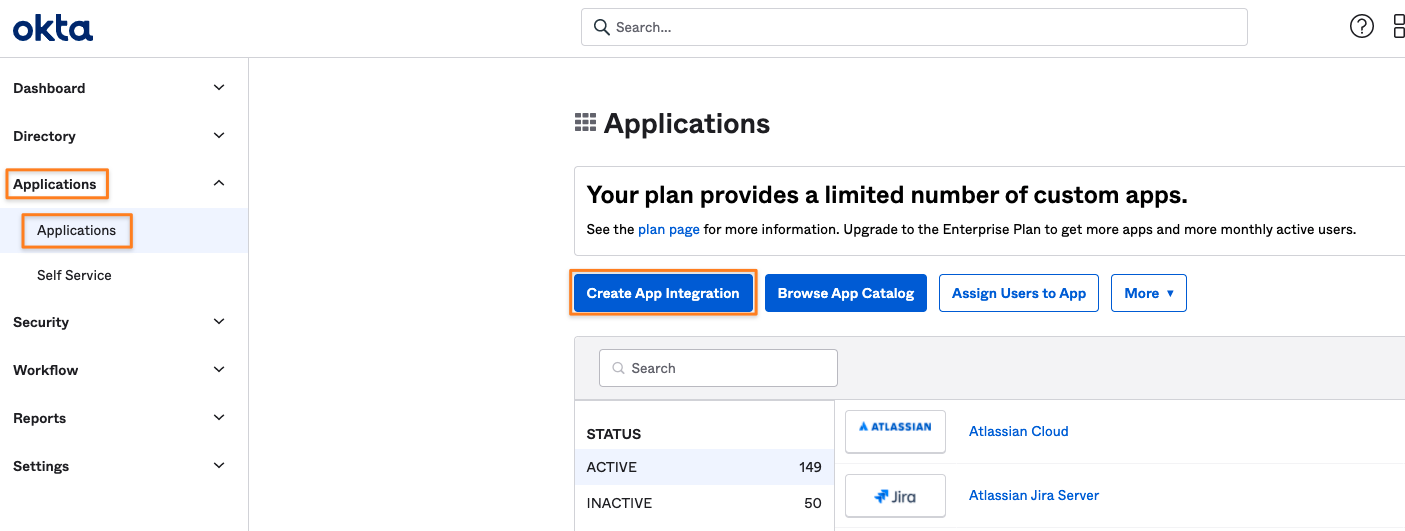
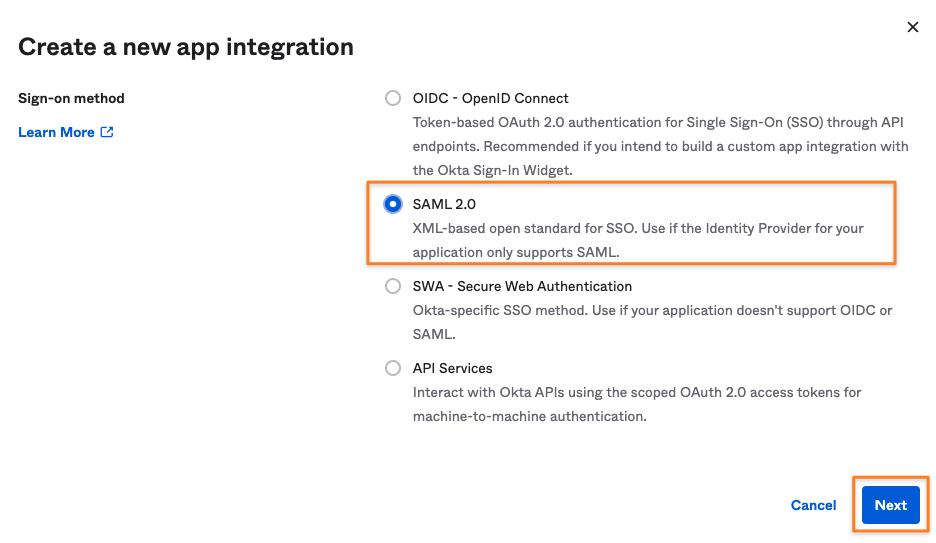
Select SAML 2.0 as the Sign-on method and click Next
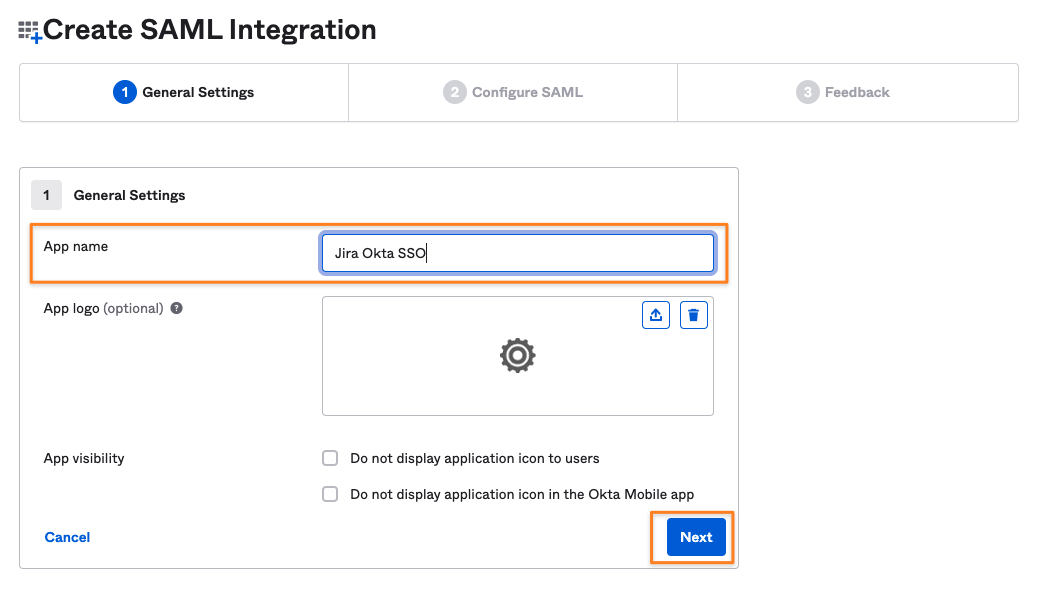
Provide an App name and click Next
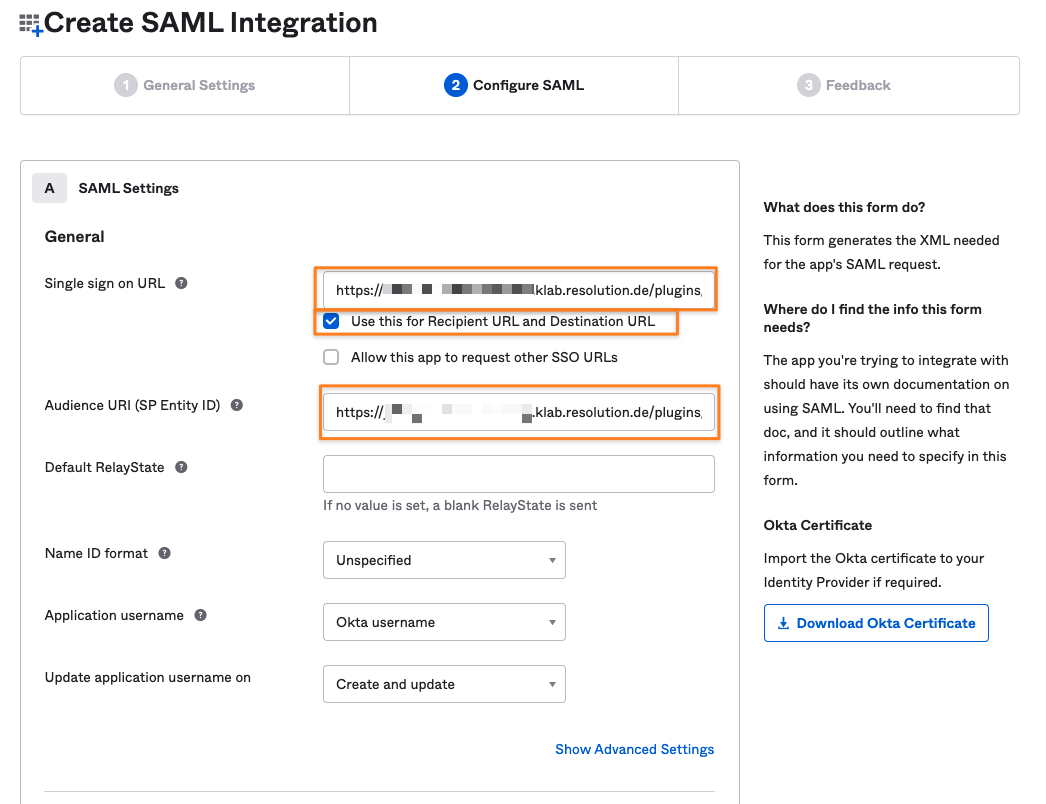
Paste the Single Sign-On URL to both the Single sign-on URL and the Audience URI (SP Entity ID) field.
Leave the Use this for Recipient URL and Destination URL checkbox enabled,
Okta Attributes for Creating Users with Just-In-Time Provisioning
Below the settings depicted above, there is another section called Attribute Statements (optional)
Please add the following attributes and map them to the value on the right side:
first
last
email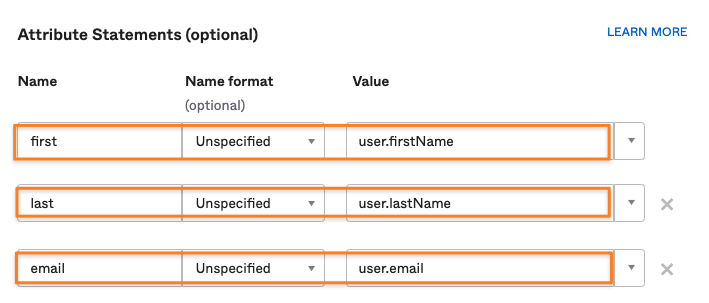
Okta Attributes for handling Groups with Just-In-Time Provisioning
If you want to create and update groups for a user signing in with SSO please add an attribute to the Group Attribute Statements (optional) section below.
Change the filter type to Matches regex and add .* as a regular expression so that all groups are sent or add another
regular expression and/ or change the filter type via the dropdown:
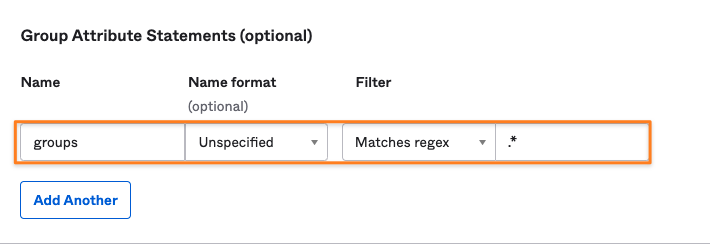
Click Next once you've added the attribute statements you need.
Complete Okta Configuration
Step 3 is just for providing some feedback to Okta. Selecting I'm an Okta customer adding an internal app and clicking on Finish is all you need to do.
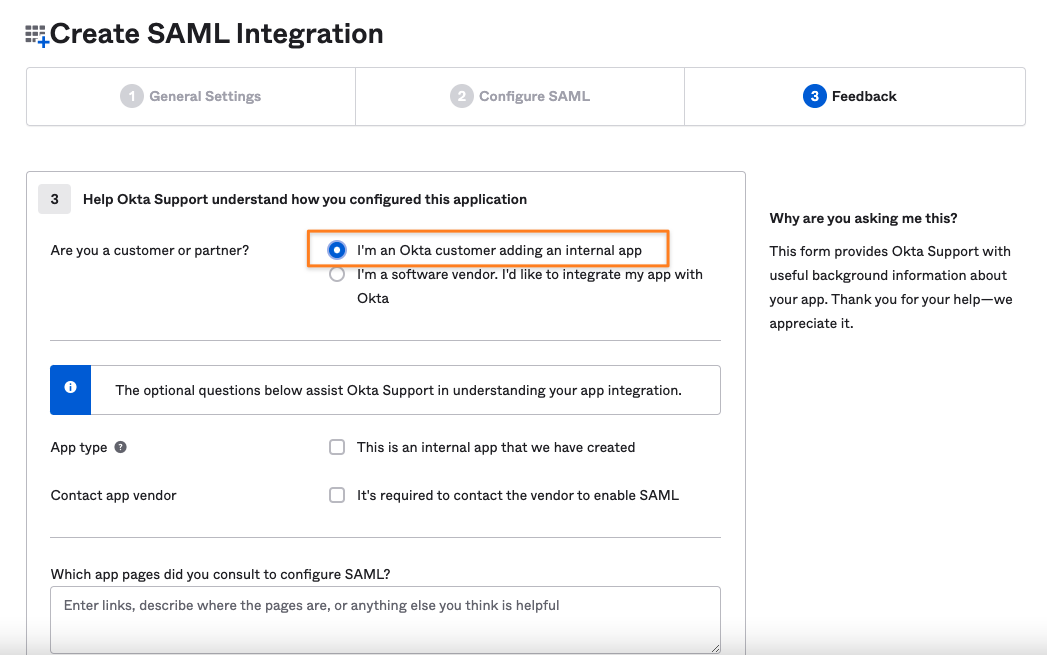
You'll be redirected to the Sign on tab from which you can get the Identity Provider metadata.
Under the SAML Signing Certificates section, click on Actions for the Active certificate, then choose View IdP metadata.
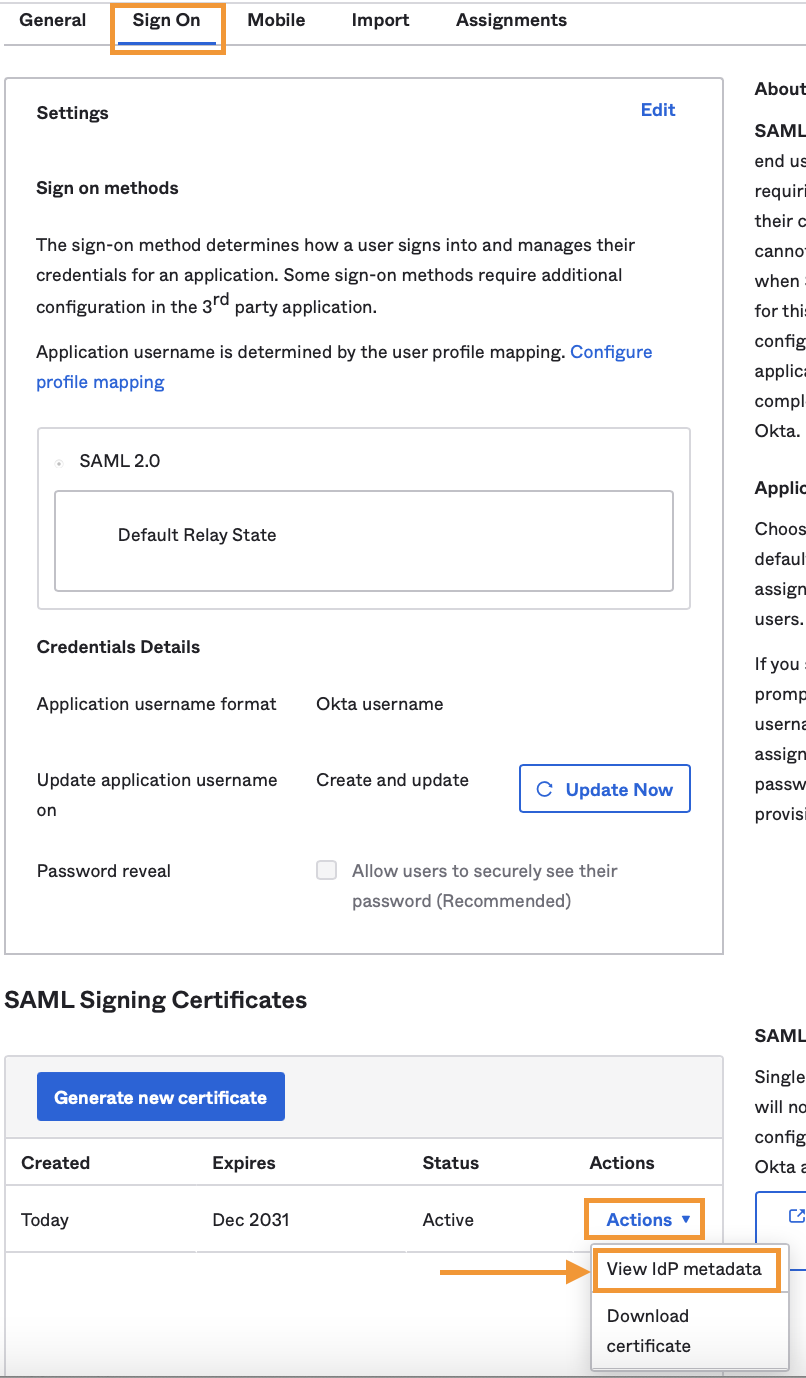
That would open a new page with the metadata XML, where you need to copy its URL from the address bar.

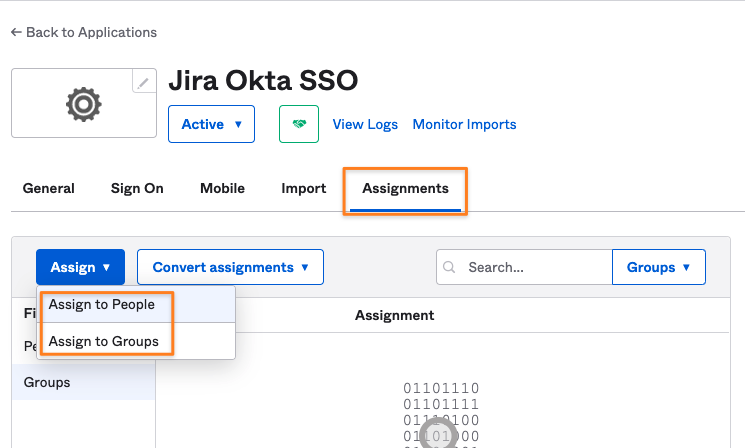
You also need to define which users and/ or groups should be allowed to sign in via SAML SSO in Okta via the app you've created.
Switch to the Assignment tab and use either the Assign to People or Assign to Groups button to define who should sign in with SSO.
Import SAML IdP Metadata
It's time to resume configuration on the SAML SSO side. Take the Okta metadata link you've copied
and paste it to the Metadata URL field in the corresponding field of the Import SAML IdP Metadata wizard screen still open.
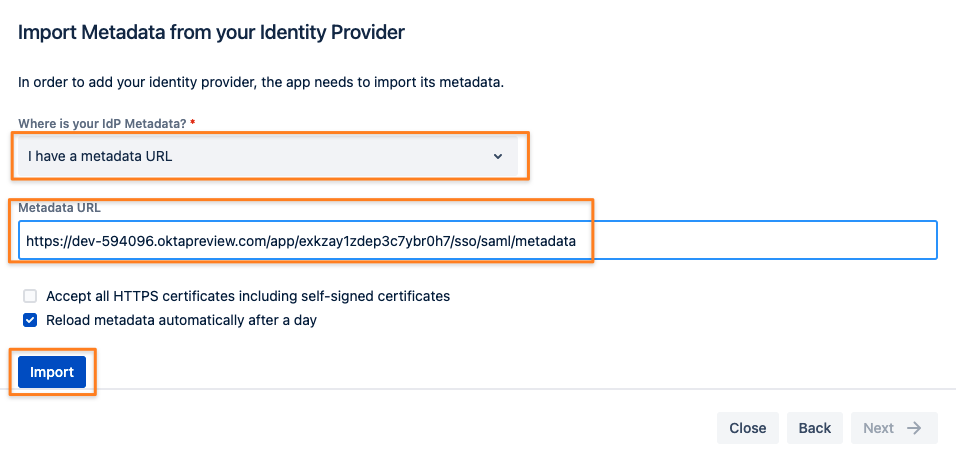
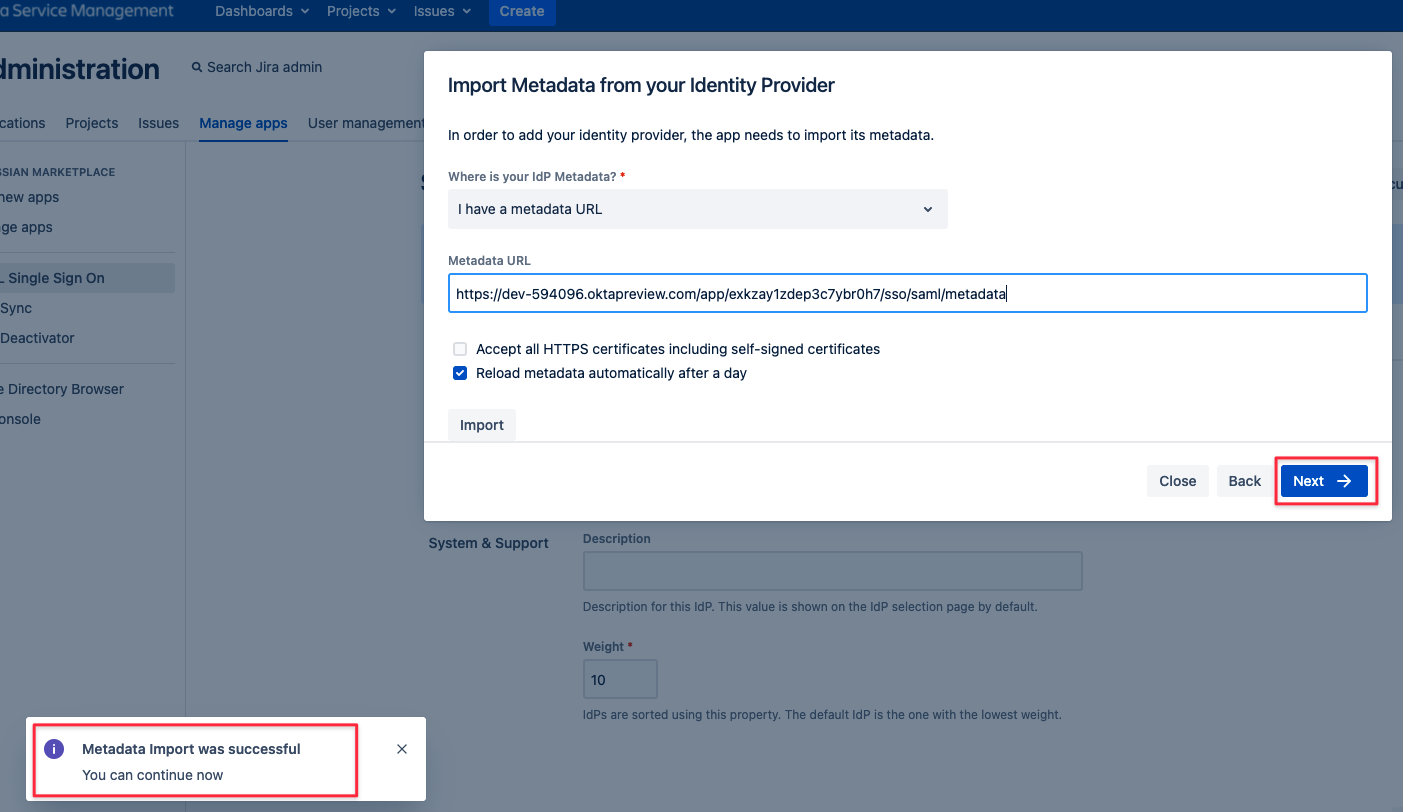
If loading the metadata from the URL worked, you can click Next
If it didn't work, your Atlassian instance can't talk directly to Okta (i.e. because traffic is blocked).
While you could also download the metadata first and import it manually by changing the Where is your IdP Metadata option,
we recommend making it work via URL. Our app supports automatic metadata refresh so that changes on the IdP will be reflected automatically after some time.
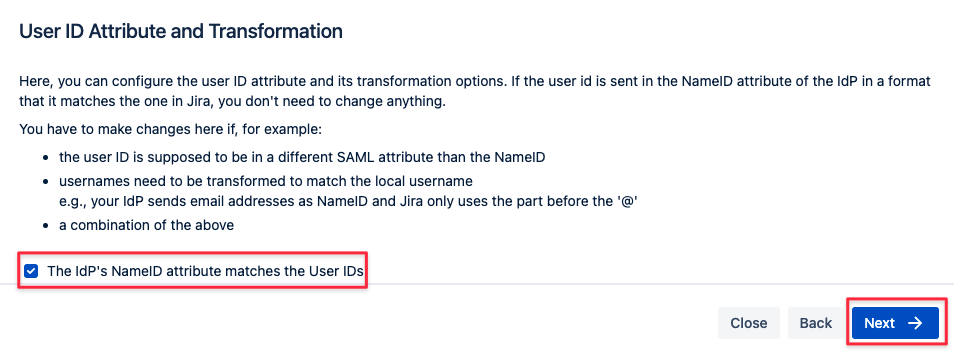
User ID attribute and transformation
It's recommended to leave this option checked. Click on Next.
User creation and update
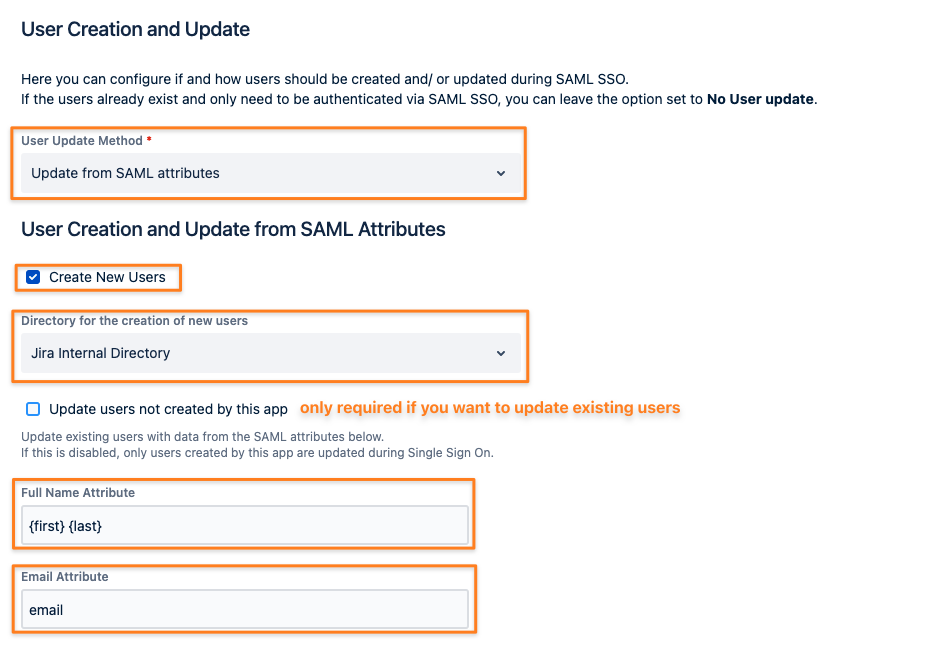
This part of the configuration defines how just-in-time provisioning is working, based on the date in the SAML response sent from Okta.
select Update from SAML-Attributes as User Update Method
check the Create New Users box
select a directory to create the new users in, usually the default user directory
if you want, you could also update users who were not created by the SAML SSO app by checking the corresponding box
enter {first} {last} as Full Name Attribute
enter email as Email Attribute
Scroll down to the Group Settings.
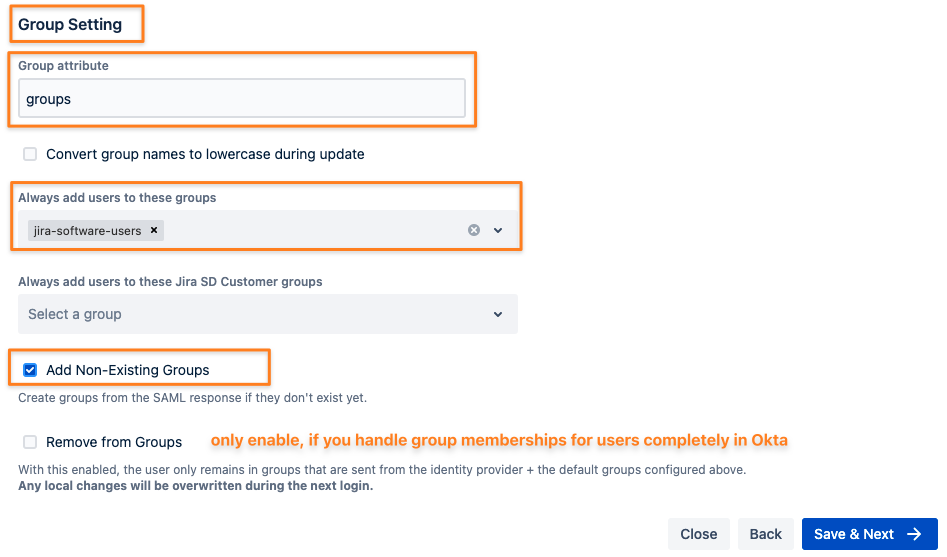
Add groups as the attribute to read the groups from as configured earlier in Okta.
Depending on your Atlassian product, it is a good idea to set default user groups for new users, such as jira-software-users for Jira or confluence-users for Confluence.
Without assigning new users to the product-specific group, users are not able to use the Atlassian product.
You can do that by adding one or more groups to Always add users to these groups, but you could also create these groups in Okta and add the users to them.
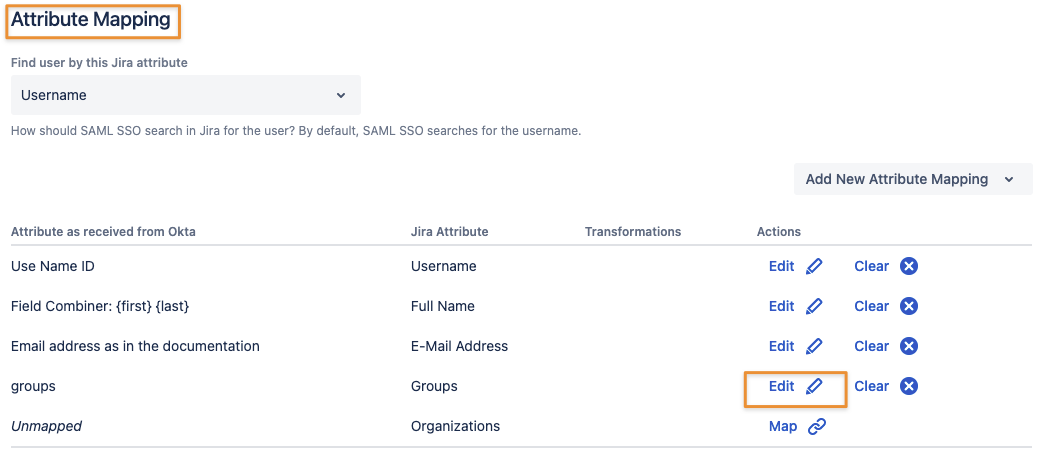
If you can't use the names on the Okta side or have existing groups with different names already, you can transform/ rename these.
That needs to be done outside the wizard afterwards in the SAML SSO configuration page: Identity Providers/ User Creation and Update/ Attribute Mapping/ Groups
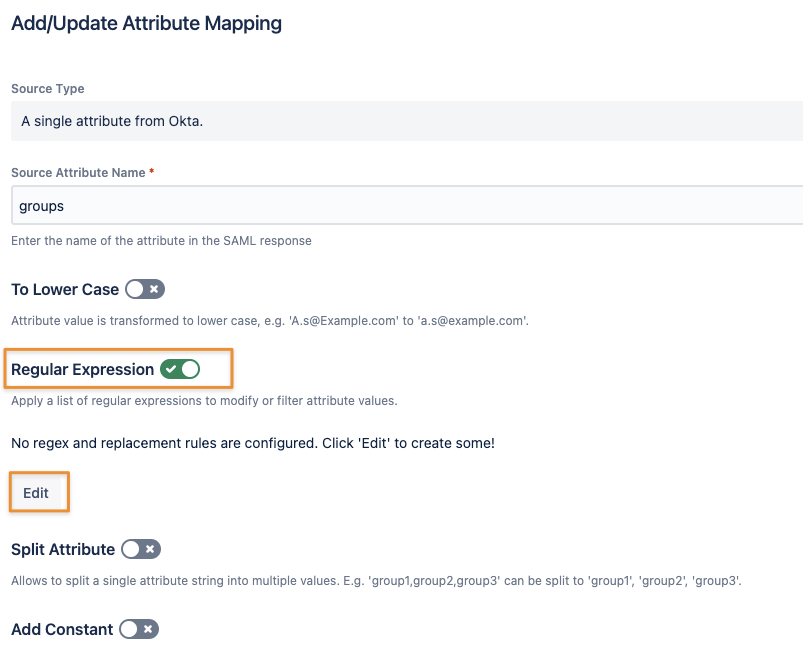
Toggling Regular Expression will allow you to add simple search/ replace transformations or even regular expressions.
Checking Add Non-Existing Groups is always a good idea.
Remove from Groups should only be activated if you are assigning groups to users only in Okta. Any groups assigned to the user directly in Jira, Confluence, etc. will be removed again from the user on the next SSO.
Click Save & Next to proceed.
Test configuration of SAML SSO app
The last step of the configuration wizard is a test that can be executed with the Start button.
Please remember that ...
the user you are testing with needs to be assigned to the SSO app you've just created in Okta
during SSO, the user should be added to the group providing application access, which was explained in the previous step above

Copy the link displayed and paste it into a new incognito/ private browsing window, and execute a login with your Identity Provider.
The status of the authentication process is permanently updated in the window.
If successful, you should click Next
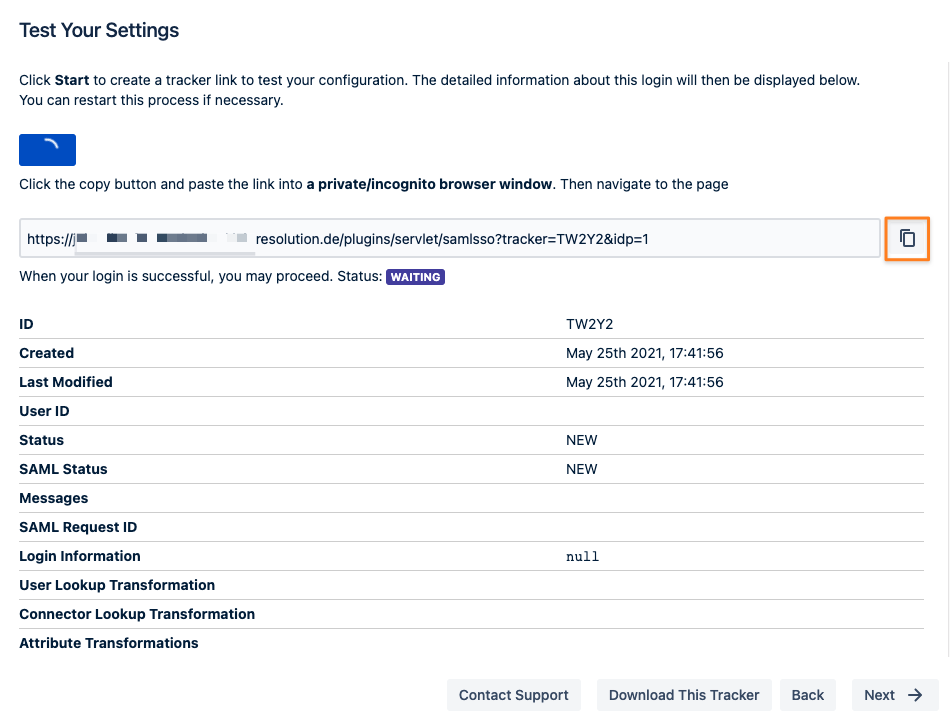
If there is any error at this point you need help with, please refer to the troubleshooting guide, which will also help us, should you open a support ticket with us.
Of course, the test window above will display a lot of information about the errors already.
Enable login redirection
The last step of adding Okta as your new IdP is to configure redirect options.
Selecting Enable SSO Redirect will ensure that users are getting redirected to be logged in via SAML,
instead of via the login form as before the SSO setup.
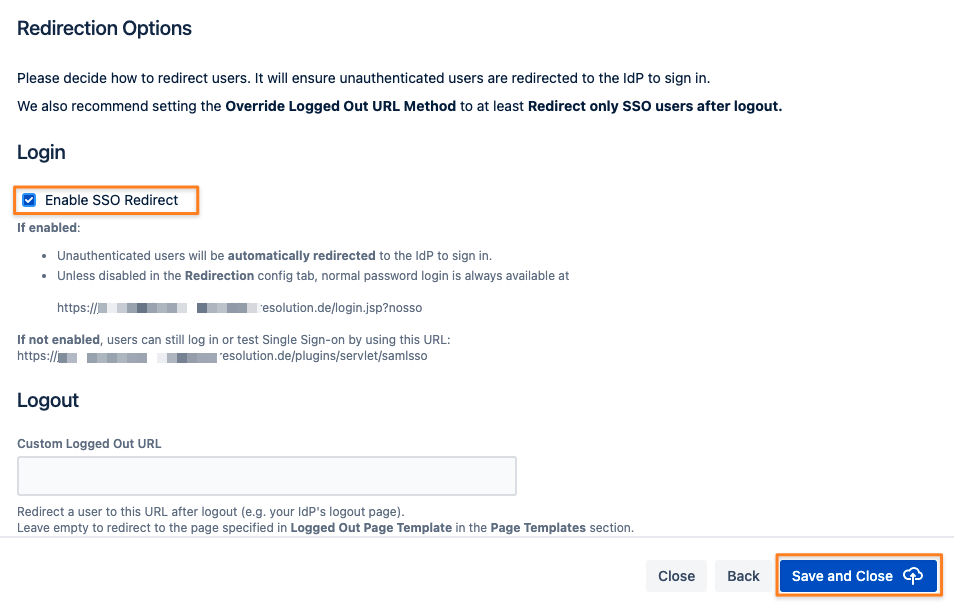
Complete the setup by clicking Save and Close
If Enable SSO Redirect is enabled, you can log in to your Atlassian application manually by browsing to the URL that matches your Atlassian application as listed below.
Use this URL, if you need to log in as a local user unknown to Okta or if there are any issues with Single Sign-On.
Jira: https://<baseurl>/login.jsp?nosso
Confluence: https://<baseurl>/login.action?nosso
Bitbucket: https://<baseurl>/login?nosso
Bamboo 5: https://<baseurl>/userlogin!default.action?nosso
Bamboo 6: https://<baseurl>/userlogin!doDefault.action?nosso
Read more about nosso here: https://wiki.resolution.de/doc/saml-sso/latest/jira/further-configuration/disable-password-login-with-nosso-parameter-v2-1-0
