

Microsoft Outlook Integration
Connect Microsoft 365 and your Outlook automatic replies become Out of Office rules in Jira. Switch automatic replies on before you leave and the app creates the rules that hand your work items to your coverers; switch them off and it takes those rules away again.
What the integration reads and writes
The connection runs in one direction. Out of Office Assistant reads the automatic-replies setting on your Microsoft 365 mailbox, and creates, replaces and removes Jira rules from it. It never writes to Outlook: the permissions it asks for are read-only (User.Read, MailboxSettings.Read, offline_access), so nothing you do in Jira changes your automatic replies or your mail.
The app checks your mailbox every 15 minutes rather than reacting to each change as it happens, so anything you alter in Outlook takes up to 15 minutes to reach Jira.
Connect your own Microsoft 365 account
Open Out of Office Assistant from the Jira sidebar under Apps.
Select the My Integrations tab.
On the Office 365 (Outlook) card, select Connect.
Microsoft opens outside Jira. The account picker always appears, so check the name before you continue.
Work through the three steps the wizard shows - Sign in, Review permissions and Finish.
You are returned to a page inside Jira that confirms the result. The card now carries a green check, the number of rule templates configured, and a Disconnect button.
Authorization fails if the Microsoft account has no mailbox, because there are no automatic replies to read.
The authorization link belongs to the Jira user who started it, so sending it to a colleague will not connect their account.
Reconnecting reuses whatever Microsoft session your browser already holds, so you may not be asked for a password. Sign out of Microsoft first if you want to connect a different account.
Choose what the rules say
Your automatic reply supplies only the dates. Scope, coverers and message come from the templates connected to this integration.
On My Integrations, select the gear on the Office 365 (Outlook) card. It opens Microsoft 365 (Personal) Integration.
Select Add template from library, tick the templates you want, then select Confirm. The same dialog offers Create template if you need a new one.
One template is connected for you when you first authorize.
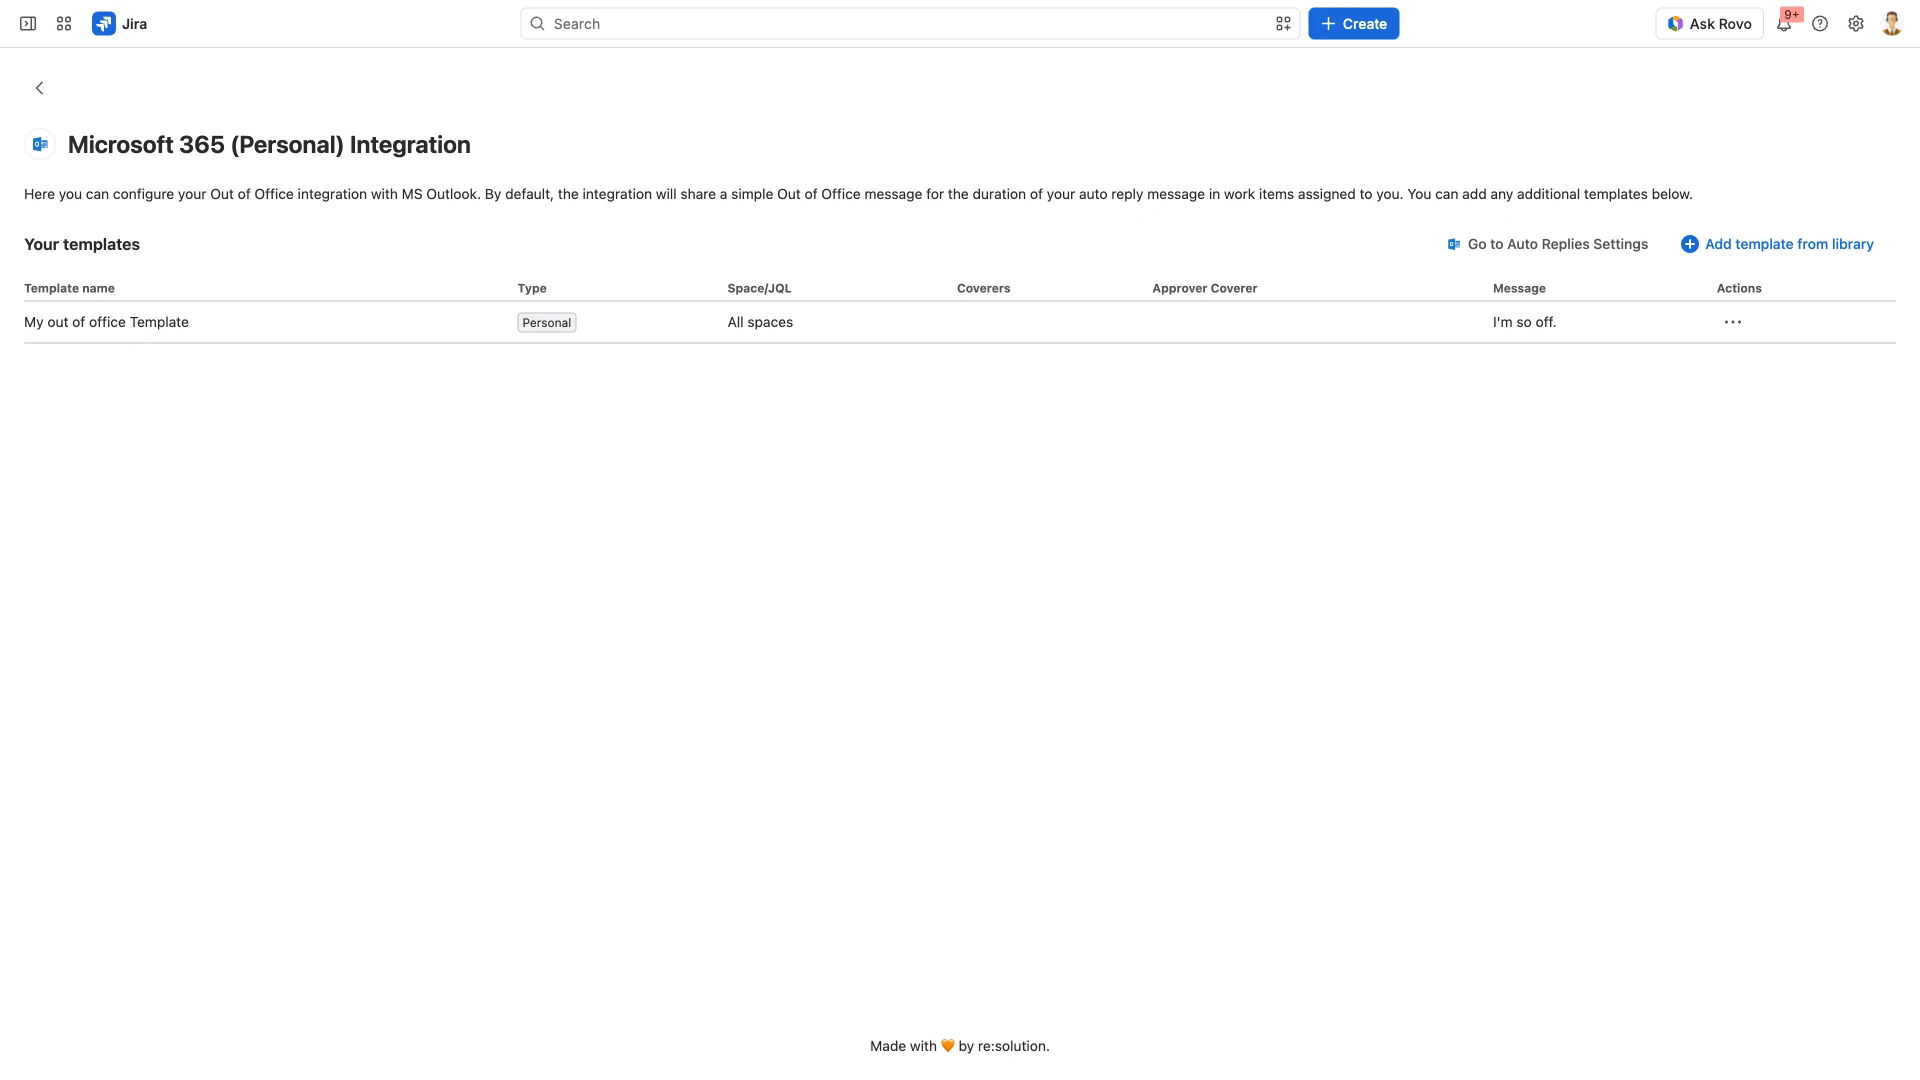
Each connected template produces its own rule, so four templates mean four rules for one absence rather than one rule with four sets of coverers. Go to Auto Replies Settings opens the automatic-replies settings in Outlook, where you set the dates.
What each change in Outlook does
Switching automatic replies on creates one rule per connected template. If you set no time period in Outlook, those rules are open ended.
A rule whose start time is still in the future is listed as Scheduled in My Rules, and turns Active when that time arrives.
Changing the time period, or changing which templates are connected, replaces the rules the integration made earlier rather than adding a second set beside them.
Switching automatic replies off removes those rules at the next check, so allow up to 15 minutes before they disappear.
The rule's message is the template's. What you type into the Outlook automatic reply is never copied into Jira, so edit the template to change the wording.
These rules sit in Current rules on My Rules alongside the ones you create by hand, and the Creator column carries the integration's icon rather than your avatar.
Connect Microsoft 365 for the whole site
An administrator can connect Microsoft 365 for a set of email domains instead of asking each person to connect an account. Open the App Settings tab, select Global Integrations, then + Add Microsoft 365. A form opens inside the app and asks for three things:
Integration Name - the name this integration carries in the Global Integrations table.
Email Domains - the domains whose users the integration serves. Type one, select Add, and repeat for each.
Default Templates - the templates used as defaults for users in those domains. Default Template, global and covering all spaces, is listed to begin with; Add from library adds more and Remove takes one out.
Save & Authorize stays disabled until the required fields are filled, and Cancel leaves without creating anything. A saved integration joins the table with its status, an Enabled toggle and an Actions menu.
Only administrators see App Settings. Permissions and Access Requirements sets out who that means and what each integration requires.
Related pages
Templates for Out of Office Rules - what a template holds, and how to build the ones this integration connects.
The List of Out of Office Rules - reading My Rules, its statuses and its tables.
Google Workspace Calendar Integration - the same pattern driven by calendar entries.
Integrations - every source that can create rules for you.