
Agent Availability Display in JSM Customer Portal
Overview
The Agent Availability Display feature enhances customer experience in Jira Service Management (JSM) portals by providing real-time visibility into support agent availability. This transparency helps manage customer expectations by showing whether their assigned agent is available, leaving soon, or currently out of office - directly within the customer portal ticket view.
Understanding Agent Availability in Customer Portals
What is Agent Availability Display?
Agent Availability Display is a customer-facing feature that:
Shows real-time agent status in the JSM customer portal
Manages customer expectations about response times
Displays absence information when agents are unavailable
Indicates unassigned tickets clearly to customers
Provides professional transparency in customer communications
How it Works
The feature creates a dedicated panel in the customer portal that mirrors the internal Out of Office issue context information. When customers view their tickets, they immediately see:
- Agent Availability Panel
- ├── Agent Avatar
- ├── Agent Name
- ├── Current Status
- │ ├── ✅ Available
- │ ├── 🟡 Leaving Soon
- │ ├── 🔴 Out of Office
- │ └── ⚪ Unassigned
- └── Absence Dates (if applicable)
Customer Experience Impact
For Available Agents:
Customers see green "Available" status
Sets expectation for normal response times
Builds confidence in timely support
For Agents Leaving Soon:
Yellow warning indicator appears
Helps customers understand potential delays
Encourages early communication if needed
For Out of Office Agents:
Red status with absence dates
Clear communication about unavailability
Manages expectations appropriately
For Unassigned Tickets:
Shows "Unassigned" label
Indicates ticket awaits assignment
Prevents confusion about response delays
Enabling Agent Availability Display
Prerequisites
Before enabling this feature, ensure:
Jira Administrator access is available
Out of Office Assistant is properly installed
JSM projects are configured and active
Agents have created their Out of Office rules
Configuration Steps
Step 1: Access Out of Office Assistant
Navigate to the app:
From Jira top menu: Apps → Out of Office Assistant
Ensure you're logged in as a Jira Administrator
Step 2: Open User Administration
Click User Administration in the left sidebar
This opens the administrative interface
Shows global configuration options
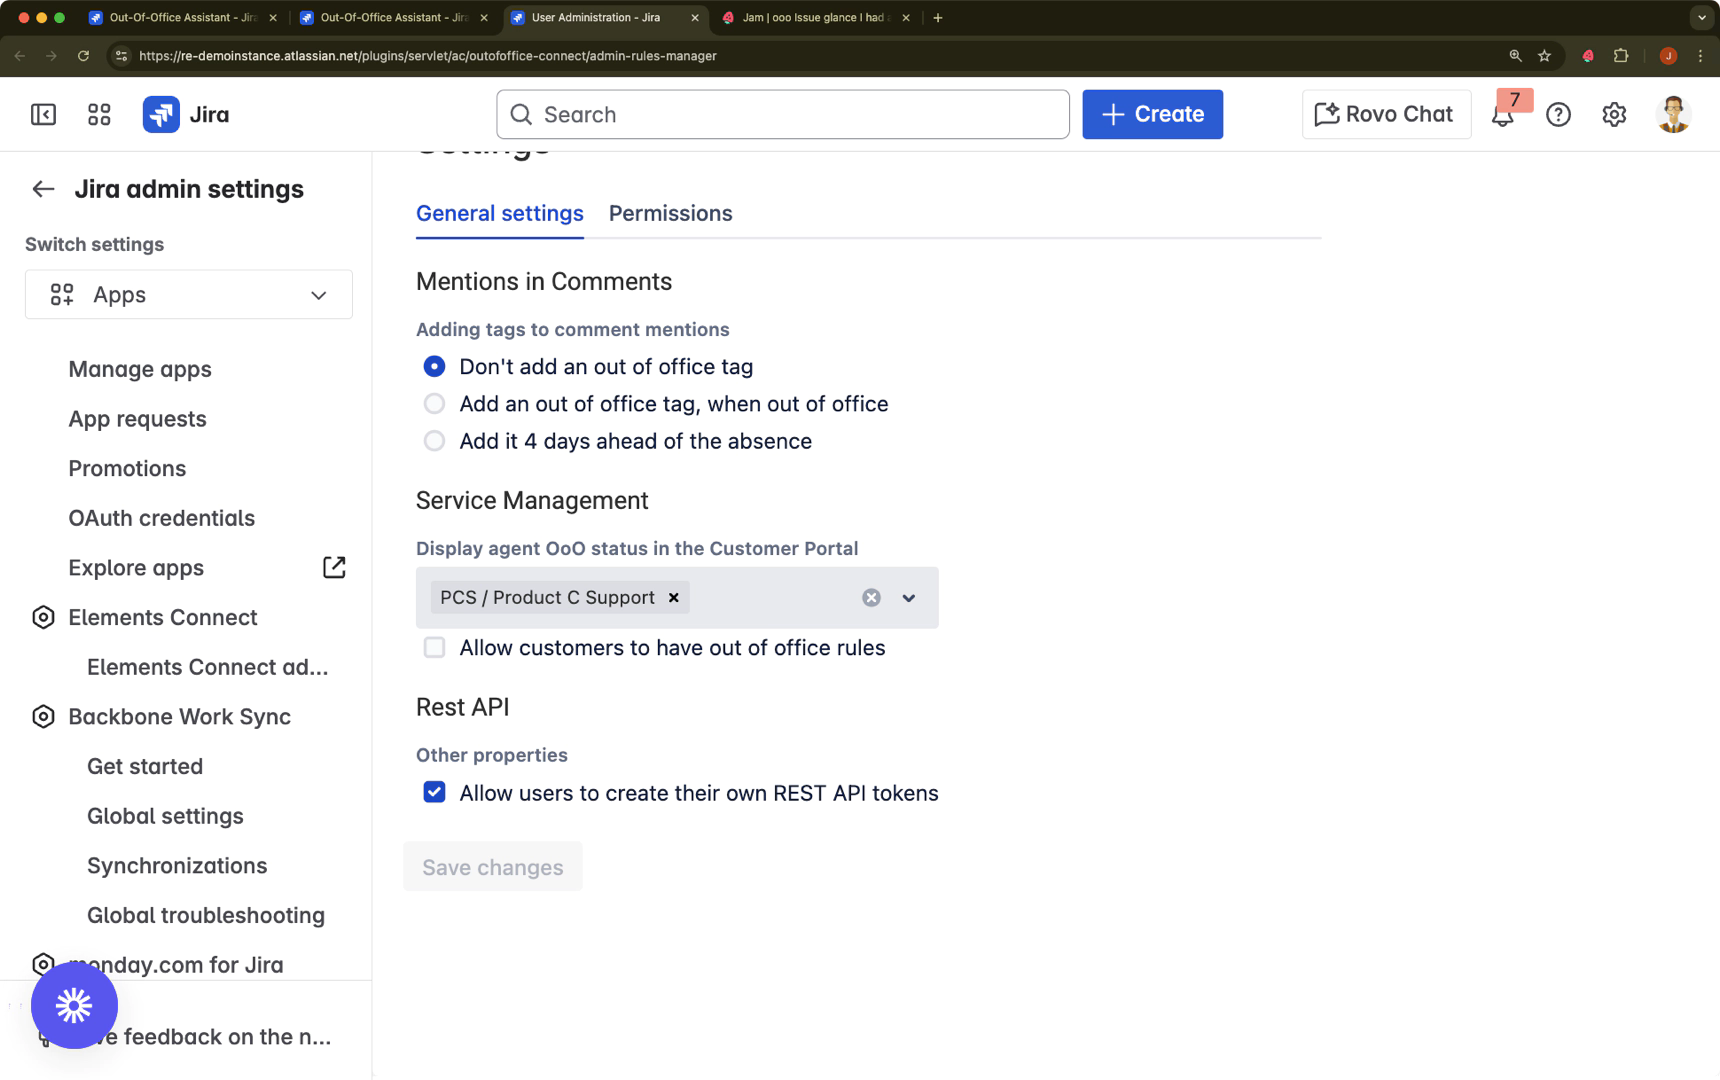
Step 3: Access Global Settings
Click Global Settings button in the top right
Opens system-wide configuration panel
Contains all administrative options
Step 4: Configure JSM Projects
Locate the setting: "Display agent OoO status in the Customer Portal"
Select JSM projects where you want to enable the feature:
Click the project selector dropdown
Choose one or multiple JSM projects
Selected projects will show agent availability
Verify your selections:
Review selected projects
Ensure all customer-facing projects are included
Consider pilot testing with specific projects first
Step 5: Save Configuration
Click Save changes button
⚠️ Important: Changes are not applied until saved
System will confirm successful save
Changes take effect immediately
Customer Portal Display
Panel Location and Appearance
The agent availability panel appears:
Position: Right sidebar of the ticket view
Visibility: Always visible when viewing a ticket
Updates: Real-time status changes
Mobile: Responsive design for all devices
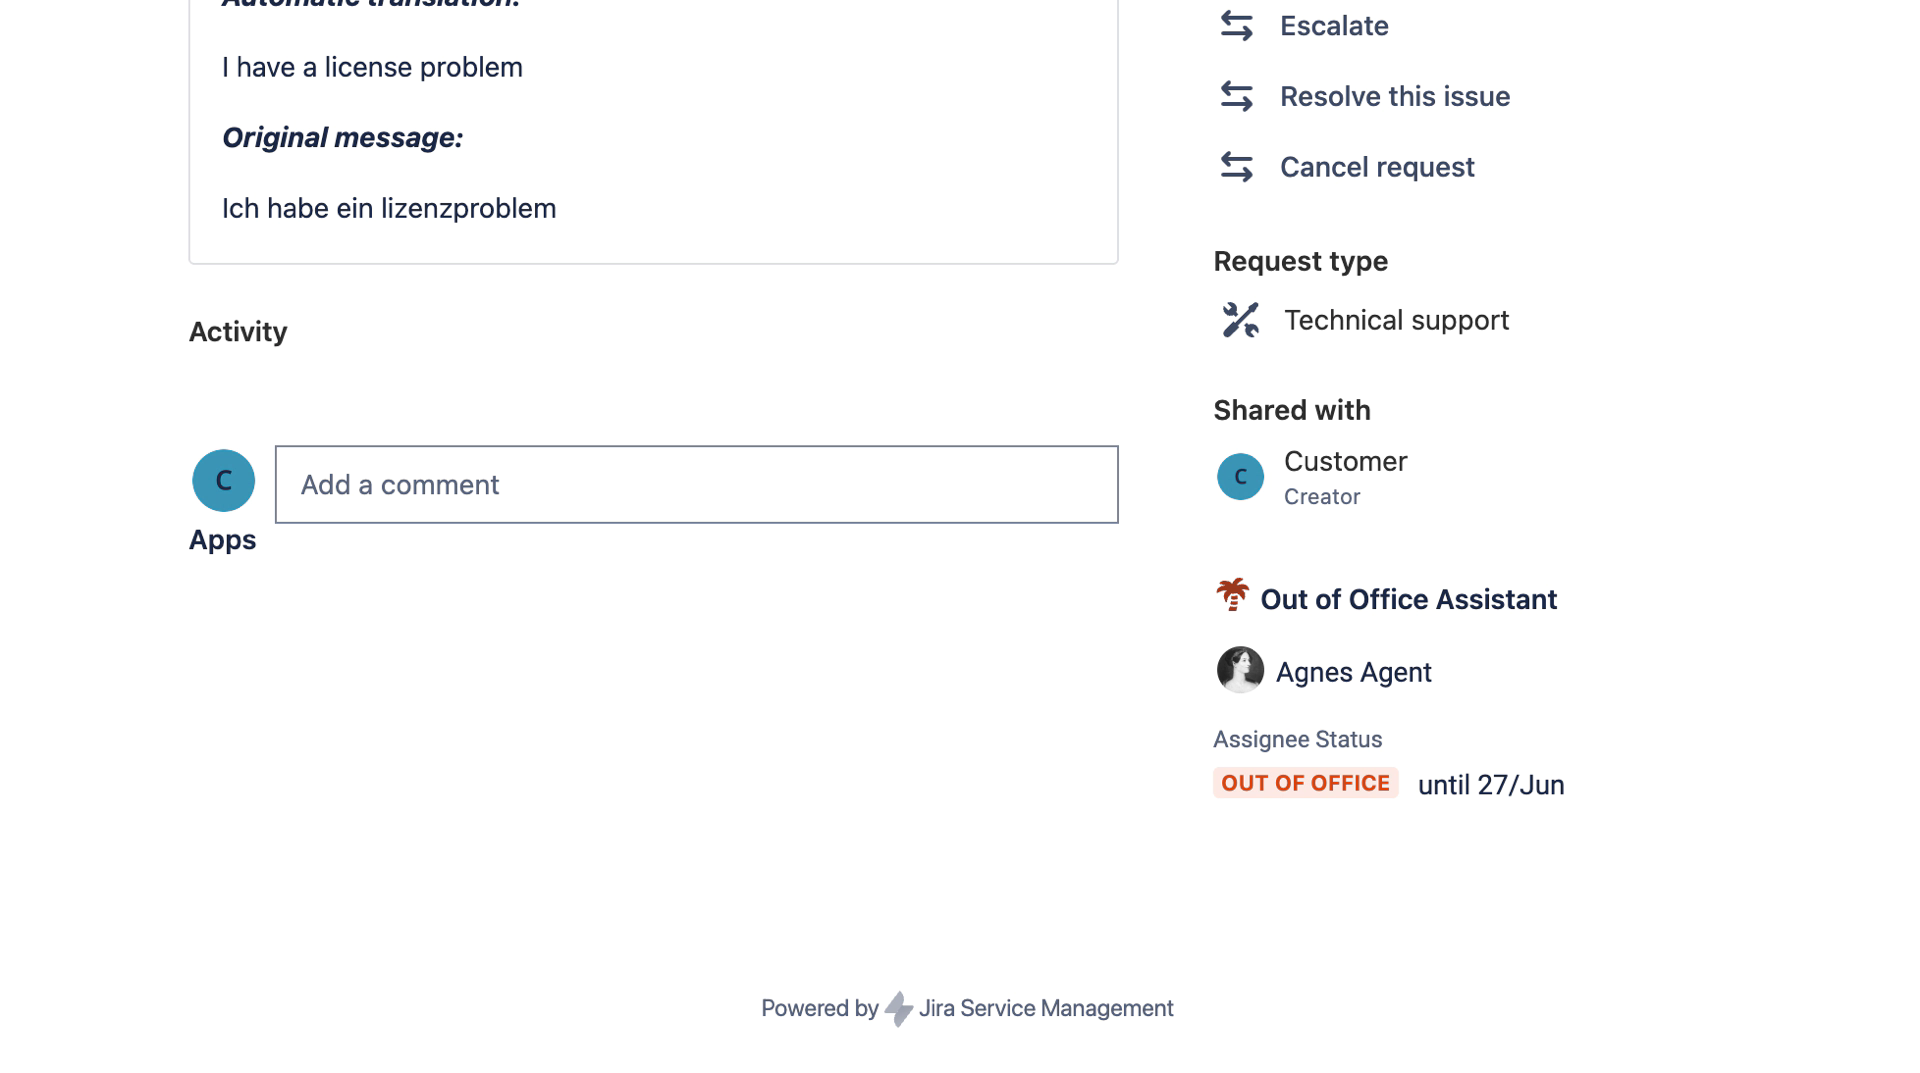
Information Displayed
Standard Display Elements
Element | Description | Customer View |
|---|---|---|
Avatar | Agent's profile picture | Visual identification |
Name | Agent's display name | Personal connection |
Status | Current availability | Clear indicator |
Dates | Absence period (if OoO) | Timeline clarity |
Customer Experience Examples
Example 1: Available Agent
- ┌─────────────────────────┐
- │ 👤 Sarah Johnson │
- │ ✅ Available │
- └─────────────────────────┘
Example 2: Agent on Vacation
- ┌─────────────────────────┐
- │ 👤 Mike Chen │
- │ 🔴 Out of Office │
- │ June 15 - June 30 │
- └─────────────────────────┘
Example 3: Unassigned Ticket
- ┌─────────────────────────┐
- │ ⚪ Unassigned │
- │ Awaiting assignment │
- └─────────────────────────┘
Best Practices
Communication Strategy
Set Clear Expectations:
Include availability info in auto-responses
Update knowledge base with support hours
Communicate coverage arrangements to customers
Proactive Messaging:
Notify customers before planned absences
Use "Leaving Soon" status effectively
Provide alternative contact methods
Administrative Management
Regular Reviews:
Monitor which projects have the feature enabled
Review customer feedback on transparency
Adjust settings based on team needs
Training Requirements:
Ensure agents understand visibility to customers
Train on proper OoO rule creation
Emphasize importance of accurate dates
Customer Service Excellence
Coverage Planning:
Always assign coverers for customer-facing roles
Ensure coverage chains are clear
Test handoffs before absences
Professional Standards:
Keep absence messages professional
Avoid excessive personal details
Focus on alternative support options
Integration Considerations
With Other JSM Features
Service Level Agreements (SLAs):
Availability display helps explain SLA pauses
Customers understand delay reasons
Reduces escalation tickets
Customer Satisfaction (CSAT):
Transparency often improves scores
Sets realistic expectations
Shows professional communication
With Support Workflows
Tier 1 Support Teams:
- Best Practice Workflow:
- 1. Enable for all Tier 1 projects
- 2. Train agents on visibility
- 3. Create standard OoO templates
- 4. Monitor customer feedback
Specialized Support Teams:
Consider selective enablement
May not suit all team types
Evaluate based on customer needs
Agent Availability Display Status: ✅ COMPLETE
Next Step: Approval Delegation for Jira Service Management