
Interface Tour and Navigation Guide
Overview
This guide provides a comprehensive tour of the Out of Office Assistant interface, explaining every element, navigation path, and user interaction. Understanding the interface layout will help you efficiently manage absence rules and integrations.
Interface Access and Navigation Paths
Primary Access Path
Location: Jira Navigation → Apps → Out-Of-Office Assistant
Step-by-Step Navigation:
Click the Apps button in Jira's navigation bar
Look for "Out-Of-Office Assistant" in the apps dropdown
Click "Out-Of-Office Assistant" to open the main interface
or
Click the User Profile Avatar button
Look for "Out-Of-Office Assistant" in the dropdown
Click "Out-Of-Office Assistant" to open the main interface
Alternative Access Paths:
Direct URL: `[Your Jira Instance]/plugins/servlet/ac/outofoffice-connect/out-of-office-addon
Main Interface Overview
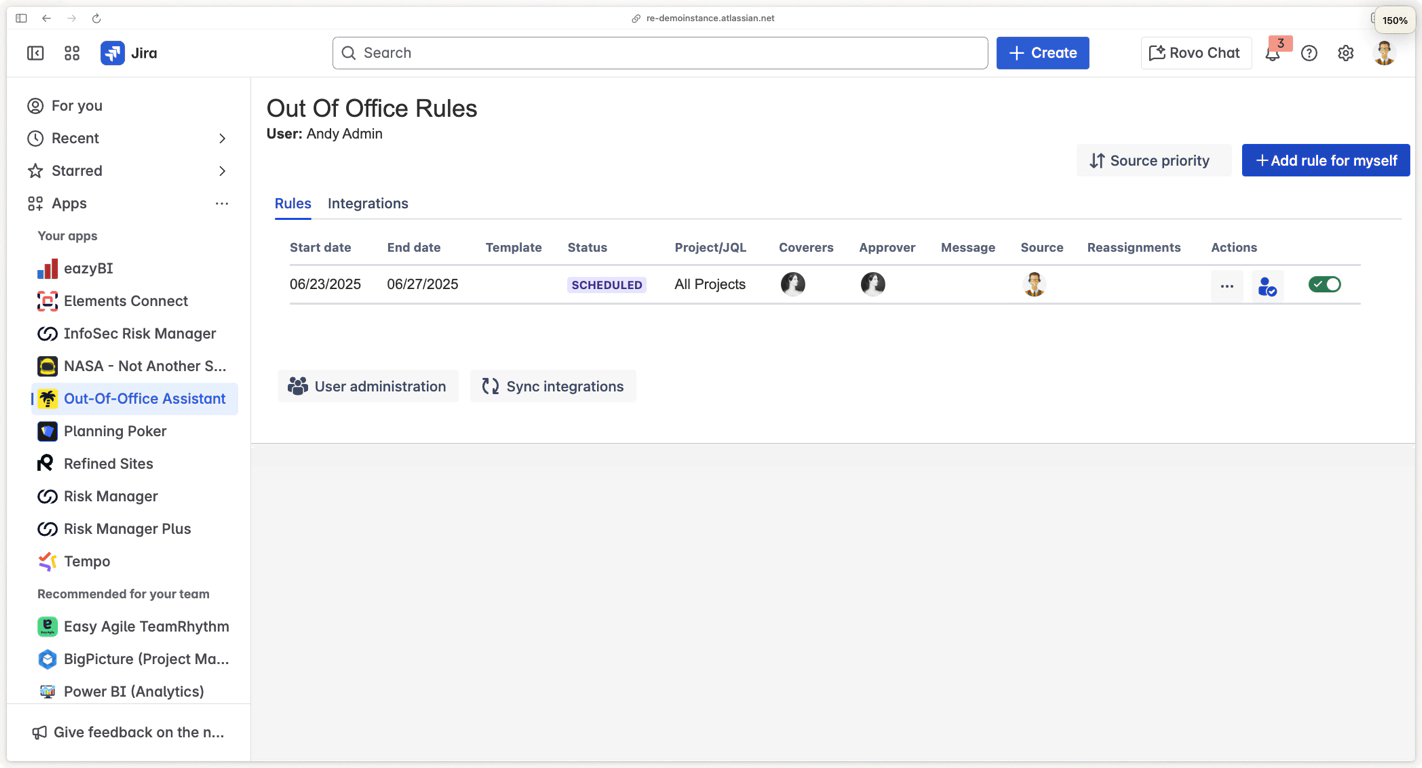
Header Section
The main interface header contains essential user information and primary actions:
User Information Display
Location: Top left of interface
Format: "User: [Full Name]" (e.g., "User: Andy Admin")
Purpose: Confirms which account is currently active
Context: Shows the user for whom rules will be created
Primary Action Buttons (Top Right)
Source Priority Button
Icon: Sort/priority icon
Purpose: Configure priority order when multiple integration sources conflict
Access Level: Available to all users
Navigation: Opens source priority configuration dialog
Add Rule for Myself Button
Style: Blue primary button with plus icon
Text: "Add rule for myself"
Purpose: Creates new absence rules for the current user
Navigation: Opens rule creation form
Keyboard Shortcut: Not defined
Main Content Tabs
The interface uses a tab-based layout with two primary sections:
Rules Tab (Default)
Purpose: Displays and manages absence rules
Default State: Selected when interface loads
Content: Rules table with complete rule information
Integrations Tab
Purpose: Manages external service connections
Content: Integration configuration and sync controls
Access: Available to all users for personal integrations
Rules Tab Interface
Rules Table Structure
The rules table provides comprehensive information about all absence rules:
Column Headers (Left to Right)
Start Date
Format: MM/DD/YYYY and time (e.g., "06/10/2025 12:00 AM")
Purpose: Shows when rule activation begins
Timezone: Displays in user's configured timezone
End Date
Format: MM/DD/YYYY or "—–" for indefinite rules
Purpose: Shows when rule deactivation occurs
Special Values: "∞" symbol indicates indefinite duration
Template
Purpose: Shows if rule was created from a template
Typical State: Empty for manually created rules
Future Use: Template system for rule standardisation
Status
Values: "SCHEDULED", "ACTIVE", "EXPIRED", "DISABLED"
Colors: Status-specific color coding for quick identification
Logic: Automatically determined based on dates and rule state
Project/JQL
Default: "All Projects" or "Single Projects" for comprehensive rule coverage
Alternative: Custom JQL filter for specific issue targeting
Purpose: Defines which issues the rule affects
Coverers
Display: Avatar group showing assigned coverers
Format: User avatars in circular format
Interaction: Hovering shows full user names
Multiple: Supports multiple coverers for round-robin assignment
Approver
Purpose: Shows approval delegation for JSM projects
Display: Avatar or empty if not configured
Context: Only relevant for Jira Service Management workflows
Message
Icon: Message/comment icon when custom message is configured
Indicator: Shows presence of out-of-office message
Purpose: Indicates automatic commenting is enabled
Source
Display: Avatar group showing rule creation source
Values: Manual creation (User Avatar), calendar integration, or other sources
Purpose: Tracks rule origin for audit and management
Reassignments
Purpose: Shows count of issues reassigned by this rule
Format: Numerical count
Updates: Real-time updates as rule processes issues
Actions
Menu Button: Three-dot menu for rule management
Start / Stop Rule Button: Enable/disable rule quickly
Rule Actions Menu
Each rule provides multiple management options through the actions menu:
Menu Options
Edit Rule: Modify rule parameters and settings
Delete Rule: Permanently remove rule (requires confirmation)
Download Event: Downloads an ics file for import in Calendar
Bulk Assign Button: Manual trigger for immediate issue assignment to Coverer
Quick Actions
Start / Stop Rule Button: Immediate enable/disable without menu navigation
Integrations Tab Interface
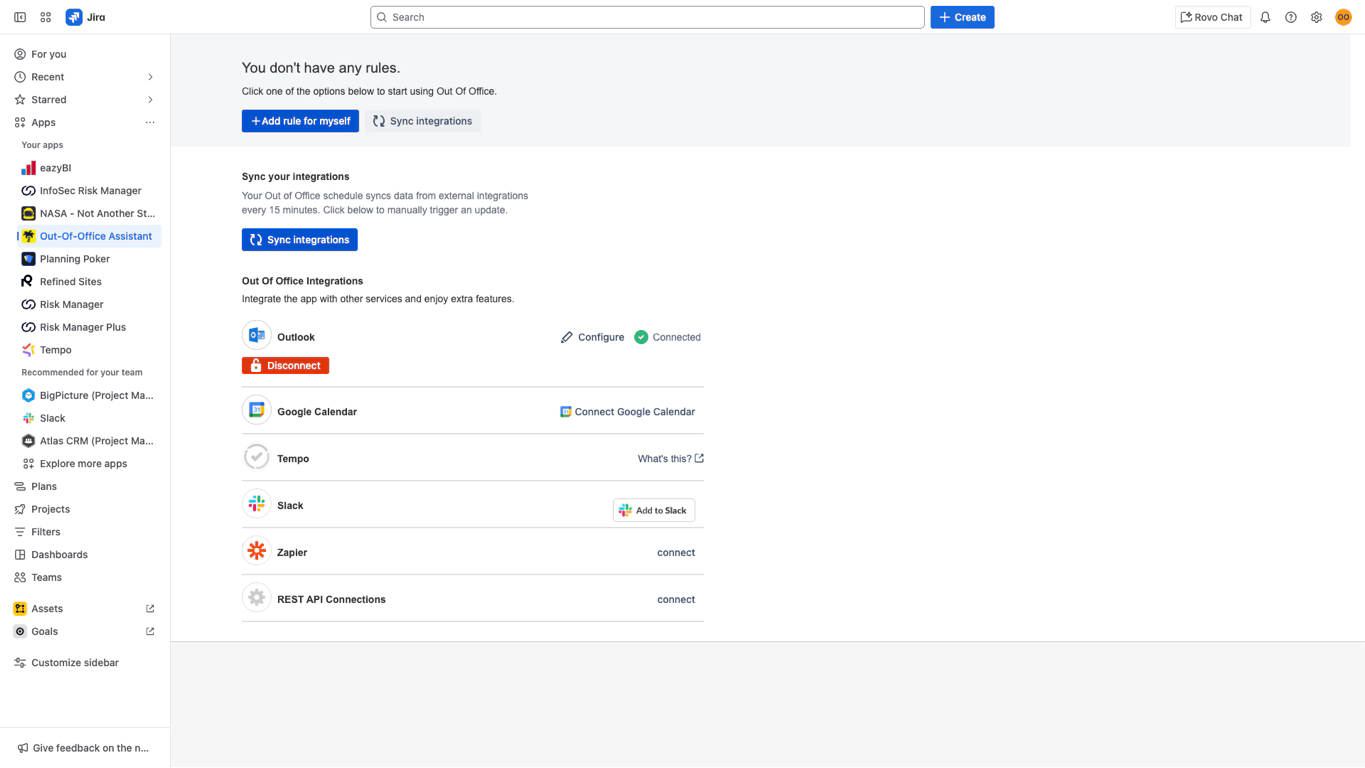
Sync Section
Manual Sync Controls
only displayed if min. one integration is connected
Description: Your Out of Office schedule syncs data from external integrations every 15 minutes. Click below to manually trigger an update.
Button: "Sync integrations" for manual trigger
Purpose: Force immediate synchronization with external services
Available Integrations
Microsoft Outlook Integration
Configuration: "Configure" button when connected
Status Indicator: "Connected" with green checkmark when active
Actions: "Disconnect" button when connected
Purpose: Sync with Outlook Automatic Reply
Documentation: Microsoft Outlook Integration Guide
Google Calendar Integration
Configuration: "Configure" button when connected
Status Indicator: "Connected" with green checkmark when active
Actions: "Disconnect" button when connected
Purpose: Syncs Out of Office events from Google Calendar into Jira.
Documentation: Google Workspace Calendar Integration Guide
Tempo Integration
Configuration: "Configure" button when connected
Status Indicator: "Connected" with green checkmark when active
Actions: "Disconnect" button when connected
Purpose: Connect plans for time off in Tempo to Out of Office Assistant
Documentation: Tempo Timesheet Integration Guide
Slack Integration
Button: "Add to Slack" with Slack branding
Purpose: The integration allows you to create and modify your Out of Office rules for Jira without moving away from Slack.
Requirements: Slack workspace admin permissions
Documentation: Slack Integration Guide
Zapier Integration
Button: "connect" for initial setup
Purpose: Zapier lets you connect Out of Office Assistant for Jira to thousands of other web services.
Flexibility: Trigger actions in other apps when rules activate
Integration Status Indicators
Connection States:
Disconnected: "Connect" button visible
Connected: Green checkmark with "Connected" text
Pending: Loading state during connection process
Administrative Interface
User Administration Access
Navigation Path:
Apps → Apps (in sidebar)
Out-Of-Office Assistant → User Administration
Or direct link from main interface footer
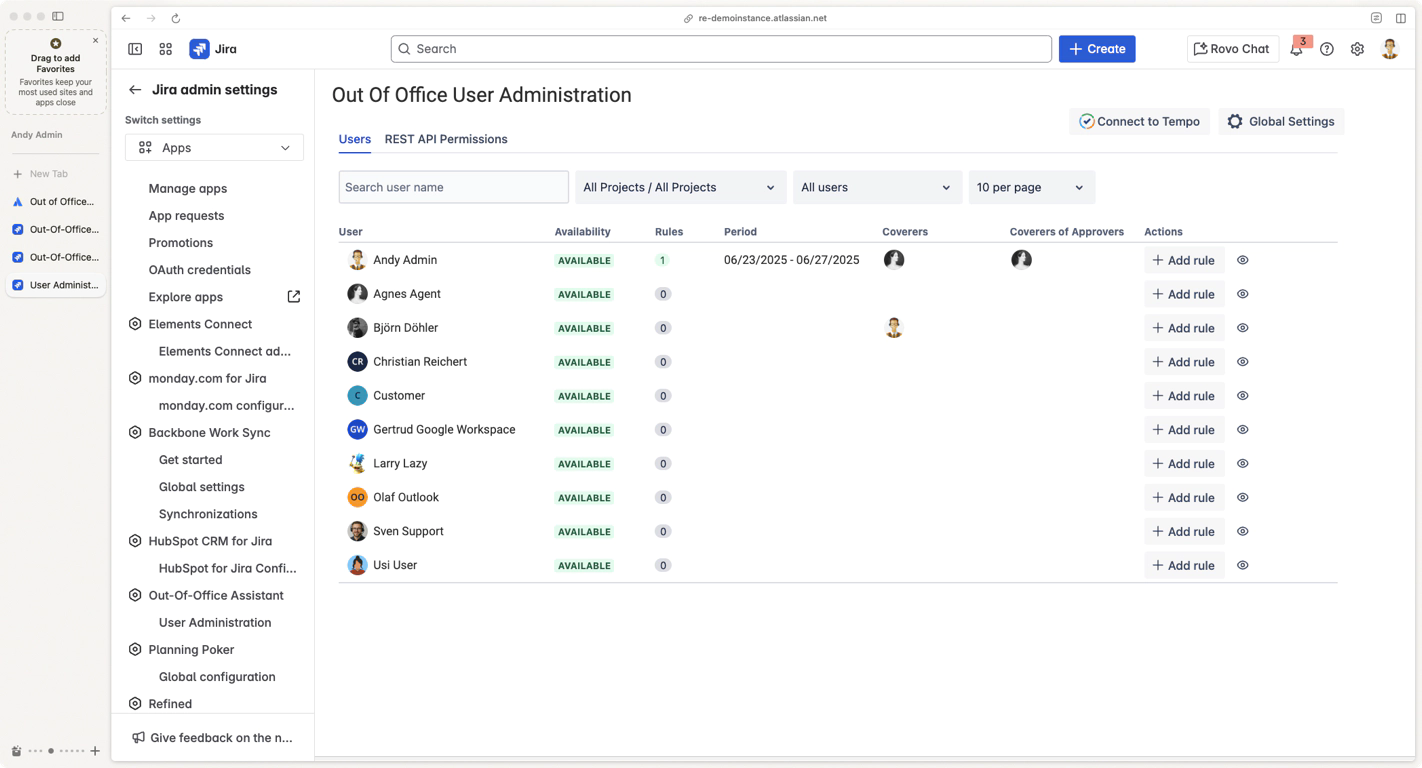
Admin Interface Layout
Header Section
Connect to Tempo: Admin Integration setup button
Global Settings: System-wide configuration access
Administrative Tabs
Users Tab (Default)
Purpose: Complete user management and rule oversight
Content: User table with comprehensive information
Functions: Add rules for users, view user status
User Management Table
Search and Filter Controls
User Search: "Search user name" text input
Project Filter: "All Projects" dropdown
User Filter: "All users" selection dropdown
Pagination: "10 per page" with pagination controls
User Table Columns
User
Display: Avatar and full name
Format: Consistent with Jira user representation
Availability
States: "AVAILABLE", "LEAVING SOON", "OUT OF OFFICE"
Real-time: Updates based on active rules
Rules
Count: Number of active/scheduled rules
Period
Format: "MM/DD/YYYY - MM/DD/YYYY" or "MM/DD/YYYY - ∞"
Purpose: Shows active rule duration
Multiple: Displays primary active rule period
Coverers
Display: Avatar group of users serving as coverers
Purpose: Shows current coverage relationships
Empty: Blank when no coverers assigned
Coverers of Approvers
Purpose: JSM-specific approval delegation display
Context: Only relevant for Service Management projects
Display: Avatar group when configured
Actions
Add Rule: Plus icon button for creating user rules
Show Rules: Eye icon for viewing user's rule list
Admin / Project Admin Only / Out of Office Admin: Administrative management functions
REST API Permissions Tab
Purpose: API token management and external access control
Content: Token table with creation, access, and expiration tracking
Security: Administrative control over API access
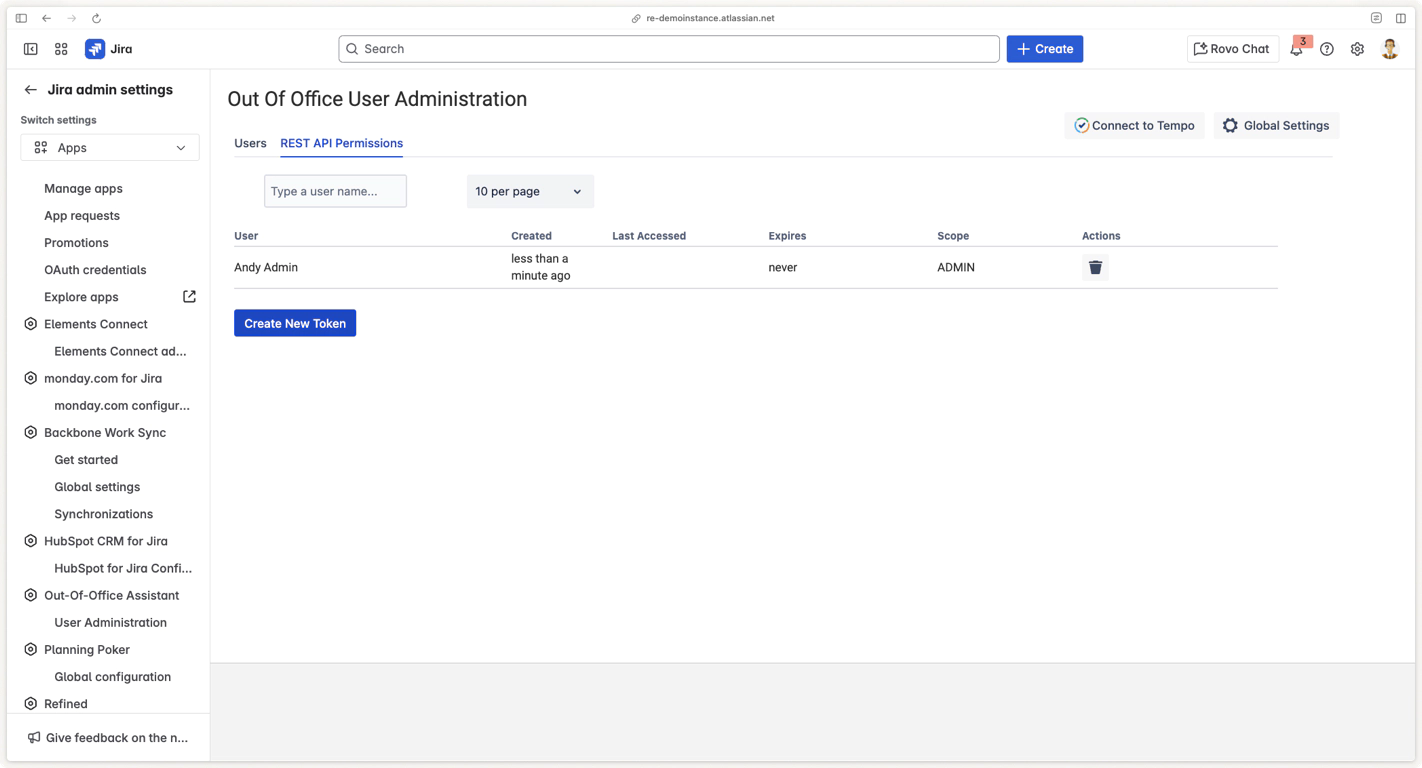
REST API Permissions Management
Token Management Table
Columns:
User: Token owner identification
Created: Token creation timestamp
Last Accessed: Most recent token usage
Expires: Token expiration date/time
Scope: Permission scope and limitations
Actions: Token management options (revoke)
Token Creation
Button: "Create New Token"
Process: Opens token creation dialog
Configuration: User assignment, scope definition
Best Practices for Interface Usage
Efficient Rule Management
Table Navigation
Filtering: Use search functions to find specific rules
Quick Actions: Use toggle switches for rapid enable/disable operations
Integration Management
Regular Monitoring: Check integration status periodically
Sync Timing: Use manual sync before important absence periods
Connection Health: Monitor for disconnection warnings
Documentation: Keep integration setup documentation accessible
Administrative Efficiency
User Management
Search First: Use search functions before scrolling through user lists
Filter by Project: Narrow scope to relevant project users
Monitoring: Regular review of user availability status
System Maintenance
Token Management: Regular review and rotation of API tokens
Global Settings: Periodic review of system-wide configurations
Integration Health: Monitor integration performance and connectivity
User Training: Regular updates to user training based on interface changes
Interface Tour Status: ✅ COMPLETE
Next Step: Permissions and Access Requirements