
Tempo Timesheets - User Configuration Process
Overview
The Tempo Timesheet integration bridges time tracking and absence management by automatically creating Out of Office rules when users plan time off in Tempo Timesheets or Tempo Planner. This integration ensures that scheduled PTO, sick leave, and other internal time entries automatically trigger appropriate absence coverage in Jira, maintaining project continuity while simplifying absence management.
Step 1: Access Integration Configuration
User Navigation Path:
Open Out of Office Assistant: Apps → Out-Of-Office Assistant
Access Integrations: Click “Integrations” tab
Tempo Configuration: Click “Configure” next to Tempo (if available)
Template Management: Access user template configuration interface
Integration Availability:
Integration Access Requirements:
✅ User assigned to Tempo team
✅ Admin has configured Tempo connection
✅ Internal issues available to user's team
✅ Valid API token active
If integration not visible:
Contact administrator to verify team assignment
Confirm internal issue access
Check API token status

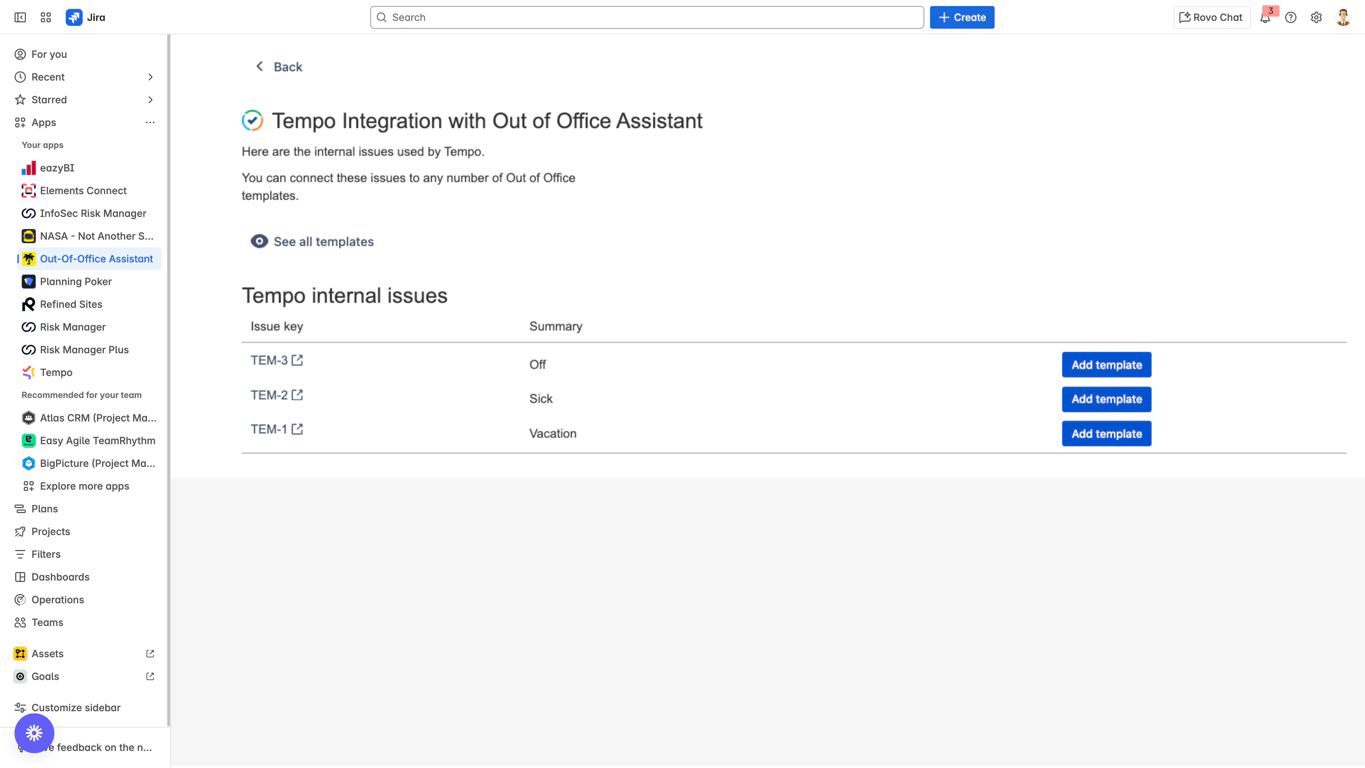
Step 2: Template Configuration
Template Creation Process:
Access Template Interface: Navigate to Tempo integration configuration
Link Internal Issues: Associate Tempo internal issues with Out of Office templates
Configure Templates: Set up rule parameters for each internal issue type
Test Configuration: Verify template settings with test plans
Template Mapping Examples:
- Example Template Configurations:
- PTO/Vacation Template:
- - Internal Issue: "II-1: Vacation"
- - Rule Scope: All Projects
- - Coverer: Team Lead
- - Message: "I'm on vacation until [return date]. [Coverer] will handle urgent matters."
- - Mention Tag: Add 4 days ahead
- Sick Leave Template:
- - Internal Issue: "II-2: Sick Leave"
- - Rule Scope: All Projects
- - Coverer: Backup team member
- - Message: "I'm out sick today. [Coverer] will cover urgent issues."
- - Mention Tag: Add when out of office
- Training Template:
- - Internal Issue: "II-3: Training"
- - Rule Scope: Development Projects only
- - Coverer: Senior Developer
- - Message: "Attending training. [Coverer] covering development work."
- - Mention Tag: Add when out of office
Step 3: Template-Issue Linking
Linking Process:
Template Linking Workflow:
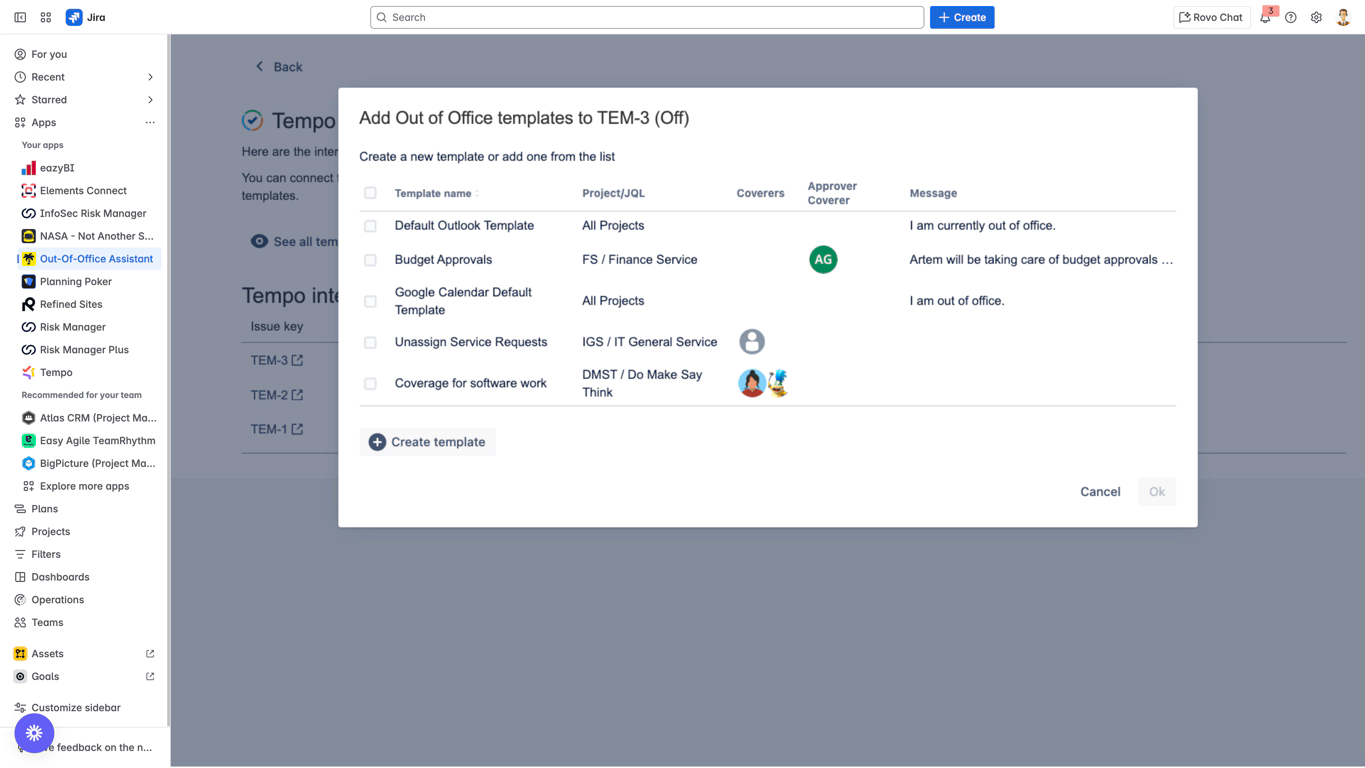
Select Tempo internal issue
Choose existing template or create new template
Configure template parameters:
Project scope (All Projects, Specific Projects, JQL Filter)
Coverer assignment (specific user, team role)
Approval coverer (for JSM projects)
Out of office message
Mention tag behavior
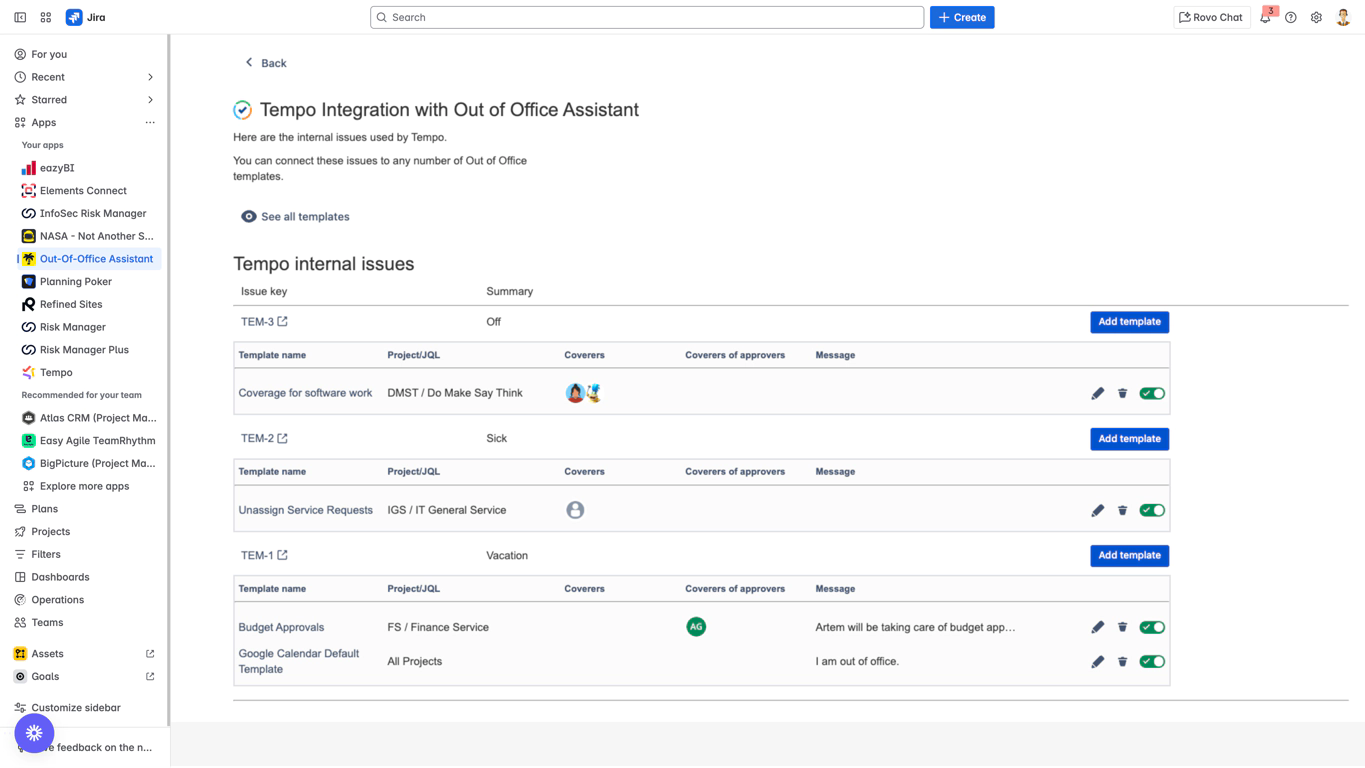
Save template association
Test with sample Tempo plan
Multiple Template Support:
Single Issue → Multiple Templates: One internal issue can trigger multiple rules
Different Scopes: Templates can target different project sets
Varied Coverage: Different coverer assignments for different rule types
Specialized Rules: JSM approval rules, development coverage, etc.
Creating Tempo Plans for Absence Rules
Tempo Timesheets Planning Process
Plan Creation Workflow:
Navigate to Tempo Timesheets: Access Tempo from Jira apps menu
Select Planning Date: Choose start date for time off
Click “Plan Time”: Use planning interface (not logging)
Select Internal Issue: Choose configured internal issue (e.g., “II–1: Vacation”)
Configure Duration: Set time period and hours
Enable Period Option: For multi-day plans, check “Period” checkbox
Set End Date: Define end date for extended absences
Define Hours: Specify daily hours or full-day duration
Save Plan: Confirm plan creation
Plan Duration Guidelines:
- Time Duration Rules:
- < 8 hours per day: Partial day absence rule
- Example: 9:00 AM - 1:00 PM → Rule active only during those hours
- ≥ 8 hours per day: Full day absence rule
- Example: 9:00 AM - 5:00 PM → Rule active entire day (00:00 - 23:59)
- Multi-day plans: Individual daily rules created
- Example: 3-day vacation → 3 separate daily rules
Tempo Planner Planning Process
Planner-Specific Features:
Resource Planning Interface: Visual capacity planning view
Team Coordination: See team member availability
Capacity Management: Plan within available capacity
Integrated Planning: Coordinate with project schedules
Planner Planning Steps:
Open Tempo Planner: Access Planner from Tempo menu
Navigate to User: Find your user in resource view
Select Time Period: Choose dates for absence
Add Internal Issue: Select configured time-off internal issue
Set Capacity: Define hours/percentage for absence
Confirm Planning: Save plan in Planner interface
Plan Modification and Rule Updates
Automatic Synchronization
Plan Change Detection:
- Tempo Plan Modifications → Rule Updates:
- Plan Date Changes → Rule dates automatically updated
- Plan Duration Changes → Rule hours/duration adjusted
- Plan Deletion → Connected Out of Office rules removed
- Internal Issue Changes → Rule association updated
- Multiple Plans → Plans merged into continuous blocks
Synchronization Timing:
Real-time Detection: Changes detected immediately
Rule Updates: Applied within next sync cycle
User Notification: Changes reflected in Out of Office interface
Audit Trail: Plan changes logged for tracking
Manual Plan Management
Plan Editing Process:
Access Tempo Interface: Navigate to Timesheets or Planner
Locate Plan: Find existing time-off plan
Modify Parameters: Update dates, hours, or internal issue
Save Changes: Confirm plan modifications
Verify Rule Updates: Check Out of Office rules for updates
Plan Deletion Impact:
- Plan Deletion Workflow:
- 1. User deletes plan in Tempo
- 2. Out of Office Assistant detects deletion
- 3. Connected absence rules automatically removed
- 4. Team notifications sent (if configured)
- 5. Coverage assignments cleared
- 6. Audit log updated
Advanced Integration Scenarios
Multiple Plan Handling
Plan Stacking Rules:
- Same-Day Multiple Plans:
- Scenario 1: Two partial plans (9:00-12:00, 14:00-17:00)
- Result: Two separate partial-day rules
- Scenario 2: Overlapping plans (9:00-13:00, 12:00-16:00)
- Result: Single merged rule (9:00-16:00)
- Scenario 3: One 8+ hour plan + partial plans
- Result: Full-day rule (ignores partial plans for that day)
- Scenario 4: Adjacent plans (9:00-12:00, 12:00-17:00)
- Result: Single continuous rule (9:00-17:00)
Multi-Day Planning:
- Extended Absence Planning:
- Week-long vacation (5 days, 8 hours each):
- - Creates 5 separate full-day rules
- - Each day treated as individual absence
- - Maintains consistent coverage assignments
- - Allows for partial week modifications
- Partial week planning (3 days, varying hours):
- - Creates 3 separate rules with different durations
- - Reflects actual planned hours per day
- - Enables granular absence management
Complex Template Scenarios
Multi-Template Configuration:
- Advanced Template Example:
- Internal Issue: "II-1: Vacation"
- Template 1: General Coverage
- - Scope: All Projects except JSM
- - Coverer: Team Lead
- - Message: General out-of-office message
- Template 2: JSM Approval Coverage
- - Scope: JSM Projects only
- - Approval Coverer: Department Manager
- - Message: Approval delegation message
- Template 3: Development Coverage
- - Scope: Development projects (JQL filter)
- - Coverer: Senior Developer
- - Message: Technical coverage message
- Result: Single vacation plan creates 3 different rules
Conditional Rule Creation:
Project-Based Rules: Different templates for different project types
Role-Based Coverage: Coverage assigned based on absence context
Time-Based Rules: Different templates for different absence durations
Team-Based Rules: Templates specific to team or department
Integration Monitoring and Maintenance
Health Monitoring
Integration Status Checks:
- Regular Monitoring Tasks:
- □ API token expiration tracking (90-day limit)
- □ Plan-to-rule synchronization verification
- □ User access and team assignment validation
- □ Internal issue availability confirmation
- □ Template configuration accuracy
- □ Error log review and resolution
Performance Metrics:
Sync Success Rate: Percentage of successful plan synchronizations
Rule Creation Accuracy: Correct rule parameter application
User Adoption: Number of users actively using integration
Plan Volume: Number of plans processed per period
Troubleshooting Common Issues
Issue 1: Integration Stopped Working
- Problem: Tempo plans no longer create Out of Office rules
- Symptoms:
- - Recent plans not generating rules
- - No error messages visible
- - Integration appears connected
- Diagnosis:
- 1. Check API token expiration (90-day limit)
- 2. Verify Tempo service status
- 3. Review error logs for API failures
- 4. Test admin connectivity
- Resolution:
- 1. Generate new Tempo API token
- 2. Update token in Out of Office Assistant
- 3. Verify connection restoration
- 4. Test with new plan creation
Issue 2: Users Cannot Access Integration
- Problem: Team members don't see Tempo integration options
- Symptoms:
- - Integration not visible in user interface
- - Cannot configure templates
- - Internal issues not available
- Diagnosis:
- 1. Verify user assignment to Tempo team
- 2. Check internal issue team permissions
- 3. Confirm admin setup completion
- 4. Review user Tempo permissions
- Resolution:
- 1. Add users to appropriate Tempo team
- 2. Assign internal issues to user team
- 3. Grant time planning permissions
- 4. Verify integration visibility
Issue 3: Incorrect Rule Parameters
- Problem: Created rules have wrong scope or coverers
- Symptoms:
- - Rules target incorrect projects
- - Wrong coverer assignments
- - Missing rule components
- Diagnosis:
- 1. Review user template configuration
- 2. Check internal issue-template associations
- 3. Verify template parameter settings
- 4. Test template functionality
- Resolution:
- 1. Update template configurations
- 2. Correct internal issue associations
- 3. Test with sample plans
- 4. Verify rule creation accuracy
Maintenance Best Practices
Proactive Maintenance:
- Integration Maintenance Schedule:
- Weekly:
- - Monitor integration health and sync success
- - Review error logs for issues
- - Check user feedback and support requests
- Monthly:
- - Review template configurations for optimization
- - Analyze usage patterns and adoption
- - Update documentation as needed
- Quarterly:
- - Renew API tokens before expiration
- - Review team assignments and access
- - Evaluate integration effectiveness
- - Plan for updates or improvements
Performance Optimization:
- Optimization Strategies:
- 🚀 Template Efficiency: Streamline template configurations
- 📊 Usage Analysis: Monitor which internal issues are most used
- 👥 User Training: Provide training on best practices
- 🔧 Configuration Review: Regular template and setup audits
- 📈 Feedback Integration: Incorporate user suggestions
Integration Limitations
System Constraints
Tempo Integration Limits:
- Current Limitations:
- 📅 API Token Expiration: 90-day maximum (requires renewal)
- 👥 Team-Based Access: Users must be in Tempo teams
- 📊 Internal Issue Scope: Limited to configured internal issues
- 🔄 Sync Frequency: Real-time detection, but not instant updates
- 📋 Template Complexity: Limited advanced template logic
Feature Limitations:
Individual Templates: Templates are per-user, not shared across teams
Retrospective Plans: Integration works with future/current plans primarily
Complex Recurrence: Limited support for complex recurring patterns
Multi-Tempo Instance: Single Tempo instance per Jira instance
Workflow Constraints
Planning Limitations:
- Planning Workflow Constraints:
- ⏰ Minimum Duration: 1-hour minimum for partial day plans
- 📅 Date Restrictions: Current and future dates only
- 🔄 Plan Modification: Some bulk modifications not supported
- 👥 Team Dependencies: Access dependent on team assignments
- 📊 Reporting: Limited integration reporting capabilities
Best Practices and Recommendations
Organizational Implementation
Rollout Strategy:
- Implementation Phases:
- Phase 1: Admin Setup and Configuration
- - Configure API token and internal issues
- - Set up initial team assignments
- - Test basic functionality
- Phase 2: Pilot User Group
- - Select power users for initial testing
- - Configure basic templates
- - Gather feedback and refine
- Phase 3: Team Deployment
- - Roll out to individual teams
- - Provide user training
- - Monitor adoption and usage
- Phase 4: Organization-Wide
- - Full deployment across organization
- - Advanced template configurations
- - Ongoing optimization and support
Training and Support:
- User Training Program:
- 📚 Admin Training: API setup, team management, troubleshooting
- 👥 Team Lead Training: Template configuration, user support
- 📖 End User Training: Plan creation, template usage
- 📞 Support Structure: Clear escalation procedures
- 📋 Documentation: Comprehensive user guides and FAQs
Template Design Guidelines
Effective Template Configuration:
- Template Best Practices:
- 🎯 Purpose-Specific: Create templates for specific absence types
- 📋 Clear Naming: Use descriptive template names
- 👥 Appropriate Coverage: Configure relevant coverer assignments
- 💬 Contextual Messages: Write clear, helpful out-of-office messages
- 🏷️ Smart Tagging: Configure mention tags appropriately
- 🔄 Regular Review: Update templates based on usage patterns
Template Examples for Different Scenarios:
- Healthcare Organization Templates:
- - Emergency Leave: Immediate coverage, all projects
- - Scheduled Surgery: Advance notice, specific coverer
- - Continuing Education: Training coverage, selective projects
- Software Development Team Templates:
- - Code Review Coverage: Senior developer assignment
- - Production Support: On-call rotation coverage
- - Sprint Planning: Scrum master delegation
- Consulting Firm Templates:
- - Client Project Coverage: Account manager delegation
- - Internal Development: Internal project focus
- - Conference Attendance: Knowledge sharing coverage
Integration Status: ✅ COMPLETE