Getting Started
Getting Started
This guide will help you install NASA - Not Another Standup App and get your team up and running quickly.
Installation & Setup
Installing from Marketplace
Open Jira and go to Apps → Explore more apps (or visit the Atlassian Marketplace).
Search for "NASA – Not Another Standup App."
Select the app listing, then click Get app or Free trial.
Confirm any permissions (read/write on Jira issues, user data, etc.).
Complete installation. A success message typically appears in Jira.
Note: You need Site Admin (Cloud) or System Admin (Data Center/Server) privileges to install Marketplace apps.
Post-Installation Checks
Verify NASA in the Jira App Menu:
Ensure the "NASA" icon is visible under Apps.Access Permissions:
If restricted by user groups, verify that your team is included.Create a Test Stream:
Add one or two teammates to ensure everything works as expected.
Quick Start Guide
This section will help you get up and running with NASA in just a few minutes.
Creating Your First Stream
Access NASA from the App Menu.
Click "Create New Stream" or the "+" button.
Step 1 - Select a Meeting Template:
NASA now provides pre-configured meeting templates to help you get started quickly. Choose from:
Template Name | Description |
|---|---|
Blank Team Meeting | Define custom questions and set durations for each agenda item |
Daily Standup | Short, daily team check-in to share updates and remove blockers |
Strategic Planning Meeting | Analyse project progress and define strategic next steps |
One-on-One Meeting | Private discussion between two people to review progress and challenges |
Release Planning Meeting | Outline upcoming release goals, features, timelines and risks |
Project Kickoff Meeting | Establish a new project incl. objective, roles, and timelines. |
Sprint Retrospective Meeting | Reflect on the previous sprint, (What went well, What could be improved) |
Sprint Planning Meeting | Define sprint goals, tasks, and priorities for the next iteration |
Sprint Review | Demonstrate completed work to stakeholders and collect feedback |
Backlog Refinement Meeting | Prioritize and clarify backlog items to enhance sprint readiness |
Brainstorming Meeting | Generate creative ideas and solutions collaboratively |
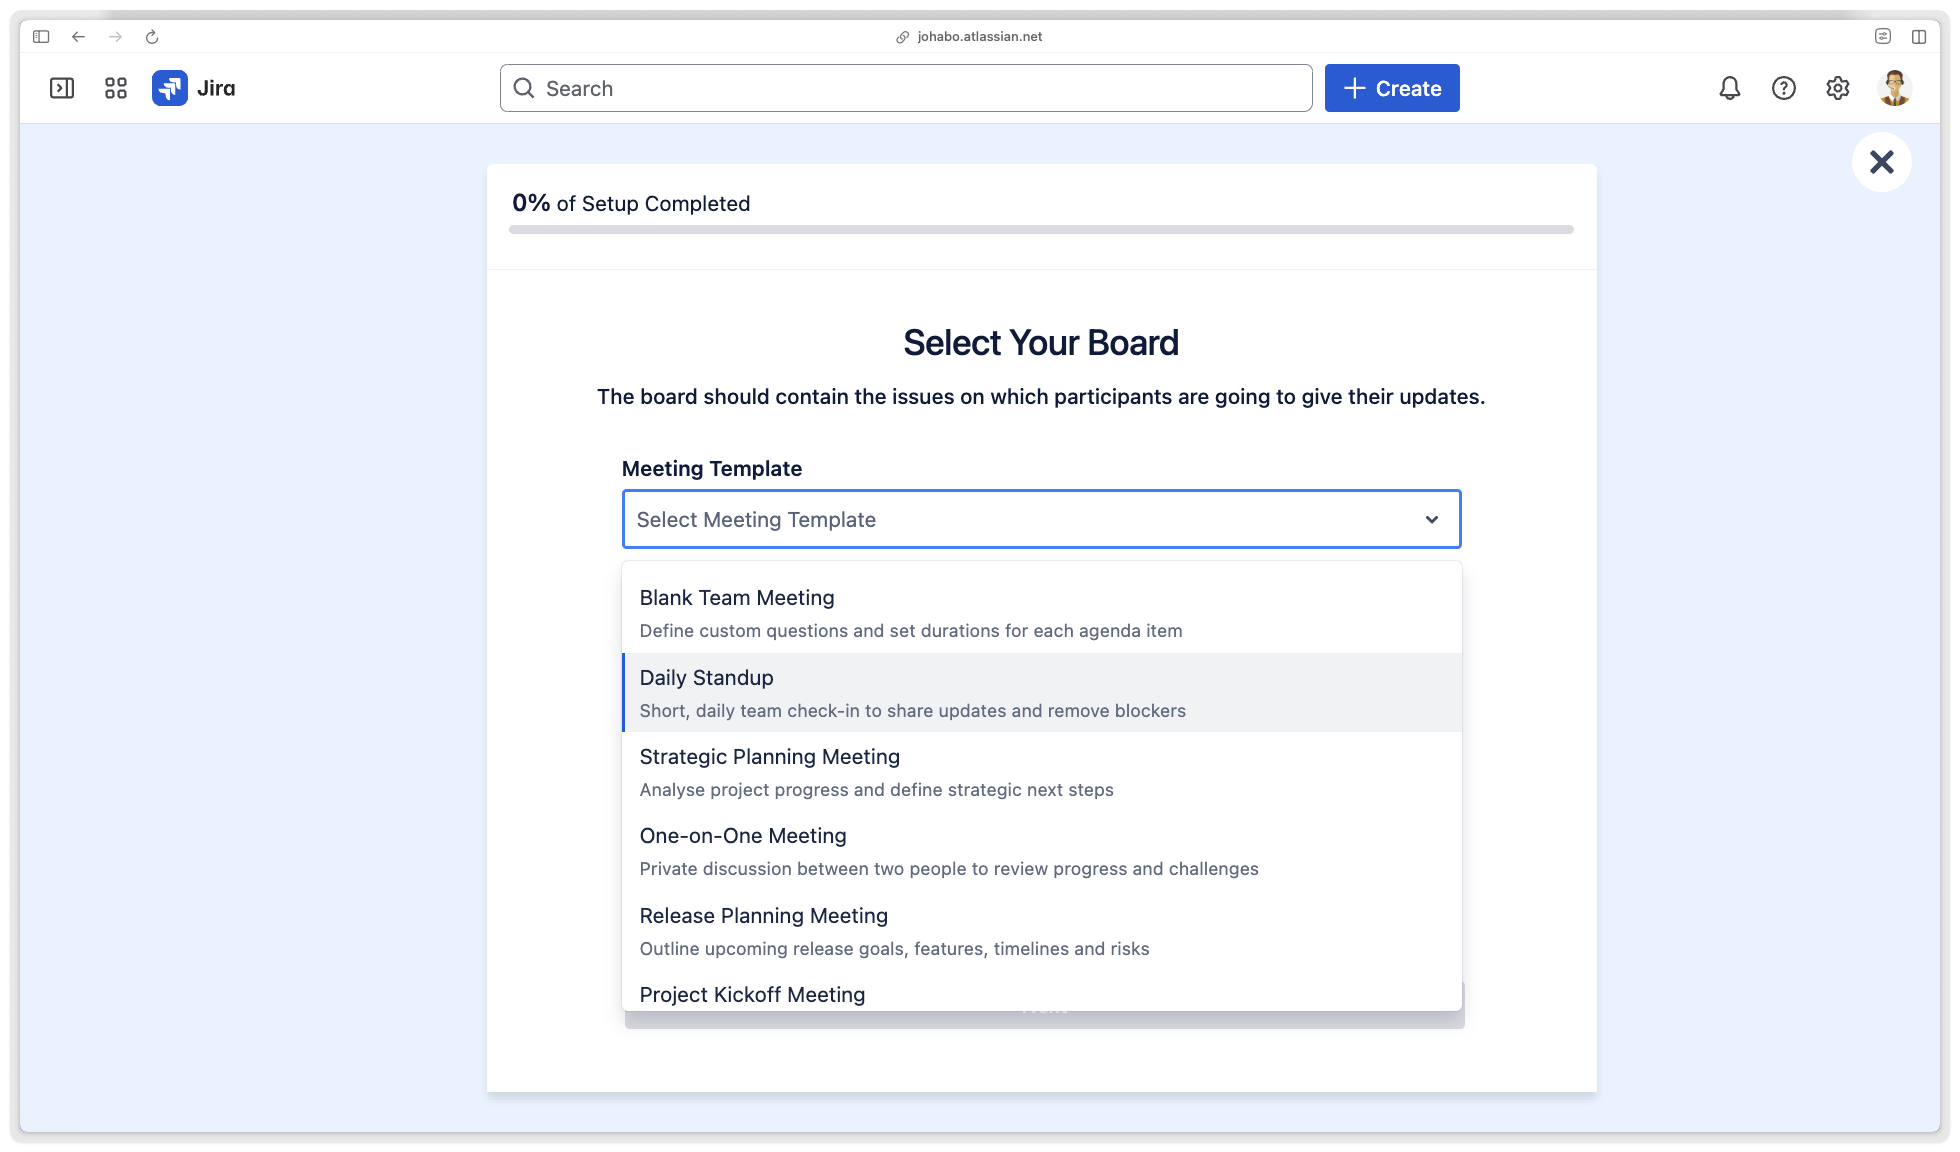
Each template automatically configures appropriate questions, meeting type, and recommended time allocations. You can customize these settings later if needed.
Select the template that best matches your meeting purpose, then click "Next".
Tip: If you're unsure which template to use, start with "Daily Standup" for regular team sync-ups or choose based on your specific agile ceremony needs.
Step 2 - Select Your Board:
NASA meeting streams must be connected to a Jira board. This will determine which issues are displayed to users by the app.
Click on the "Jira Board" dropdown to reveal your available options.
Some tips for selecting boards
The dropdown will display boards to which the current user has access.
Boards can include issues from one or multiple projects.
Make sure the selected board is restricted to just some projects.
The project(s) team(s) will be prepopulated as the meeting participants.
Any board can be configured to include Jira Service Management projects. However, the board will have to be stored in a Jira Software project.
Select which Board you want to connect from the dropdown.
Under "Name of Meeting Stream" you can give individual teams dedicated standup stream names to differentiate them.
Note: When using meeting templates, the stream name is automatically generated based on your template and board selection. You can still customize it if needed.
Change the logo for your meeting stream by clicking on "Change Logo" to upload a new image.
Once you are done click on "Next" to proceed to the next step.
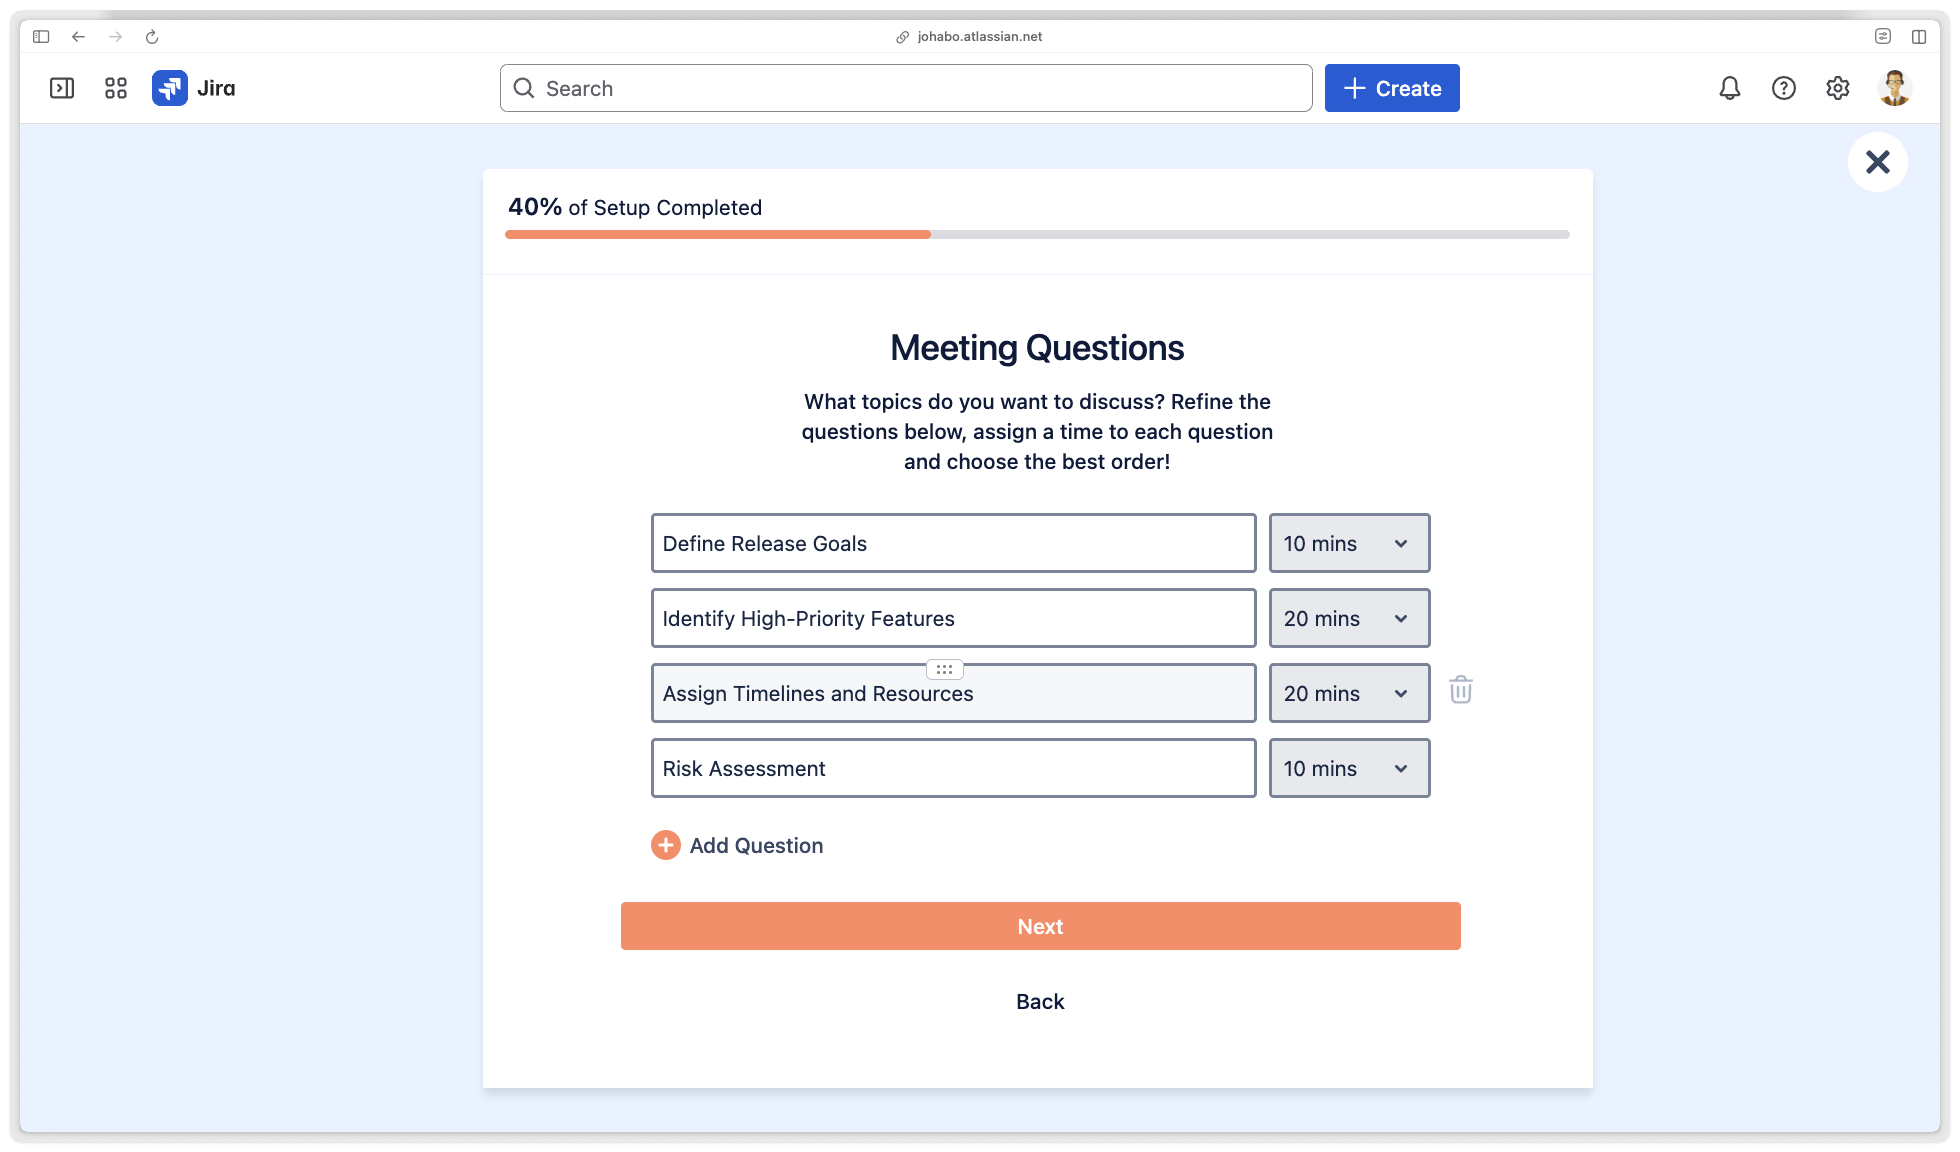
Step 3 - Review Meeting Questions:
Based on your selected template, NASA has pre-configured appropriate questions for your meeting type. For example:
Daily Standup: Yesterday's accomplishments, Today's plan, Blockers
Sprint Retrospective: What went well, What could improve, Action items
Sprint Planning: Sprint goal, Selected stories, Capacity concerns
You can:
Keep the default questions provided by the template
Edit any question by clicking on it
Delete questions you don't need
Add additional questions using the "Add question" button
Reorder questions by dragging them
Once you're satisfied with your questions, click "Next" to proceed.
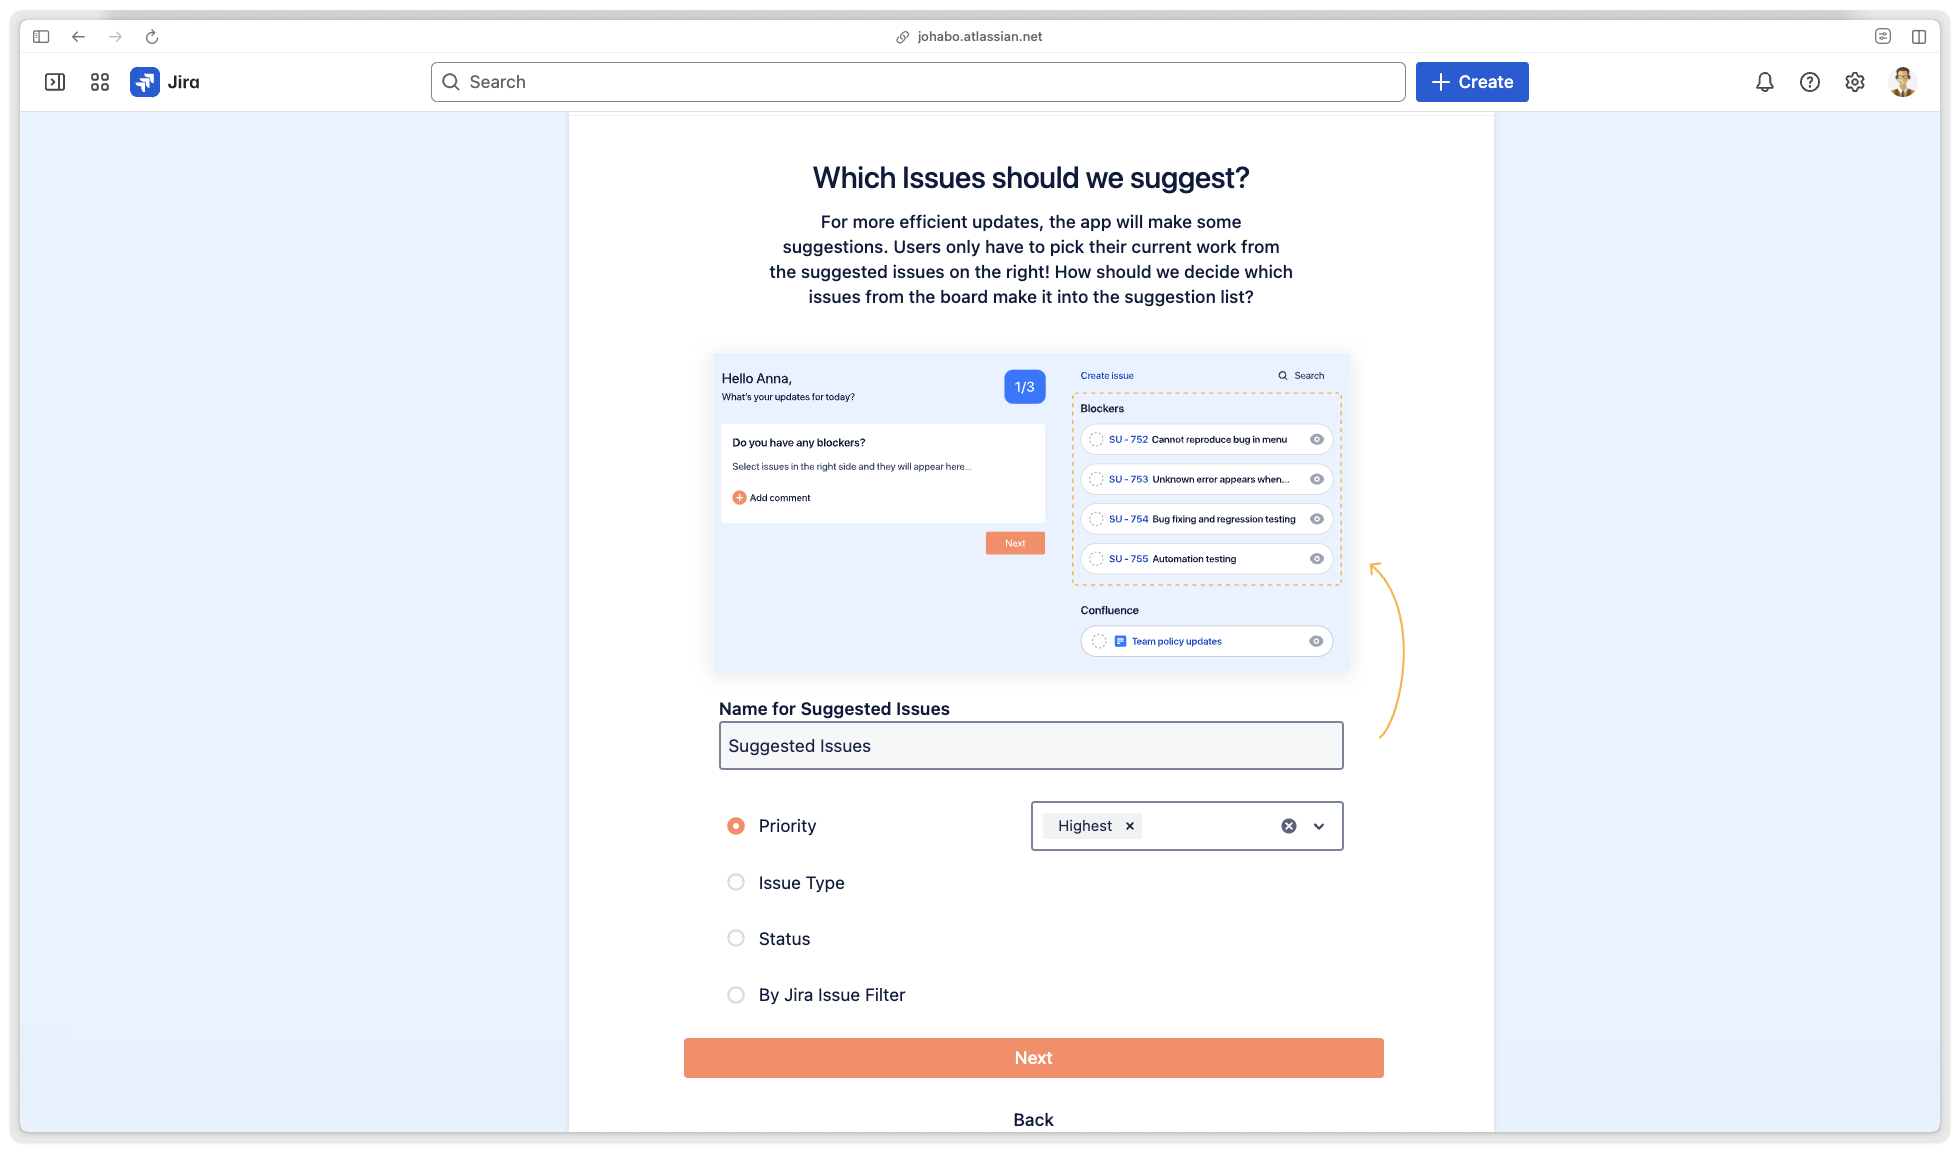
Step 4 - Which Issues should we suggest:
Give a name to your suggested issues which will be displayed to your participants when preparing for a meeting.
Select which Jira issues you want to see - you can choose from:
"Priority",
"Issue Type",
"Status", or
"By Jira Issue Filter".
Once you have chosen one of the options (for example: "Issue Type"), you'll have the option to refine that selection. In this case, you'll be able to choose from the issue types available in your project (for example: "Task").
For more information on the different types of suggested Jira Issue selections you can choose from, click here.
Once you are done, click "Next" to proceed to the next step.
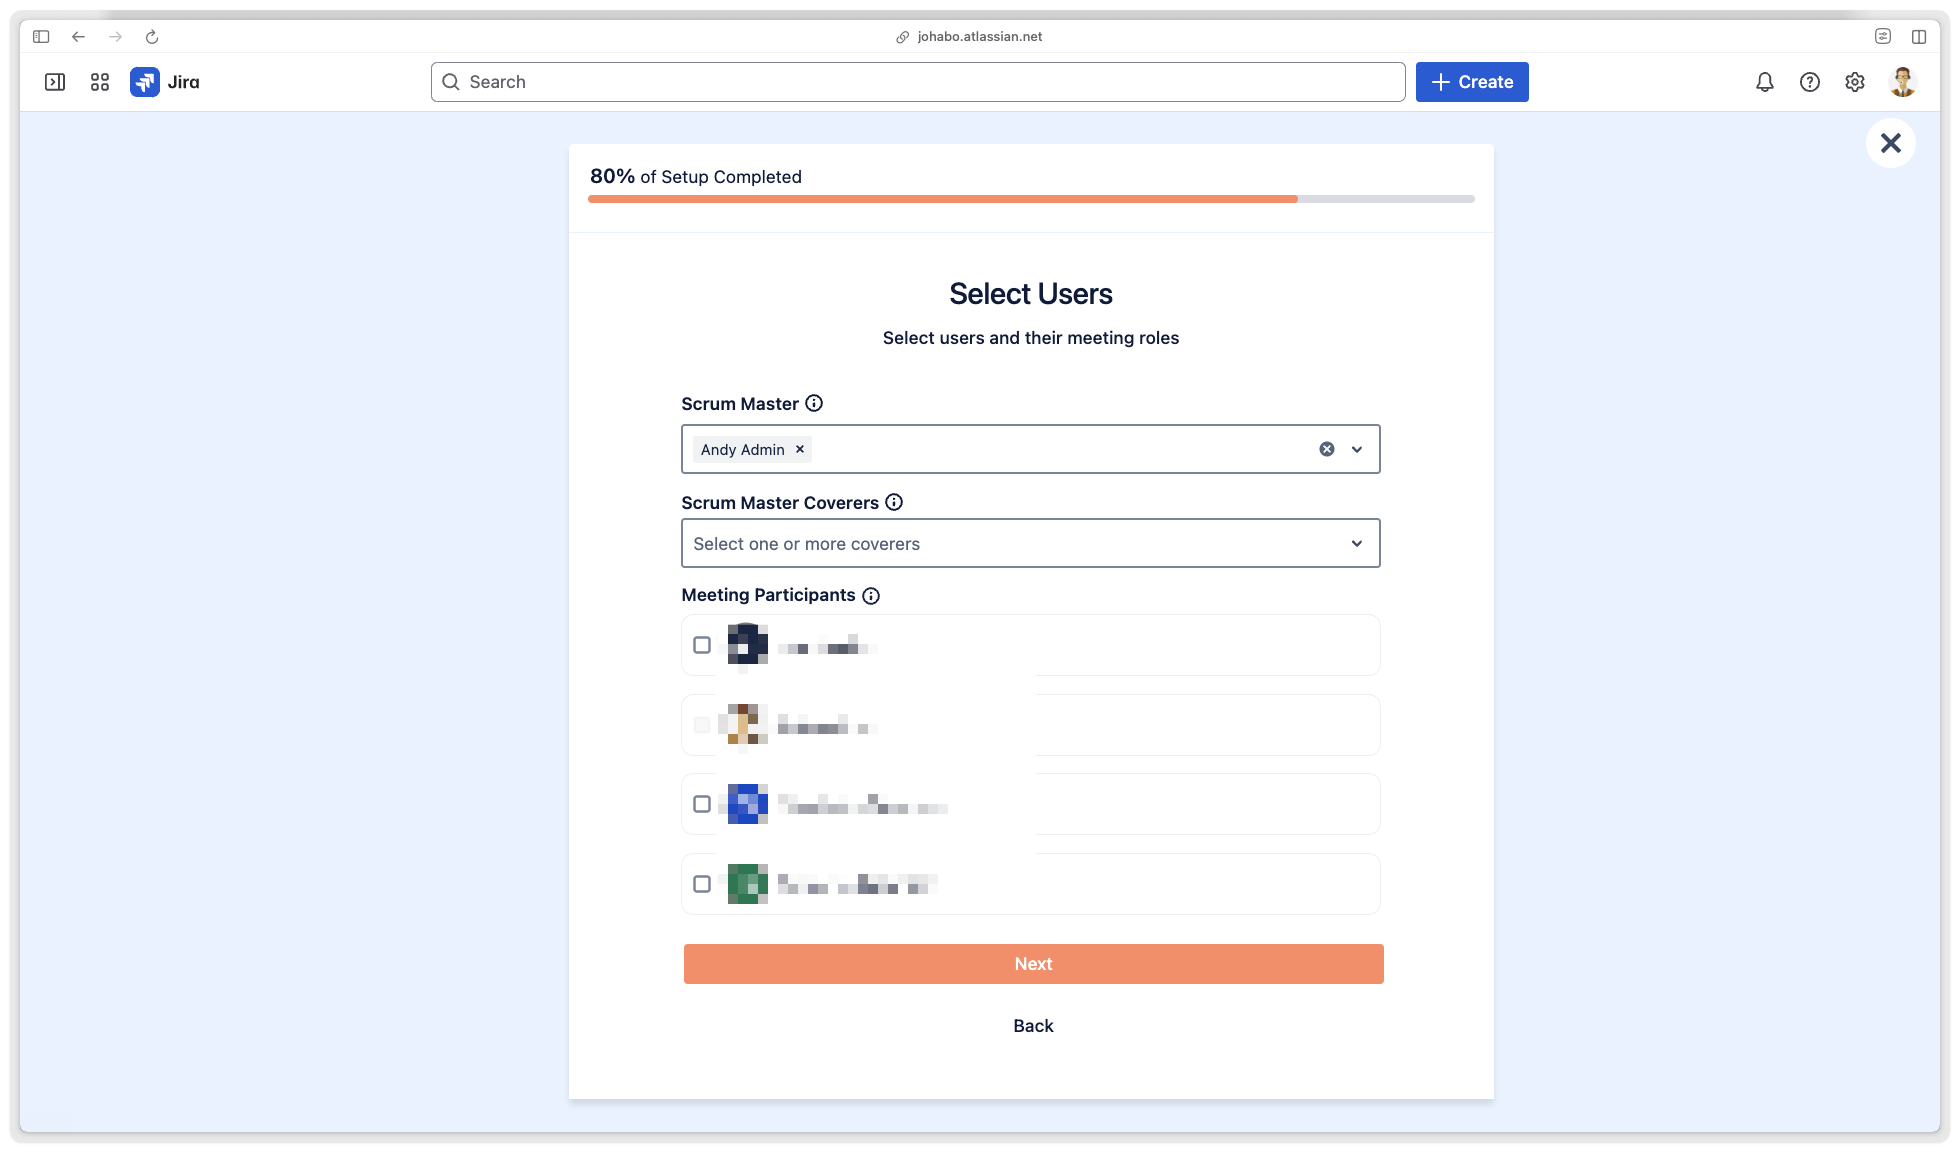
Step 5 - Select your Scrum Master and participants:
Click on the "Scrum Master" to add your Scrum Master (mostly yourself)
By default, the creator of the stream will show as Scrum Master.
Start typing the name of the Jira user whom you want to set as Scrum Master.
Click on the name of the user once it appears to select it.
Click on the "Coverers" to add a coverer for when your Scrum Master is not available.
Start typing the name of the Jira user that you want to set as Coverer.
Click on the name of the user once it appears in order to select it.
To add Participants, click on the check boxes next to their names to add them to your stream.
Once you are done click on "Next" to proceed to the next step.
Step 6 - Schedule Your Meetings:
Based on your template selection, NASA will suggest appropriate scheduling:
Daily Standup: Monday-Friday schedule
Sprint ceremonies: Bi-weekly or based on your sprint cadence
One-on-One/Brainstorming: Weekly or as needed
Make sure to click the "check" mark for each day of the week when meetings will occur.
Click on "Select Time" to change at what time your meeting is taking place.
Click on your team's preferred meeting time to select it.
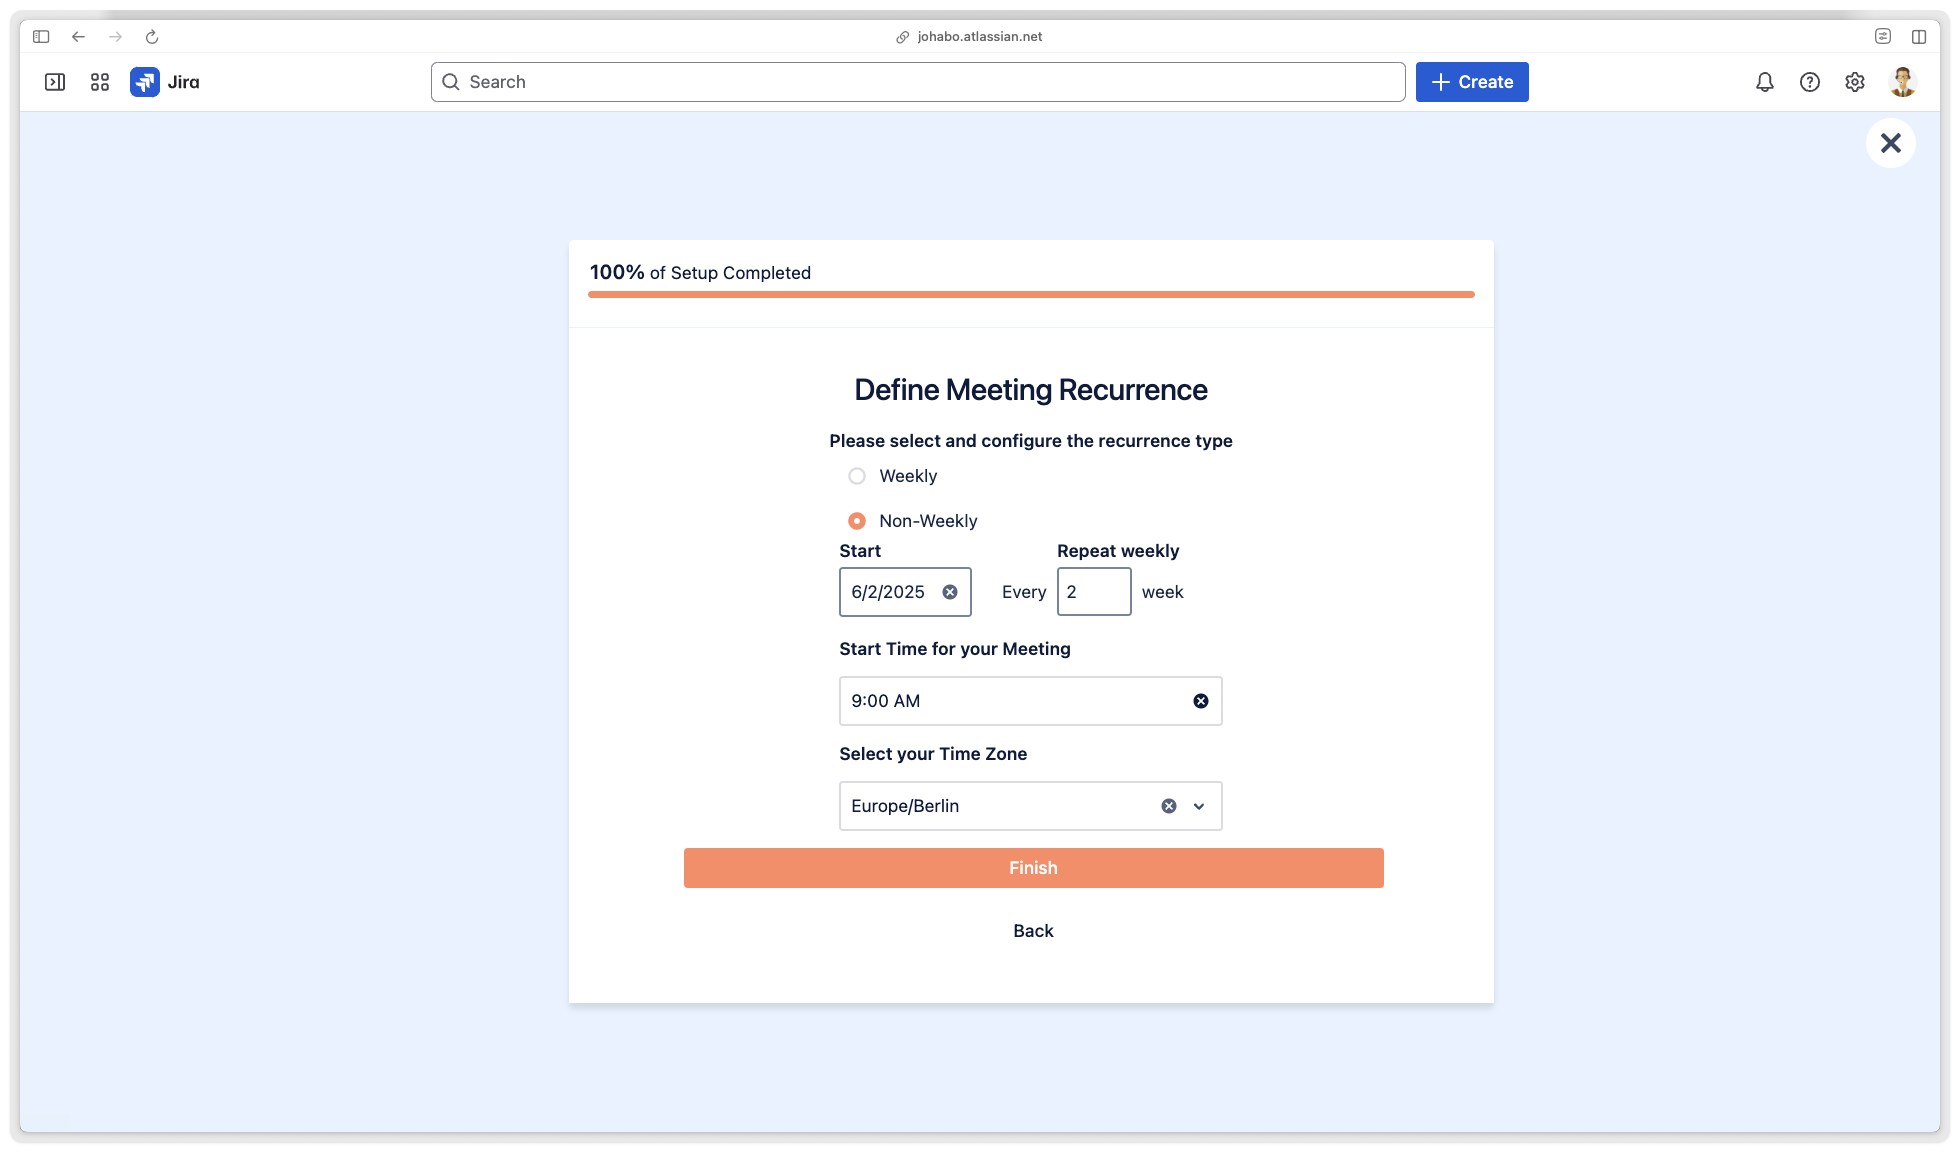
For non-weekly meetings, use "Repeats every X weeks" to set the appropriate interval.
Select your Project Cadence based on frequency.
Project Cadence
The project cadence calculates team performance statistics, such as goal completion rates.
For Scrum boards, the project cadence is equal to the sprint length, and this setting will not be displayed.
Once you are done, click on "Next" to proceed to the next step.
Step 7 - Duration:
Your selected template includes recommended durations, but you can adjust them:
Click on the dropdown to select your meeting duration.
Please note that you can select between "Total Length" and "Time per Participant".
Total Length: If you and your team dedicate a fixed amount of time to your meetings, you can select this option and enter your desired duration time, for example: 15 minutes for standups or 2 hours for sprint planning.
Time per Participant: If you do not have a fixed amount of time for meetings, you can allow a specific amount of time per participant, for example, 3 minutes per participant.
Once you have selected your meeting duration, click on "Finish" to finalize the setup process.
Running Your First Meeting
Preparation Phase:
Each participant opens "My Update" before the meeting
Add relevant Jira issues and text items
Answer the questions configured for your meeting type
2. Live Meeting:
Scrum Master starts the meeting when everyone is ready
Each participant shares their update when it's their turn (Standup) or discusses agenda items (Team Meeting)
Important items can be flagged for follow-up
Scrum Master ends the meeting when complete
3. Review Team Journal:
After the meeting, check the Team Journal to see the complete record
Follow up on any flagged items
Next Steps
Now that you've set up your first stream and run a meeting, you can:
Explore Core Concepts & Navigation to learn more about streams, user roles, and the NASA interface
Learn about Meeting Templates to understand all available templates and customization options
Dive into Meeting Settings to further customize your meetings
Check out Features to discover all the capabilities of NASA
For role-specific guidance, see our User Guides by Role.
