
Rule Configuration Guide
Overview
This guide provides detailed instructions for creating and configuring absence rules using Out of Office Assistant. Rules automatically manage issue assignment and communication when team members are away from work.
Understanding Rule Configuration
Rule Lifecycle
Out of Office rules follow a predictable lifecycle:
Creation: Rule defined with dates, scope, and handling instructions
Scheduled: Rule waiting for start date to activate
Active: Rule processing issues and executing actions
Expired: Rule past end date, no longer processing issues
Disabled: Rule manually deactivated but preserved

Rule Components
Every rule consists of:
Timing: Start date (required) and optional end date
Scope: Which issues the rule affects (projects or JQL filter)
Handling: How issues are processed (coverer, approval, or message)
Options: Additional behaviors like mention tags and custom messages
Accessing Rule Configuration
Navigate to Rule Creation
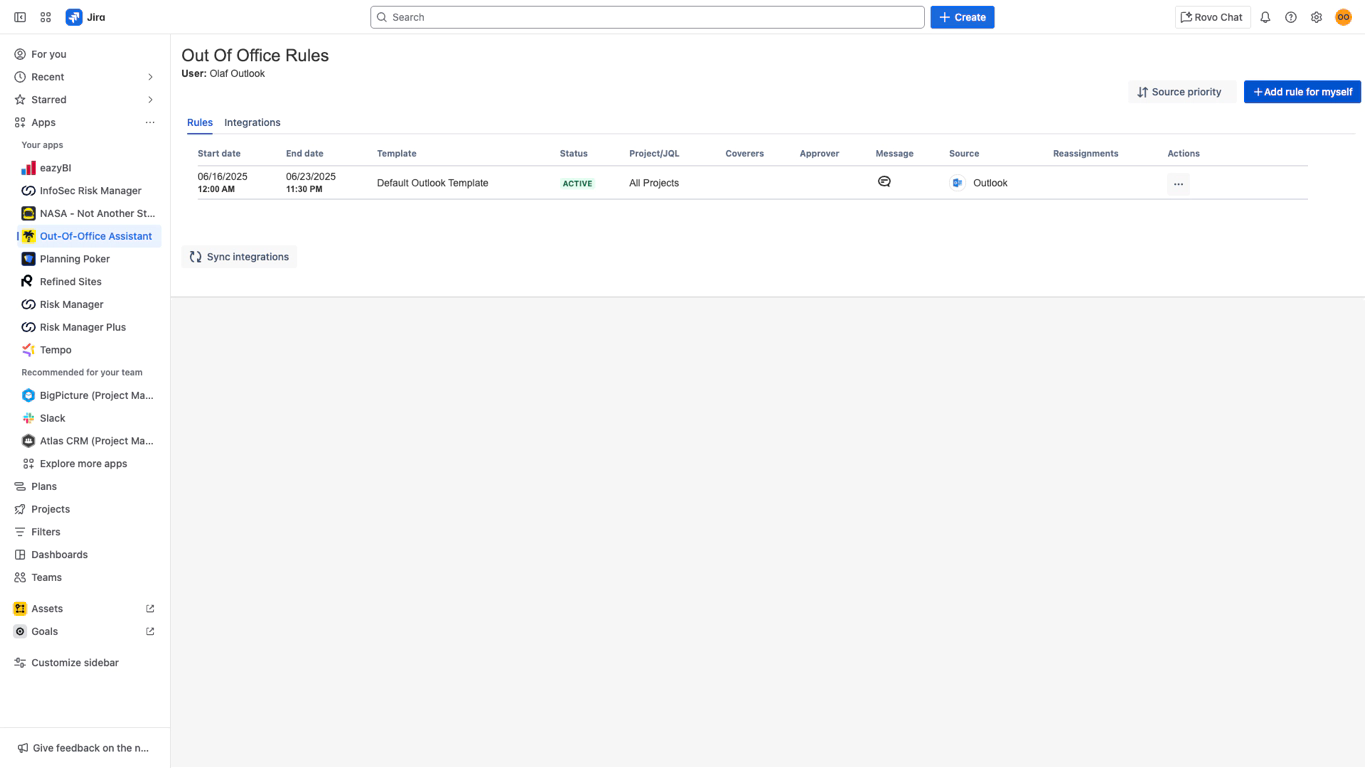
Open Out of Office Assistant:
Navigate to Apps → Out-Of-Office Assistant
Verify you see the main interface with rules table
Start Rule Creation:
Click the blue “Add rule for myself” button in the top right
Rule creation form opens with complete configuration options
Rule Configuration Form
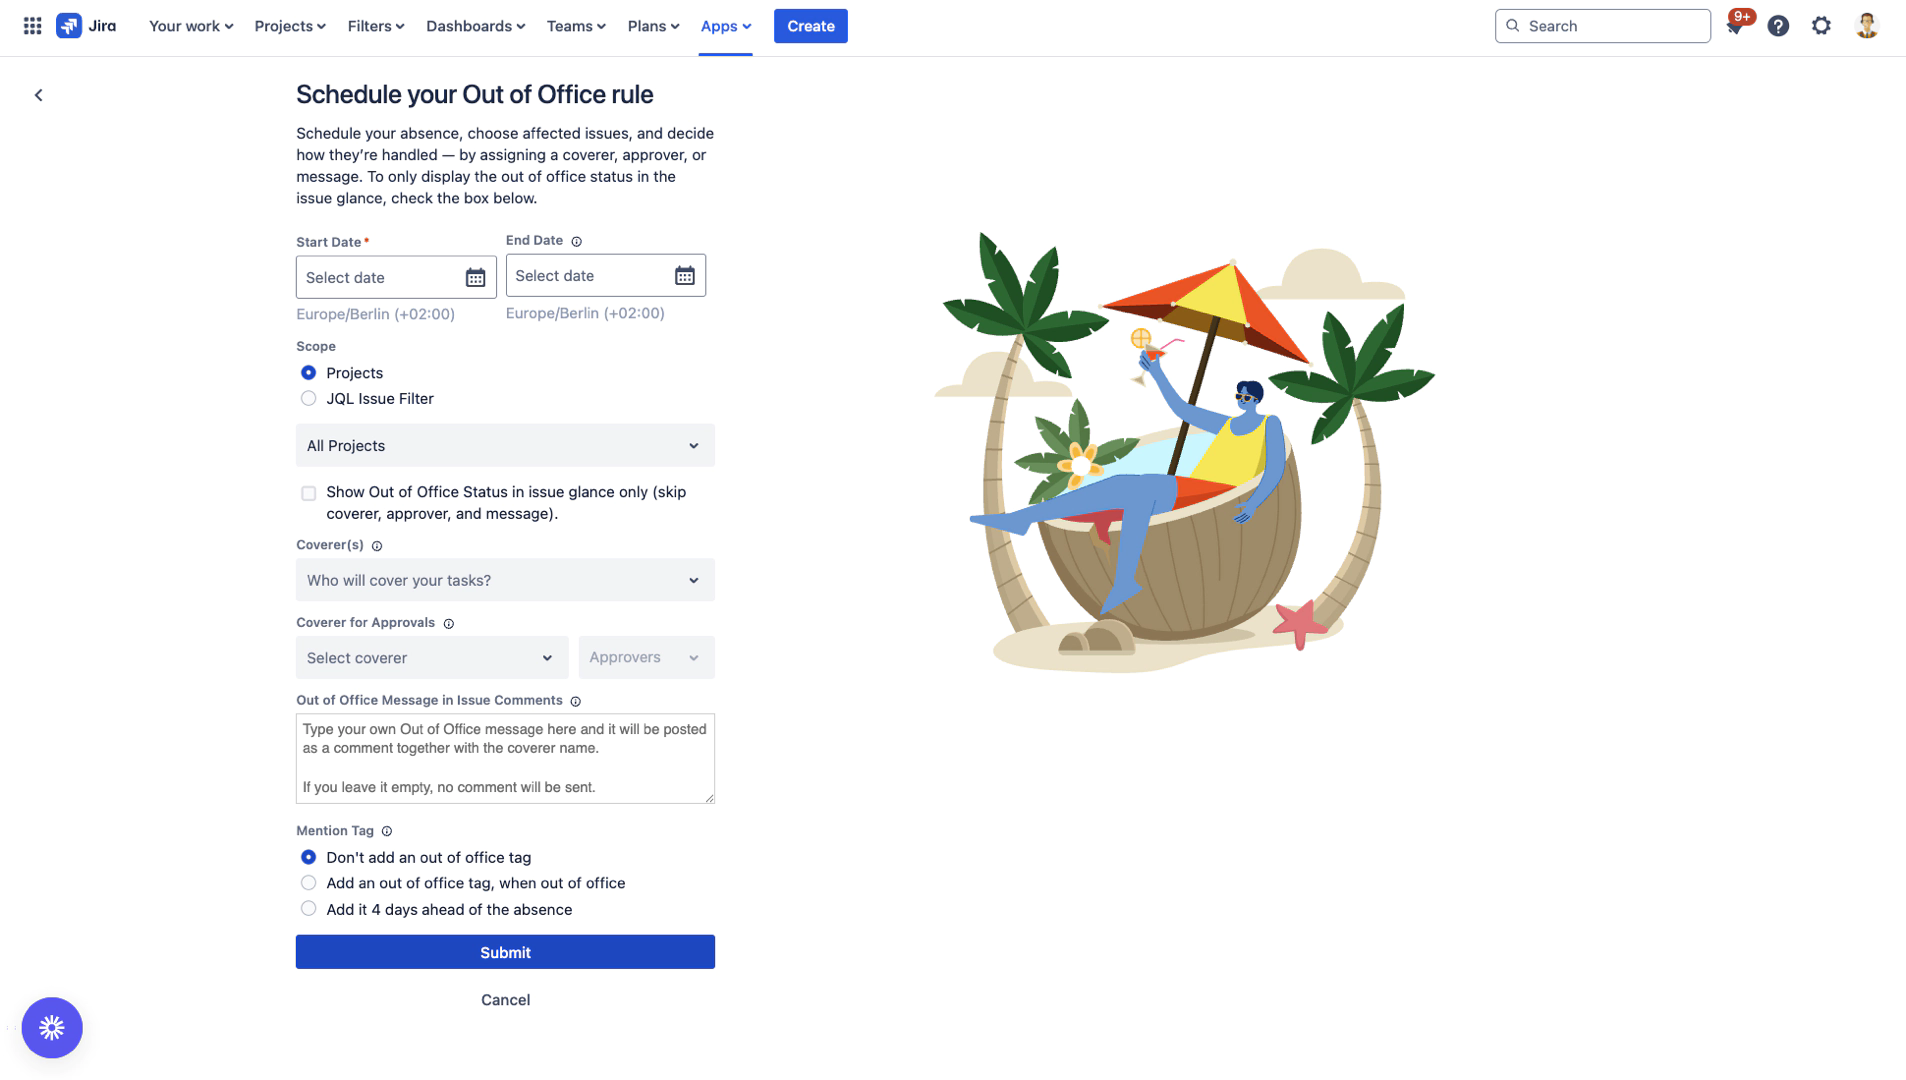
Essential Configuration Fields
Start Date (Required)
Purpose: Defines when your absence rule begins
Requirements: Must be set - rule cannot be created without start date
Configuration Steps:
Click the Start Date field (marked with red asterisk *)
Select date using the calendar picker
Time defaults to 12:00 AM in your timezone
Timezone information displays below field (e.g., “Europe/Berlin (+02:00)”)
Best Practices:
For planned absences: Set start date to the first day you’ll be away
For immediate activation: Select today’s date or past date
For future planning: Use specific start dates for vacation scheduling
End Date (Optional)
Purpose: Defines when your absence rule automatically deactivates
Default: If left empty, rule continues indefinitely until manually disabled
Timezone: Uses same timezone as start date
Configuration Options:
Specific End Date: Rule automatically deactivates at end date
Indefinite Duration: Leave empty for manual deactivation control
Return Planning: Set end date for day you return to work
Usage Recommendations:
Vacation: Always set specific end date
Sick leave: Leave empty for uncertain return date
Extended projects: Set end date for project completion
Scope Configuration
Project Scope (Default)
All Projects (Recommended for Most Users):
Rule applies to all Jira projects you have access to
Issues assigned to you in any project will be affected
Simplest configuration for comprehensive coverage
Specific Projects:
Click the “All Projects” dropdown
Select specific projects where rule should apply
Useful for role-based absence management
JQL Issue Filter (Advanced)
When to Use:
Complex issue filtering requirements
Specific issue types or statuses
Custom business logic for issue selection
Configuration:
Select “JQL Issue Filter” radio button
Select existing Jira Filter or Create a Custom Filter
Test JQL in our Out of Office Preview or in Jira Issue Search
JQL Examples:
- # All issues in specific project
- project = "MY PROJECT" AND assignee = "user.account.id"
- # Only bugs and stories
- project = "MY PROJECT" AND issuetype IN (Bug, Story) AND assignee = "your user ID"
- # High priority issues only
- priority = High AND assignee = "user.account.id"
- # Issues with specific labels
- labels = urgent AND assignee = "user.account.id"
JQL Best Practices:
Always include
assignee = "user.account.id"for personal rulesTest JQL queries before using in rules
Keep filters simple for reliable operation
Document complex JQL for future reference
Issue Handling Configuration
Coverer Assignment (Most Common) | Out-of-Office assistant will assign new issues during your absence to your coverer. |
|---|---|
Approval Delegation (JSM Projects) | Out-of-Office assistant will assign approval requests in JSM projects to your coverer |
Custom Message (Auto Reply) | Out of office assistant adds a comment to issues which are assigned to you during your absence with your individual message. |
Status-Only Rules | Status-Only Rules display your Out-of-Office status without automatically reassigning issues. These rules inform colleagues about your availability in the Issue Context. |
Requirement: Must configure at least one handling method.
Option 1: Coverer Assignment (Most Common)
Purpose: Reassign issues to colleagues who will handle them during absence
Configuration:
Click “Coverer(s)” dropdown
Type colleague’s name - dropdown filters as you type
Select user from dropdown when name appears
Add multiple coverers for round-robin assignment
Coverer Selection Criteria:
Permissions: Coverer must have assignment permissions in relevant projects
Availability: Verify coverer is available during your absence period
Skills: Choose coverer with appropriate expertise for your issue types
Workload: Consider coverer’s current workload and capacity
Multiple Coverers:
Round-robin assignment: Issues distributed among multiple coverers
Load balancing: Helps prevent overwhelming single coverer
Backup coverage: Provides redundancy if one coverer becomes unavailable
Option 2: Approval Delegation (JSM Projects)
Purpose: Delegate approval responsibilities in Jira Service Management projects
Restrictions
JQL-based rules are not supported for approvers
Groups of approvers are not supported
Only a single approver coverer is supported.
Changes to the workflows governing the approval processes may result in the app not being able to delegate approvals for existing issues that went into the approval process before the last change to the workflow.
When to Use:
You have approval responsibilities in JSM projects
Customer requests require approval during your absence
Service level agreements must be maintained
Configuration:
Coverer for Approvals:
Select colleague who will handle approval decisions
Must have appropriate permissions in JSM projects
JSM-Specific Considerations:
Customer Impact: Approvals affect customer experience directly
SLA Compliance: Ensure approval delegation maintains service levels
Option 3: Custom Message Only
Purpose: Notify stakeholders about absence without reassigning issues
When to Use:
You prefer to handle issues yourself upon return
Temporary absence where reassignment is not needed
Communication-only requirement for transparency
Configuration:
Type message in “Out of Office Message in Issue Comments” text area
Include essential information:
Return date (if known)
Emergency contact information
Alternative resources for urgent matters
Message Best Practices:
- I'm currently out of office until [return date].
- For urgent matters, please contact:
- - [Colleague Name]: [email] for [specific type of issues]
- - [Manager Name]: [email] for approval decisions
- I'll respond to non-urgent matters upon my return.
Option 4: Status-only Rules
Option 1: Coverer Assignment (Most Common)
Purpose: Visibility without delegation: Shows you're away without transferring work. Displays your status in the Issue Context
Configuration:
Choose Status-Only Rule type
When to Use:
Visibility without delegation: Shows you're away without transferring work
Absence communication: Displays your status and custom message
Flexible availability: Ideal for non-traditional schedules
Integration support: Works with all Out-of-Office integrations
Advanced Configuration Options
Out of Office Message
Purpose: Custom message posted to issue comments when rule processes issues
Compatibility: Works with all handling methods (coverer, approval, message-only)
Message Configuration:
Custom Content: Add specific instructions, contact information, timelines
Professional Tone: Keep messages clear and helpful for issue stakeholders
Message Examples:
With Coverer:
- I'm currently out of office until [date]. [Coverer Name] will be handling my issues during this time.
- For urgent matters, please contact [Coverer Name] directly at [contact].
Message Only:
- I'm currently out of office until [date]. This issue will be addressed upon my return.
- For urgent assistance, please contact [backup contact] or escalate through your project manager.
Mention Tag Options
Purpose: Add visual indicators to issue comments for stakeholder awareness
Tag Options:
Don’t add an out of office tag (Default):
No visual indication added to issues
Clean issue appearance
Recommended for internal teams with good communication
Add an out of office tag, when out of office:
Tag appears when rule is active
Immediate visual indicator of absence status
Useful for customer-facing projects
Add it 4 days ahead of the absence:
Early warning for stakeholders
Allows planning and coordination
Recommended for planned vacations and critical role absences
Tag Benefits:
Visual Awareness: Immediate indication of user availability in comments
Planning Support: Advance notice helps team coordination
Rule Configuration Workflows
Quick Setup for Vacation
Timeline: 2–3 minutes for standard vacation rule
Start Date: First day of vacation
End Date: Day after return (for safety buffer)
Scope: All Projects
Coverer: Select trusted colleague
Message: Include return date and emergency contact
Mention Tag: “Add it 4 days ahead” for advance notice
Emergency Sick Leave Setup
Timeline: 1 minute for immediate activation
Start Date: Today’s date (or yesterday if retroactive)
End Date: Leave empty (uncertain return)
Scope: All Projects
Coverer: Select available colleague or manager
Message: Brief explanation with contact for urgent matters
Mention Tag: “When out of office” for immediate indication
Project-Specific Absence
Timeline: 3–5 minutes for targeted configuration
Start Date: Project absence start
End Date: Project timeline completion
Scope: Select specific projects OR use JQL filter
Coverer: Project team member with relevant expertise
Message: Project-specific instructions and contacts
Mention Tag: Based on project visibility requirements
Service Desk Agent Configuration
Timeline: 5 minutes for complete JSM setup
Start Date: Service absence start
End Date: Return to service date
Scope: JSM projects only (use JQL:
project IN (serviceDesk1, serviceDesk2))Approval Delegation: Select backup agent with customer permissions
Message: Customer-friendly language with service alternatives
Mention Tag: “Add it 4 days ahead” for customer planning
Form Submission
Successful Submission:
Click “Submit” button when all requirements met
Return to main interface automatically
New rule appears in rules table
Status shows “Scheduled” (future start) or “Active” (current/past start)
Cancellation:
Click “Cancel” to return without saving
No data preserved - must restart configuration if needed
Confirmation dialog may appear for complex configurations
Rule Management After Creation
Rule Status Indicators
Scheduled: Rule created but start date not reached
Active: Rule currently processing issues
Expired: End date passed, rule no longer active
Disabled: Manually deactivated but preserved
Rule Modification
Edit Existing Rules:
Click menu button (three dots) in Actions column
Select “Edit Rule” from dropdown
Modify configuration as needed
Submit changes to update rule
Quick Enable/Disable:
Toggle switch in Actions column for immediate state change
No confirmation required for toggle operations
Rule configuration preserved when disabled
Best Practices Summary
Planning and Preparation
Plan Ahead: Configure rules at least 24 hours before absence
Communicate: Inform team members about coverer assignments
Test: Create test rules for complex configurations
Configuration Choices
Start Simple: Use “All Projects” scope for first rules
Choose Appropriate Coverers: Select based on availability and expertise
Set Clear Messages: Include return dates and emergency contacts
Use Mention Tags: Provide advance notice for planned absences
Maintenance and Updates
Monitor Active Rules: Check status and effectiveness regularly
Update as Needed: Modify rules if circumstances change
Clean Up: Disable or delete expired rules
Learn and Improve: Refine approach based on experience
Rule Configuration Status: ✅ COMPLETE
Next Step: https://resolution.atlassian.net/wiki/spaces/OoO/pages/4848353576