
Issue Context Assignment and Availability Display
Overview
The Out of Office Issue Context provides real-time visibility into team member availability directly within Jira issues, enabling informed assignment decisions and preventing work allocation to unavailable users. This intelligent interface displays current and future availability status, suggests available assignees, and automatically handles coverage rules during the assignment process.
Understanding Issue Context Assignment
What is the Issue Context?
The Issue Context is an intelligent assignment interface that enhances Jira's native assignee field by providing:
Real-time availability status for all project team members
Visual indicators showing current and upcoming absences
Smart suggestions for available assignees
Automatic coverage handling when assigning to out-of-office users
Detailed absence information including coverage arrangements
How it Works
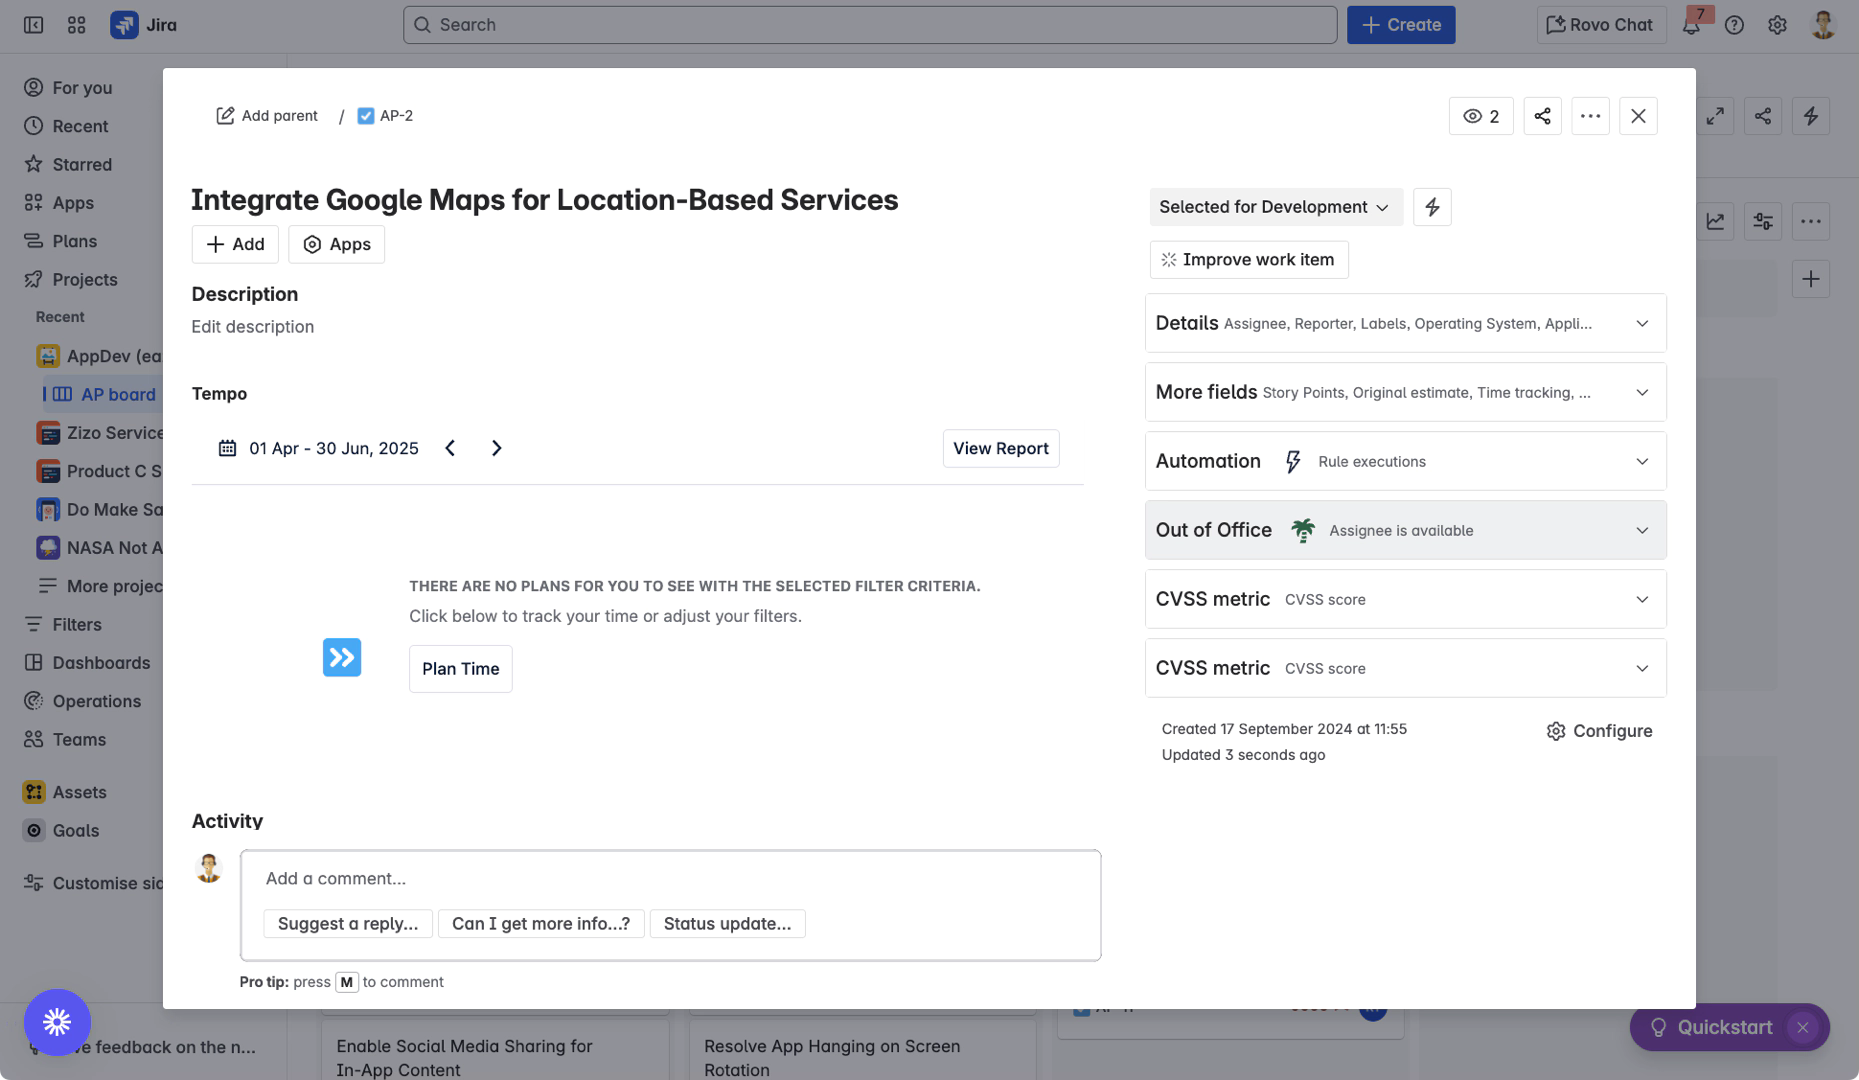
The Issue Context integrates with Out of Office rules to display up-to-date availability information. When viewing any Jira issue, the context appears below the standard issue fields, providing both a collapsed summary view and an expanded detailed view with assignment capabilities.
Availability Status Types
The system recognizes four distinct availability states, each with unique visual indicators:
1. Unassigned Status
Indicator: Grey status
Meaning: Issue is unassigned
Display: Shows in both collapsed and expanded views
2. Available Status
Indicator: 🟢 Green status
Meaning: User is currently working and accepting assignments
Display: Shows in both collapsed and expanded views
3. Leaving Soon Status
Indicator: 🟡 Yellow/amber warning
Meaning: User has upcoming time off scheduled
Display: Alerts assigners to impending unavailability
4. Out of Office Status
Indicator: 🔴 Red status
Meaning: User is currently away and has active OOO rules
Display: Shows coverage information if configured
Using the Issue Context
Accessing the Issue Context
Navigate to any Jira issue
Open the issue in full view mode
Scroll past Details, More Fields, and Automations sections
Locate the Out of Office section
Position: Below standard Jira fields
Default state: Collapsed view showing current assignee status
Basic Assignment Process
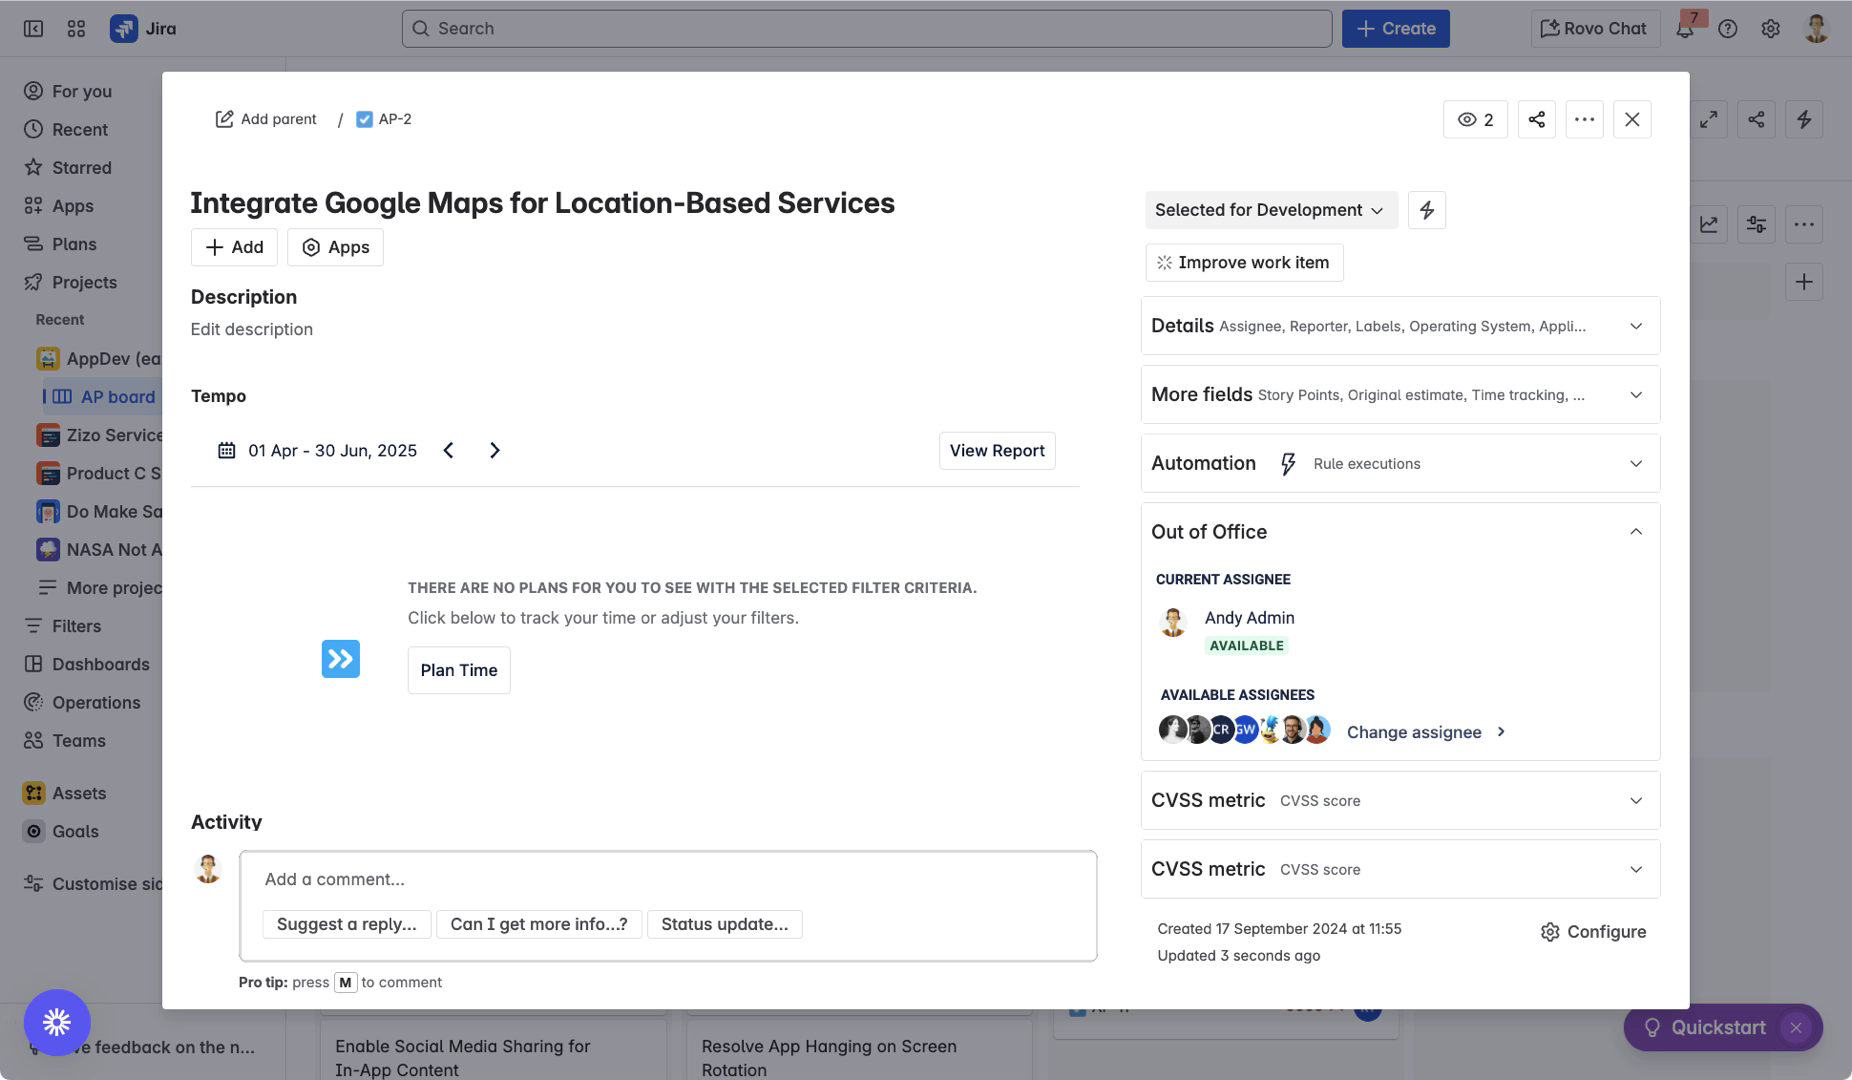
Step 1: Check Current Status
The collapsed view immediately shows:
Current assignee name and avatar
Availability status indicator
Quick visual reference for assignment decisions
Step 2: Expand for Options
Click on the issue context to expand
View available information:
Current assignee details
Available team members roster
Status indicators for all users
Step 3: Quick Assignment
Select from available users:
Click any avatar in the "Available Assignees" section
System shows spinner during processing
Assignment updates in real-time
Verify assignment:
Check updated assignee in context
Confirm native Jira field updated
Note any coverage information displayed
Advanced Assignment Features
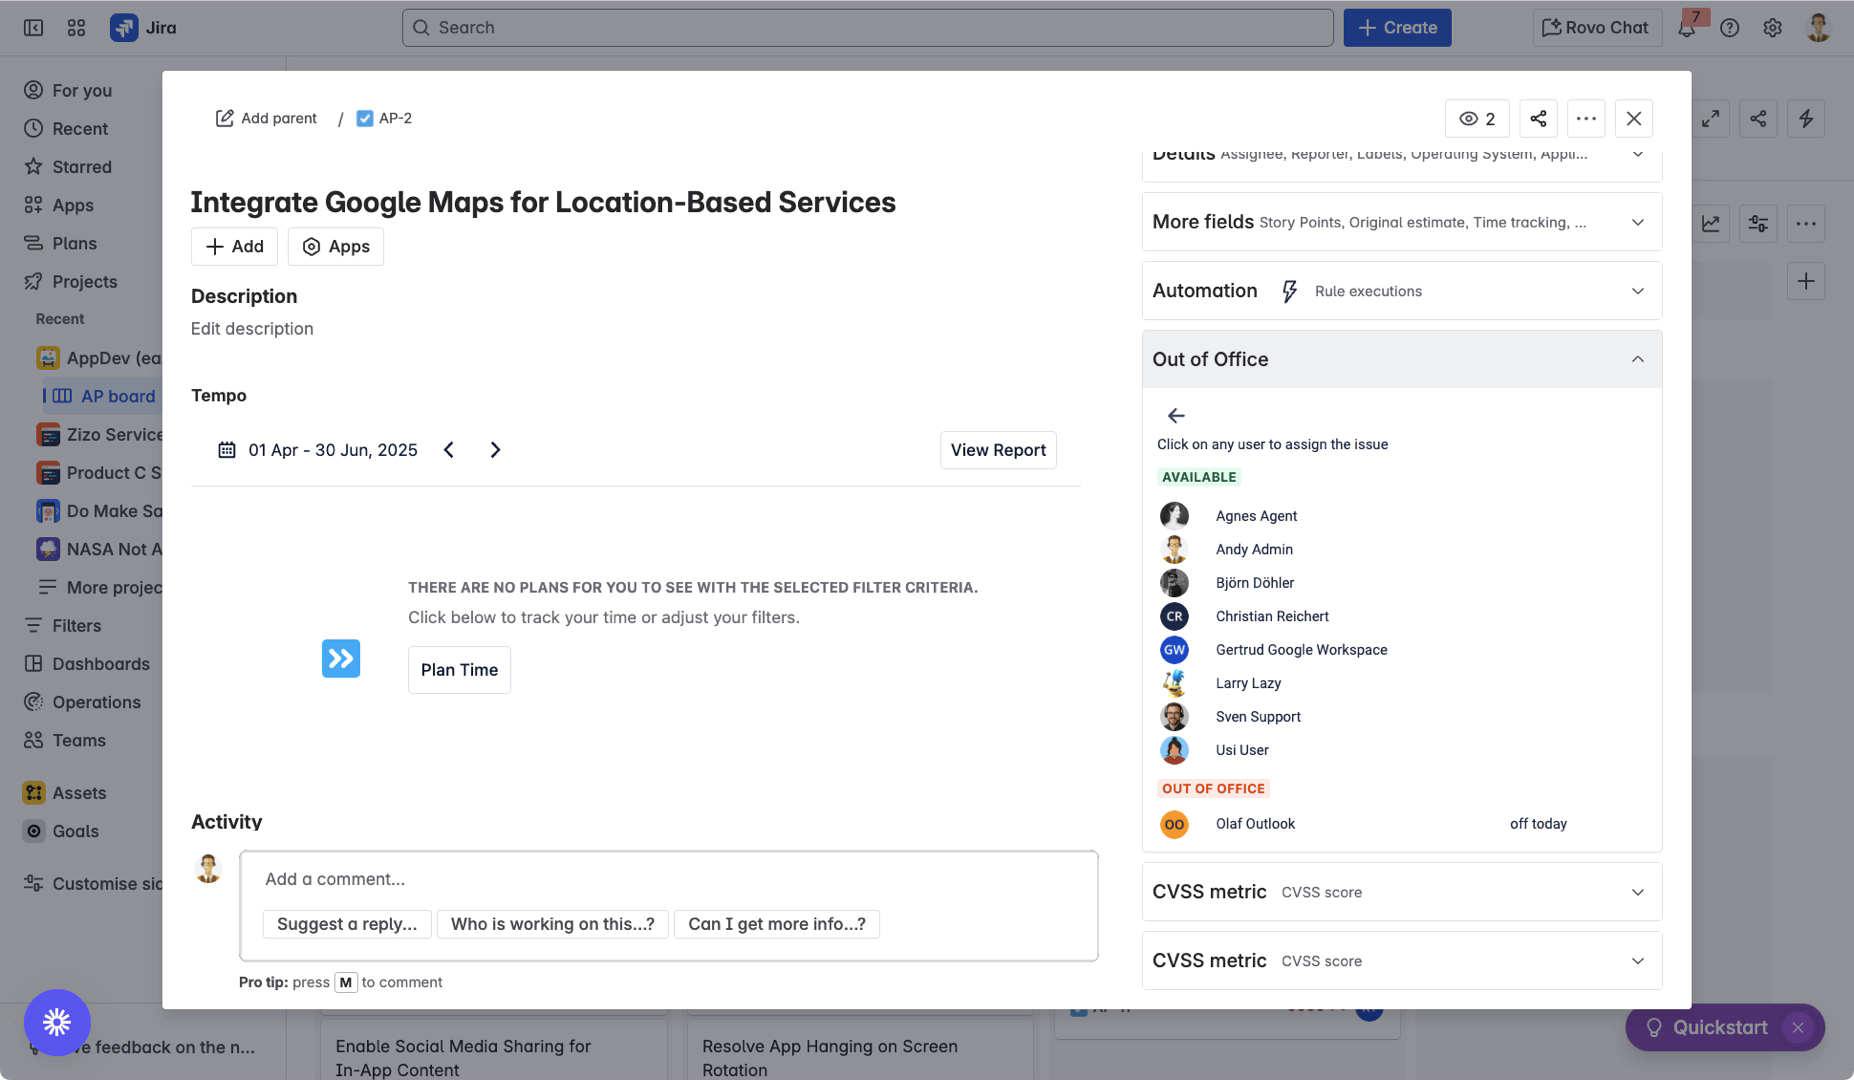
Finding All Project Members
Click "Change assignee" button
Opens full team member list
Sorted by availability status
Shows all project users regardless of status
Review team availability:
- Team Member List Structure:
- ├── ✅ Available Users
- │ └── [List of currently available team members]
- ├── 🟡 Leaving Soon
- │ └── [Users with upcoming absences]
- └── 🔴 Out of Office
- └── [Currently absent users with coverage info]
Assigning to Unavailable Users
When assigning to out-of-office users:
System checks for active rules
Automatic reassignment occurs if coverage configured
Coverage indicator appears: "covering [original assignee]"
Both users shown in the context
Viewing Detailed Information
Check Absence Details
Click arrow icon next to user with "Leaving Soon" or "Out of Office" status
View comprehensive rule information:
Rule period (start and end dates)
Designated coverers
Approver coverage settings
Custom out-of-office message
Check Coverage Arrangements
Click arrow icon next to "covering" indicator
View reverse coverage details:
Who is being covered
Coverage period
Original rule configuration
Best Practices
Assignment Strategy
Prioritize Available Users:
Always check the availability roster first
Use quick assignment for efficient triaging
Consider workload distribution among available team members
Plan for Upcoming Absences:
Review "Leaving Soon" indicators
Reassign long-running tasks before absences
Document handover requirements in issue comments
Team Coordination
Leverage Coverage Information:
Understand coverage chains before assigning
Verify coverer availability when assigning to OOO users
Use coverage details to maintain accountability
Maintain Accuracy:
Refresh browser if assignment data seems outdated
Report any synchronization issues to administrators
Keep OOO rules updated for accurate displays
Integration Considerations
Customer-Facing Teams:
💡 Tip: The availability information can be displayed in JSM customer portals. See Displaying agent availability in the customer portal for configuration details.
High-Volume Environments:
Use bulk assignment features where available
Consider automation rules for standard coverage scenarios
Monitor performance with multiple reassignments
Issue Context Assignment Status: ✅ COMPLETE
Next Step: Rule Configuration Guide