The List of Out of Office Rules
Overview
The Rules Management Interface is the central hub for viewing, creating, and managing all Out of Office rules in your Jira instance. This comprehensive dashboard provides real-time visibility into active absences, scheduled time off, and historical rule performance, enabling effective absence management and team coordination.
Accessing the Rules Interface
Navigation Methods

Via Apps Menu
Click Apps in Jira's top navigation bar
Select Out-Of-Office Assistant from dropdown
Rules tab opens by default
Via User Profile
Click your avatar (top right)
Select Out-Of-Office Assistant
Automatically displays your rules
Direct URL Access
Bookmark:
[Your-Instance]/plugins/servlet/ac/outofoffice-connect/out-of-office-addonInstant access to rules interface
Understanding the Rules Table
Table Column Reference
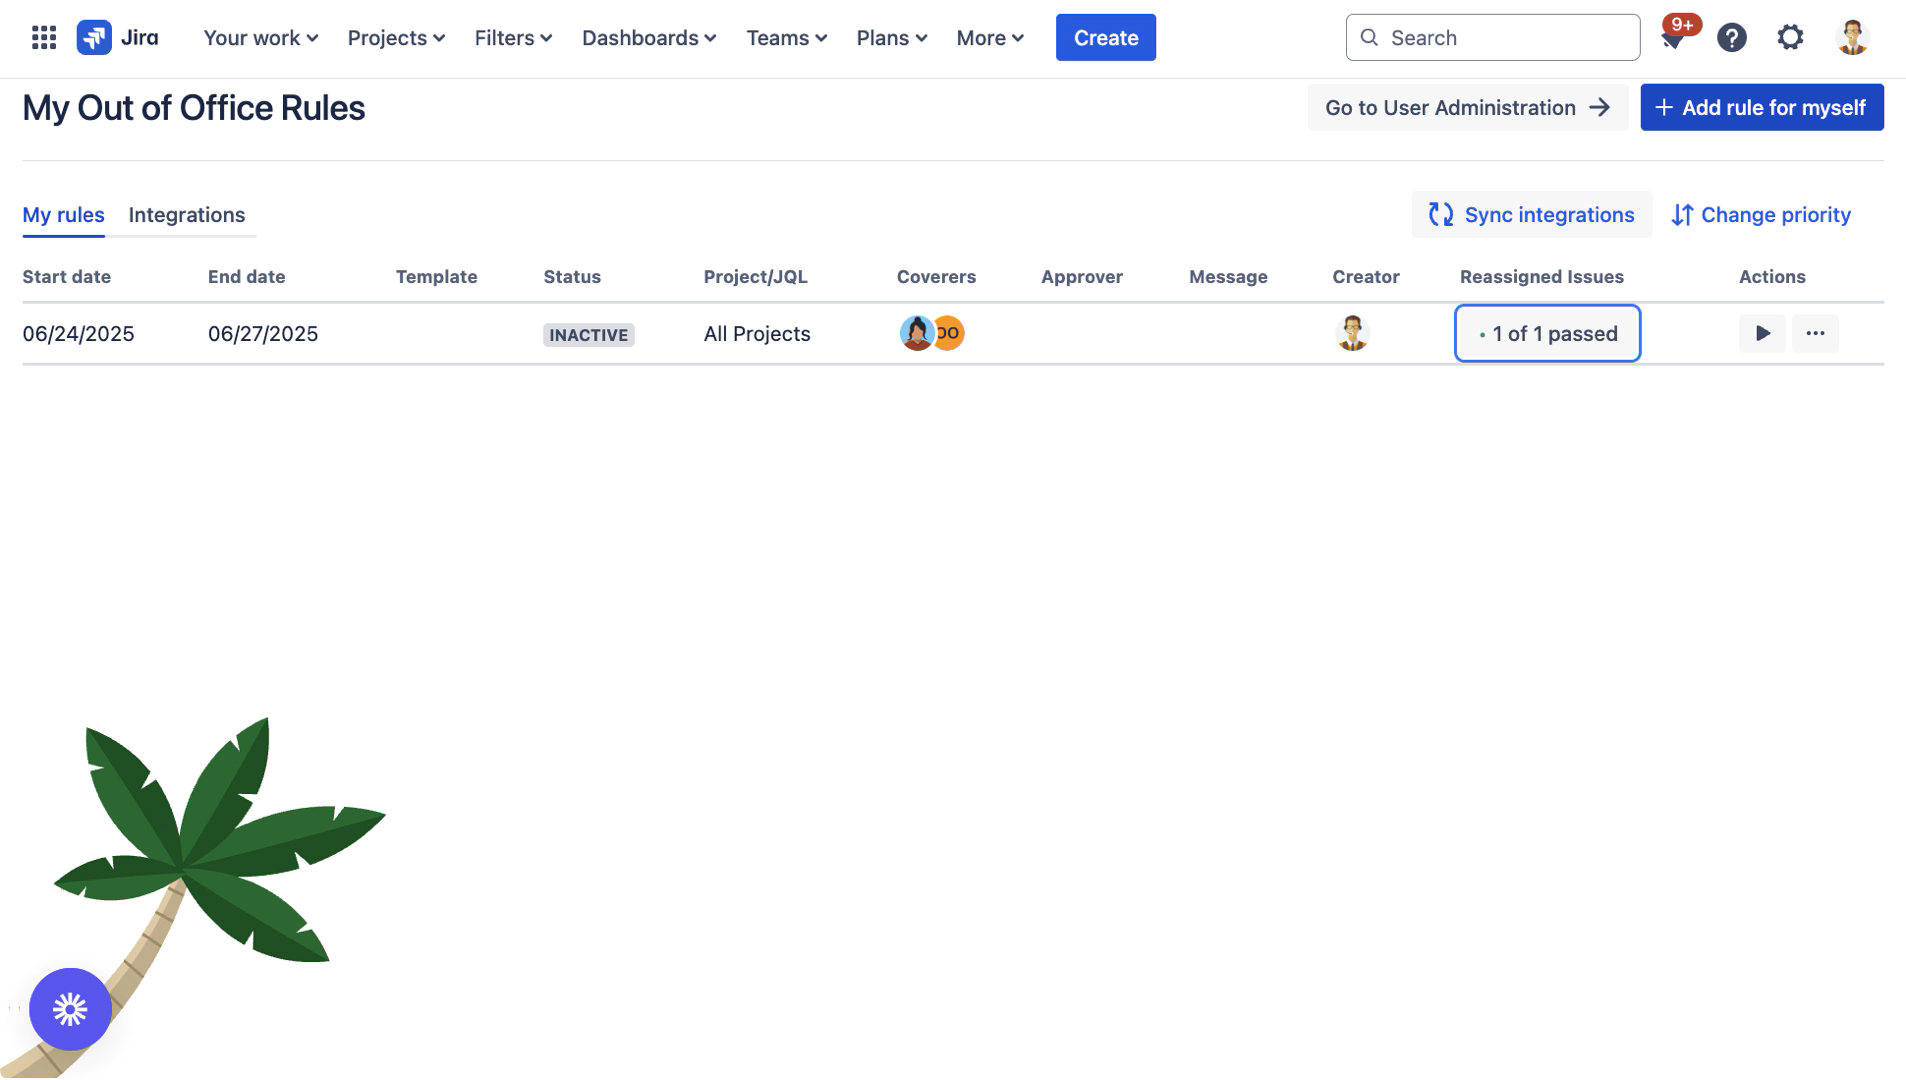
The rules table displays comprehensive information about all absence rules:
1. Start Date Column
Information Displayed:
Date Format: MM/DD/YYYY
Time Component: HH:MM AM/PM
Timezone Indicator: Shows when different from instance timezone (if Timezone is different to User Timezone)
2. End Date Column
Information Types:
Date Format: MM/DD/YYYY
Time Component: HH:MM AM/PM
Timezone Indicator: Shows when different from instance timezone (if Timezone is different to User Timezone)
Open-Ended / Indefinite Symbol: "∞" for no planned end
3. Template Column
Template Indicators:
Template Name: Shows linked template
Manual Rule: Empty/blank
Integration Source: Template from specific integration
Template Sources:
- Supported Template Sources:
- ✅ Google Calendar templates
- ✅ Microsoft Outlook templates
- ✅ Tempo integration templates
- ❌ Manual rules (no template)
- ❌ REST API rules (direct creation)
- ❌ Slack rules (direct creation)
4. Status Column
Rule Status Types:
Status | Description | Visual Indicator |
|---|---|---|
ACTIVE | Currently processing issues | 🟢 Green badge |
SCHEDULED | Waiting for start date | 🟣 Purple badge |
EXPIRED | Past end | 🟡 Yellow badge |
INACTIVE | Manually deactivated | ⚫ Grey badge |
Status Logic:
- Status Determination:
- IF current_time < start_date → SCHEDULED
- ELSE IF current_time >= start_date AND current_time <= end_date → ACTIVE
- ELSE IF current_time > end_date → EXPIRED
- ELSE IF manually_disabled → INACTIV
5. Project/JQL Column
Scope Display Options:
All Projects: Universal rule application
Specific Projects: Shows project keys (e.g., "DEV, PROD, TEST")
JQL Filter: Shows "JQL" badge with hover tooltip
JQL Hover Display:
- JQL Badge → Hover reveals:
- "project = DEV AND issuetype = Bug AND priority = High"
6. Coverers Column
Coverage Display:
Single Coverer: Individual avatar
Multiple Coverers: Avatar group (up to 5 visible)
Overflow Indicator: "+2 more" for large groups
Hover Details: Full names on avatar hover
Round-Robin Indicator:
- Multiple Coverers Display:
- 🧑💼 🧑💻 🧑🔧 (+3 more)
- └── Round-robin assignment active
7. Approver Column
JSM-Specific Display:
Approver Avatar: Shows designated approval delegate
Empty State: No approver configured
Hover Information: Full name and role
8. Message Column
Message Indicators:
💬 Icon: Message configured
Empty: No message set
Hover Preview: Shows full message text
Message Preview Example:
- 💬 (hover) → "I'm out of office until June 20.
- For urgent matters, please contact my coverer."
9. Source Column
Source Types Display:
Source | Icon | Description |
|---|---|---|
Manual | User avatar | Created by user |
Google Calendar | Calendar icon | Google integration |
Outlook | Outlook icon | Microsoft integration |
Tempo | Tempo icon | Timesheet integration |
REST API | API icon | Programmatic creation |
Slack | Slack icon | Slack command |
10. Reassignments Column
Statistics Display:
Count Number: Total reassigned issues
Clickable Link: Opens issue list
Real-time Updates: Count increases as rules process
Click Action:
- "42" → Click → Opens JQL:
- "assignee changed FROM user TO coverer
- DURING (startDate, endDate)"
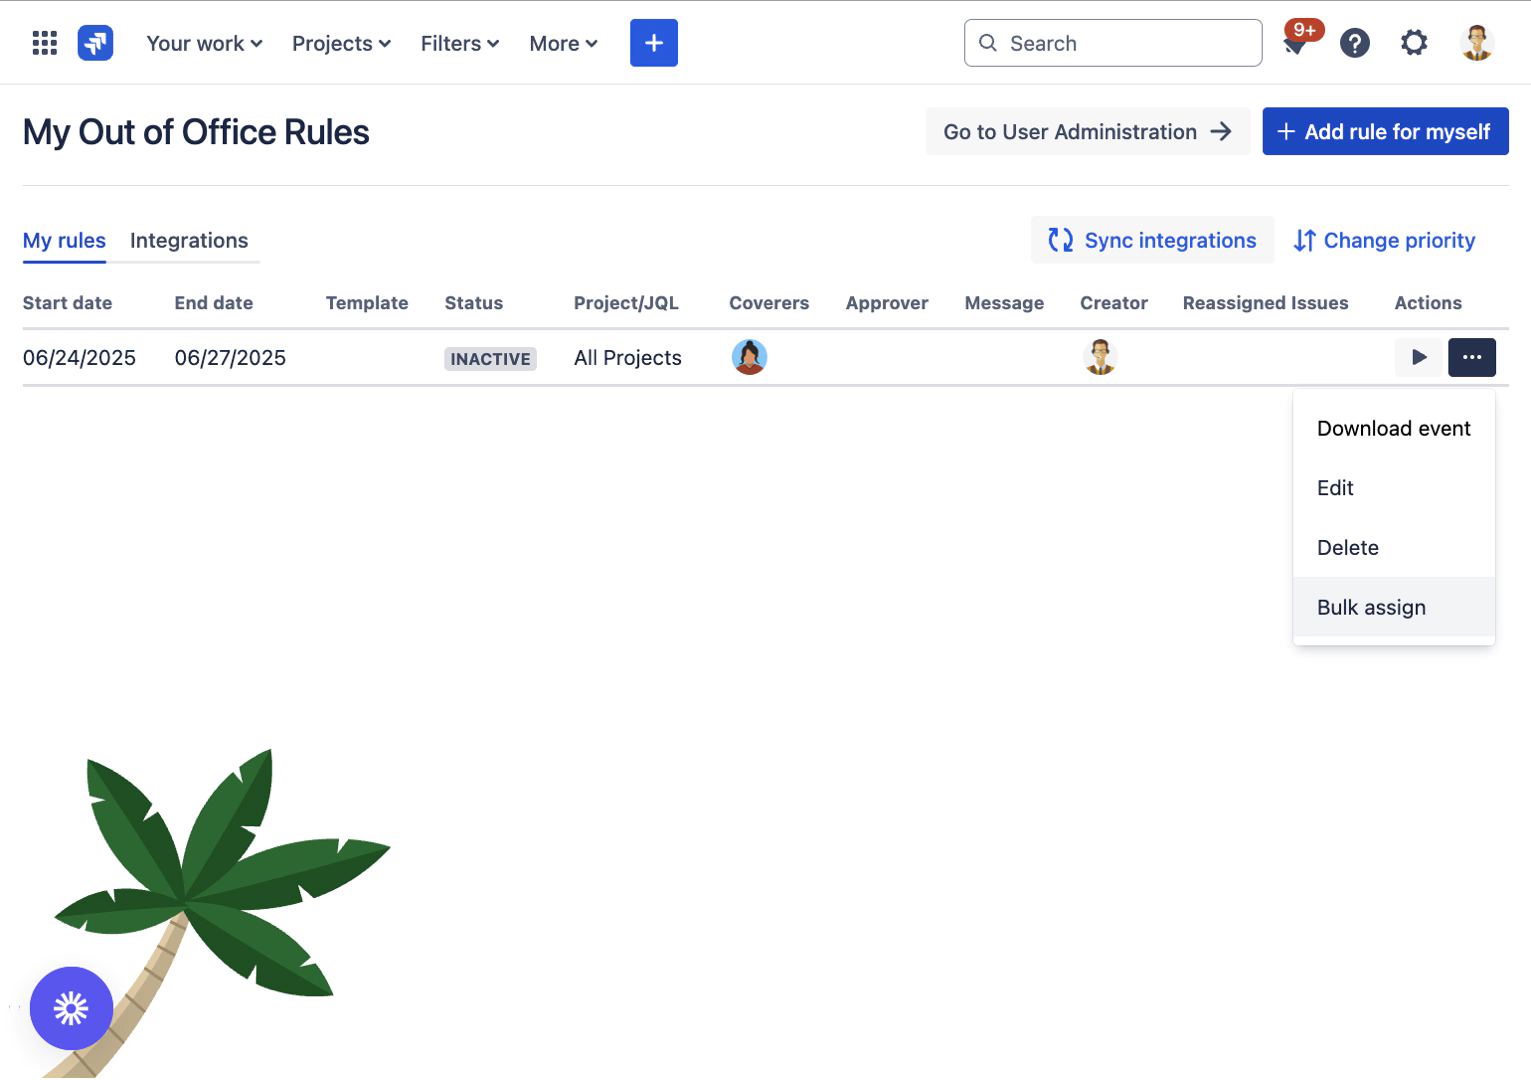
11. Actions Column
Available Actions Menu:
Edit Rule: Modify rule parameters
Delete Rule: Remove rule (with confirmation)
Download Event: Export as .ics file

12. Quick Actions
Bulk Assign:
After setting up your rule details, click Action Menu > Bulk Assign
Function: Assign existing open issues
Availability: Active, paused and scheduled rules
Enable/Disable Toggle:
Location: Right side of row
Function: Quick activation/deactivation
Rule Management Operations
Creating New Rules
Quick Rule Creation:
Click "Add rule for myself" button (top right)
Configure rule parameters in creation dialog
Save rule to add to table
Creation Methods Available:
- Rule Creation Options:
- 📝 Manual: Direct form entry
- 📅 Template: Use saved configuration
- 🔄 Integration: Automatic from external source
- 💻 API: Programmatic creation
- 💬 Slack: Command-based creation
Editing Existing Rules
Editable Rule Types:
Rule Source | Editable | How to Edit |
|---|---|---|
Manual | ✅ Yes | Via Actions → Edit |
Template-based | ⚠️ Partial | Edit template instead |
Integration / API | ❌ No | Edit in source system or template |
Slack | ✅ Yes | Via Actions → Edit |
Edit Restrictions for Integration Rules:
- Read-Only Integration Rules:
- - Google Calendar rules → Edit in Google Calendar
- - Outlook rules → Edit Auto-Reply settings
- - Tempo rules → Edit Tempo plans
- - Template changes → Edit connected template
Deleting Rules
Deletion Process:
Access Actions Menu: Click three-dot menu
Select Delete: Choose "Delete rule" option
Confirm Deletion: Acknowledge confirmation dialog
Result: Rule removed from table
Bulk Operations
Bulk Reassignment Feature
When to Use Bulk Reassignment:
- Use Cases:
- ✅ Before vacation starts - Reassign open issues
- ✅ Unexpected absence - Quick coverage setup
- ✅ Project handover - Systematic reassignment
- ✅ Team restructuring - Mass issue migration
Bulk Reassignment Process:
Click Reassign Icon (👥) on rule row
Select Scope:
Issues assigned to you
Specific project issues
JQL-filtered issues
Choose Action:
Reassign to coverer
Add coverer as watcher
Both actions
Execute: Confirm bulk operation
Downloading Calendar Events
Export to Calendar:
Access Actions Menu: Three-dot menu
Select "Download Event": Generates .ics file
Import to Calendar:
Outlook: File → Open → Calendar
Google: Settings → Import
Apple Calendar: File → Import
ICS File Contents:
- BEGIN:VEVENT
- SUMMARY:Out of Office - [User Name]
- DTSTART:20250615T090000
- DTEND:20250620T170000
- DESCRIPTION:Coverer: [Coverer Name]
- STATUS:CONFIRMED
- END:VEVENT
Rule Status Management
Understanding Rule Lifecycle
Rule State Transitions:
- Rule Lifecycle Flow:
- CREATED → SCHEDULED → ACTIVE → EXPIRED
- ↓ ↓ ↓ ↓
- INACTIV INACTIV INACTIV INACTIV
- Manual Toggle: Any state → INACTIV
- Re-enable: INACTIV → Previous state
Managing Rule States
Automatic State Changes:
Scheduled → Active: When start date/time reached
Active → Expired: When end date/time passed
Any → INACTIV: Manual toggle action
Manual State Control:
Toggle Switch: Instant enable/disable
Preserves Configuration: Settings maintained
Immediate Effect: Real-time processing change
Integration Rule Management
Read-Only Integration Rules
Rules created by integrations have special handling:
Why Read-Only?
- Integration Rule Principles:
- 🔒 Source of Truth: External system maintains authority
- 🔄 Automatic Sync: Changes propagate from source
- 📊 Consistency: Prevents conflicting configurations
- 🔐 Data Integrity: Ensures accurate synchronization
Managing Integration Rules
To Modify Integration Rules:
Integration | How to Modify | Sync Time |
|---|---|---|
Google Calendar | Edit calendar event | 15 minutes |
Outlook | Change Auto-Reply | 15 minutes |
Tempo | Update time plans | Real-time |
Templates | Edit template config | Immediate |
Historical Rules and Retention
Data Retention Policy
Current Retention Settings:
- Rule History Retention:
- 📅 Active Rules: Indefinite storage
- 📊 Expired Rules: 30 days post-expiration
- 🗄️ Reassignment Log: Permanent in issue history
Viewing Historical Data
Accessing Past Rules:
Default View: Shows last 30 days
Extended History: Via JQL in issue navigator
Audit Trail: Issue history for reassignments
Export Options: Download for archival
Best Practices for Rule Management
Rule Organization
Effective Rule Management:
- Best Practices Checklist:
- ☑️ Review rules for accuracy
- ☑️ Delete expired rules after 30 days
- ☑️ Use templates for consistency
- ☑️ Document coverage arrangements
- ☑️ Test rules before absence
- ☑️ Communicate with coverers
Coverage Planning
Strategic Coverage Setup:
- Coverage Strategy:
- 1. Primary Coverer: Daily operational tasks
- 2. Secondary Coverer: Escalations and urgent items
- 3. Approval Delegate: JSM approval workflows
- 4. Communication: Clear out-of-office messages
Rules Interface Status: ✅ COMPLETE
Next Step: Quick Start Guide for first-time users
Overview
The Rules Management Interface is the central hub for viewing, creating, and managing all Out of Office rules in your Jira instance. This comprehensive dashboard provides real-time visibility into active absences, scheduled time off, and historical rule performance, enabling effective absence management and team coordination.
Accessing the Rules Interface
Navigation Methods

Via Apps Menu
Click Apps in Jira's top navigation bar
Select Out-Of-Office Assistant from dropdown
Rules tab opens by default
Via User Profile
Click your avatar (top right)
Select Out-Of-Office Assistant
Automatically displays your rules
Direct URL Access
Bookmark:
[Your-Instance]/plugins/servlet/ac/outofoffice-connect/out-of-office-addonInstant access to rules interface
Understanding the Rules Table
Table Column Reference
The rules table displays comprehensive information about all absence rules:
1. Start Date Column
Information Displayed:
Date Format: MM/DD/YYYY
Time Component: HH:MM AM/PM
Timezone Indicator: Shows when different from instance timezone (if Timezone is different to User Timezone)
2. End Date Column
Information Types:
Date Format: MM/DD/YYYY
Time Component: HH:MM AM/PM
Timezone Indicator: Shows when different from instance timezone (if Timezone is different to User Timezone)
Open-Ended / Indefinite Symbol: "∞" for no planned end
3. Template Column
Template Indicators:
Template Name: Shows linked template
Manual Rule: Empty/blank
Integration Source: Template from specific integration
Template Sources:
- Supported Template Sources:
- ✅ Google Calendar templates
- ✅ Microsoft Outlook templates
- ✅ Tempo integration templates
- ❌ Manual rules (no template)
- ❌ REST API rules (direct creation)
- ❌ Slack rules (direct creation)
4. Status Column
Rule Status Types:
Status | Description | Visual Indicator |
|---|---|---|
ACTIVE | Currently processing issues | 🟢 Green badge |
SCHEDULED | Waiting for start date | 🟣 Purple badge |
EXPIRED | Past end | 🟡 Yellow badge |
INACTIVE | Manually deactivated | ⚫ Gray badge |
Status Logic:
- Status Determination:
- IF current_time < start_date → SCHEDULED
- ELSE IF current_time >= start_date AND current_time <= end_date → ACTIVE
- ELSE IF current_time > end_date → EXPIRED
- ELSE IF manually_disabled → INACTIV
5. Project/JQL Column
Scope Display Options:
All Projects: Universal rule application
Specific Projects: Shows project keys (e.g., "DEV, PROD, TEST")
JQL Filter: Shows "JQL" badge with hover tooltip
JQL Hover Display:
- JQL Badge → Hover reveals:
- "project = DEV AND issuetype = Bug AND priority = High"
6. Coverers Column
Coverage Display:
Single Coverer: Individual avatar
Multiple Coverers: Avatar group (up to 5 visible)
Overflow Indicator: "+2 more" for large groups
Hover Details: Full names on avatar hover
Round-Robin Indicator:
- Multiple Coverers Display:
- 🧑💼 🧑💻 🧑🔧 (+3 more)
- └── Round-robin assignment active
7. Approver Column
JSM-Specific Display:
Approver Avatar: Shows designated approval delegate
Empty State: No approver configured
Hover Information: Full name and role
8. Message Column
Message Indicators:
💬 Icon: Message configured
Empty: No message set
Hover Preview: Shows full message text
Message Preview Example:
- 💬 (hover) → "I'm out of office until June 20.
- For urgent matters, please contact my coverer."
9. Source Column
Source Types Display:
Source | Icon | Description |
|---|---|---|
Manual | User avatar | Created by user |
Google Calendar | Calendar icon | Google integration |
Outlook | Outlook icon | Microsoft integration |
Tempo | Tempo icon | Timesheet integration |
REST API | API icon | Programmatic creation |
Slack | Slack icon | Slack command |
10. Reassignments Column
Statistics Display:
Count Number: Total reassigned issues
Clickable Link: Opens issue list
Real-time Updates: Count increases as rules process
Click Action:
- "42" → Click → Opens JQL:
- "assignee changed FROM user TO coverer
- DURING (startDate, endDate)"
11. Actions Column
Available Actions Menu:
Edit Rule: Modify rule parameters
Delete Rule: Remove rule (with confirmation)
Bulk assign: Reassign existing open issues
Download Event: Export as .ics file

Start / Pause Toggle:
Location: Right side of row
Function: Quick activation/deactivation of the rule
Rule Management Operations
Creating New Rules
Quick Rule Creation:
Click "Add rule for myself" button (top right)
Configure rule parameters in creation dialog
Save rule to add to table
Creation Methods Available:
- Rule Creation Options:
- 📝 Manual: Direct form entry
- 📅 Template: Use saved configuration
- 🔄 Integration: Automatic from external source
- 💻 API: Programmatic creation
- 💬 Slack: Command-based creation
Editing Existing Rules
Editable Rule Types:
Rule Source | Editable | How to Edit |
|---|---|---|
Manual | ✅ Yes | Via Actions → Edit |
Template-based | ⚠️ Partial | Edit template instead |
Integration / API | ❌ No | Edit in source system or template |
Slack | ✅ Yes | Via Actions → Edit |
Edit Restrictions for Integration Rules:
- Read-Only Integration Rules:
- - Google Calendar rules → Edit in Google Calendar
- - Outlook rules → Edit Auto-Reply settings
- - Tempo rules → Edit Tempo plans
- - Template changes → Edit connected template
Deleting Rules
Deletion Process:
Access Actions Menu: Click three-dot menu
Select Delete: Choose "Delete rule" option
Confirm Deletion: Acknowledge confirmation dialog
Result: Rule removed from table
Bulk Operations
Bulk Reassignment Feature
When to Use Bulk Reassignment:
- Use Cases:
- ✅ Before vacation starts - Reassign open issues
- ✅ Unexpected absence - Quick coverage setup
- ✅ Project handover - Systematic reassignment
- ✅ Team restructuring - Mass issue migration
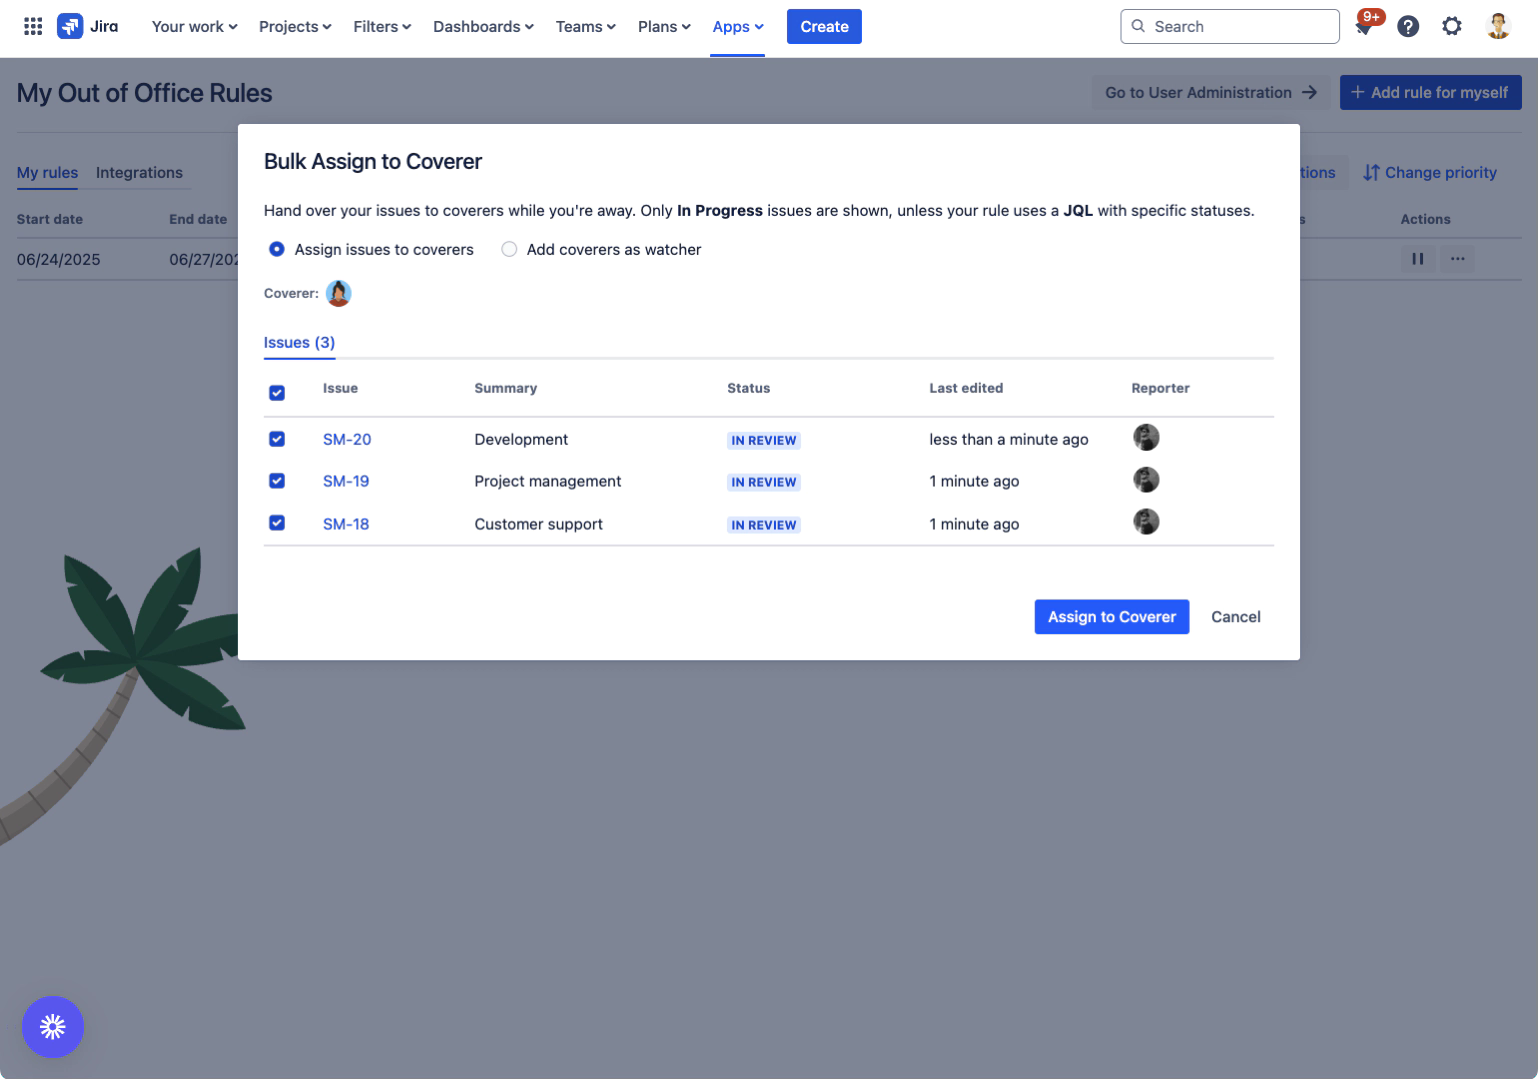
Bulk Reassignment Process:
After setting up your rule details, click Action Menu > Bulk Assign
The system displays all your currently assigned open issues
Review the list showing:
Issue key and summary
Status
Project information
Due dates (Displayed if available)

By default, all issues are selected for reassignment
Uncheck any issues you want to keep assigned to yourself
Review your selection
Click Reassign Selected Issues
Confirm the bulk reassignment
Selected issues are immediately reassigned to your coverer

Downloading Calendar Events
Export to Calendar:
Access Actions Menu: Three-dot menu
Select "Download Event": Generates .ics file
Import to Calendar:
Outlook: File → Open → Calendar
Google: Settings → Import
Apple Calendar: File → Import
ICS File Contents:
- BEGIN:VEVENT
- SUMMARY:Out of Office - [User Name]
- DTSTART:20250615T090000
- DTEND:20250620T170000
- DESCRIPTION:Coverer: [Coverer Name]
- STATUS:CONFIRMED
- END:VEVENT
Rule Status Management
Understanding Rule Lifecycle
Rule State Transitions:
- Rule Lifecycle Flow:
- CREATED → SCHEDULED → ACTIVE → EXPIRED
- ↓ ↓ ↓ ↓
- INACTIV INACTIV INACTIV INACTIV
- Manual Toggle: Any state → INACTIV
- Re-enable: INACTIV → Previous state
Managing Rule States
Automatic State Changes:
Scheduled → Active: When start date/time reached
Active → Expired: When end date/time passed
Any → INACTIV: Manual toggle action
Manual State Control:
Toggle Switch: Instant enable/disable
Preserves Configuration: Settings maintained
Immediate Effect: Real-time processing change
Integration Rule Management
Read-Only Integration Rules
Rules created by integrations have special handling:
Why Read-Only?
- Integration Rule Principles:
- 🔒 Source of Truth: External system maintains authority
- 🔄 Automatic Sync: Changes propagate from source
- 📊 Consistency: Prevents conflicting configurations
- 🔐 Data Integrity: Ensures accurate synchronization
Managing Integration Rules
To Modify Integration Rules:
Integration | How to Modify | Sync Time |
|---|---|---|
Google Calendar | Edit calendar event | 15 minutes |
Outlook | Change Auto-Reply | 15 minutes |
Tempo | Update time plans | Real-time |
Templates | Edit template config | Immediate |
Historical Rules and Retention
Data Retention Policy
Current Retention Settings:
- Rule History Retention:
- 📅 Active Rules: Indefinite storage
- 📊 Expired Rules: 30 days post-expiration
- 🗄️ Reassignment Log: Permanent in issue history
Viewing Historical Data
Accessing Past Rules:
Default View: Shows last 30 days
Extended History: Via JQL in issue navigator
Audit Trail: Issue history for reassignments
Export Options: Download for archival
Best Practices for Rule Management
Rule Organization
Effective Rule Management:
- Best Practices Checklist:
- ☑️ Review rules for accuracy
- ☑️ Delete expired rules after 30 days
- ☑️ Use templates for consistency
- ☑️ Document coverage arrangements
- ☑️ Test rules before absence
- ☑️ Communicate with coverers
Coverage Planning
Strategic Coverage Setup:
- Coverage Strategy:
- 1. Primary Coverer: Daily operational tasks
- 2. Secondary Coverer: Escalations and urgent items
- 3. Approval Delegate: JSM approval workflows
- 4. Communication: Clear out-of-office messages
Rules Interface Status: ✅ COMPLETE
Next Step: Quick Start Guide for first-time users
